Do you have a question about the Automation Dr. Nix QNix 8500 and is the answer not in the manual?
Covers factory and custom calibration methods, including one-point and two-point procedures.
Instructions for creating, selecting, renaming, and deleting user-defined calibration profiles.
Procedure for establishing an average zero reference on uneven surfaces.
Using menu options 'Zero' and 'Infi' for setting reference points.
Configuration options for the gauge's display, interface, and system settings.
Checks for common causes of inaccurate measurements, including substrate and zero reference.
Troubleshooting steps for when automatic substrate detection fails.
Reasons for missing features, such as basic vs. premium versions or firmware updates.
Troubleshooting tips for menu activation issues, especially with memory batches.
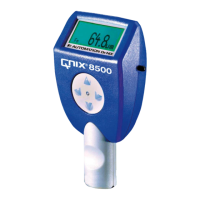
The QNix 8500 is a versatile coating thickness gauge designed for precision and flexibility in various applications. Its modular system allows users to combine a hand-held gauge with internal, cable-bound, or radio-controlled probes, offering adaptability to diverse measurement needs. The device is capable of measuring coating thickness on both iron and steel surfaces (Fe) and non-magnetic metallic surfaces (NFe) such as aluminum, zinc, copper, brass, and certain types of high-grade steel.
The primary function of the QNix 8500 is to accurately measure coating thickness. It supports several measuring modes, including Fe, NFe, and a combined Fe/NFe mode. The Fe and NFe modes are suitable for applications with clearly defined substrates, while the Fe/NFe mode is ideal for situations where the substrate material (steel or non-iron) may vary. The combined mode is particularly useful when an object made from steel has been hot zinc-dipped and then painted, as it displays the thickness of both the zinc coating and the paint as separate values. For the combined mode, the metallic coating on the magnetic substrate must have a minimum thickness of 50 µm.
The gauge offers both single and continuous measurement modes. In continuous mode, the probe takes repeated readings at short intervals as long as it remains on the surface. It also features upper and lower limit settings, which trigger visual and audio warnings if readings fall outside the defined range. An averaging function allows the gauge to calculate and display a valid coating thickness value from a predefined number of measurements, which is beneficial for substrates with large thickness variations or to meet specific test standards.
Data memory is a key feature, enabling users to activate/deactivate the memory function and manage measurement batches. Up to 100 user-specific calibrations can be set, saved, and individually named, enhancing accuracy for specific measurement circumstances or desired coating thickness ranges. The device also provides statistical functions, calculating average value, standard deviation, maximum, and minimum for each memory block. These statistical parameters can be displayed in parallel with readings or as a summary.
The QNix 8500 includes a radio-controlled probe option, which allows for wireless measurements within a 20-meter radius from the gauge. When connected, the probe's rechargeable battery is automatically charged, and its charge status is displayed.
Operating the gauge is straightforward. It can be turned on by simply placing the probe on the surface to be tested or by pressing one of the four buttons. The gauge automatically shuts down after 30 seconds of inactivity to conserve power. When using a radio-controlled probe, the gauge needs to be turned on again if several minutes pass without a reading. Proper probe placement, ensuring the bearing ring is flat on the surface and V-grooves are aligned on curved surfaces, is crucial for accuracy. Incorrect placement or measurements outside the range are indicated by "Error" or "Infi" messages. Measurements should not be taken on magnetized parts, as magnetic or electromagnetic fields can affect readings.
For stationary use, such as with a measuring stand, the gauge can be set to take readings by pressing a button, eliminating the need to place or press the probe head on a surface.
Setting the zero reference is an important step, especially for first-time use, after battery changes, or for varying applications. This can be done by pressing the ▲ button and placing the probe on a reference plate or an uncoated Fe- or NFe substrate. Alternatively, the "Zero" and "Infi" menu items within the "Calibration" menu allow for separate setting of zero and infinity values. For rough surfaces, an "Average Zero Reference" option allows for multiple readings to calculate an average zero reference, improving accuracy.
The menu structure is intuitive, with buttons for activating menus, proceeding to the next level, calling selected items, going back, canceling functions, and scrolling through lists. Active menu items are highlighted, and a symbol marks active memory items. The menu can always be exited by pressing the measuring head, returning to display mode.
Calibration options include custom-designed calibrations, which can be deleted, renamed, or activated. One-point calibration optimizes accuracy near a specific coating thickness, while two-point calibration optimizes accuracy within a range.
Gauge setup options allow users to customize the display unit (µm or mil), resolution (Coarse, Normal, Fine), backlight behavior (Auto, Off), and display orientation (Normal, Flip) for comfortable viewing. The wireless interface can be activated or deactivated, with an "EnergySave" mode to prolong battery life. System information, language selection (up to 3 languages), buzzer control, and time/date settings are also available. The function of the ▲ button can be configured to either set the zero reference or take a measurement.
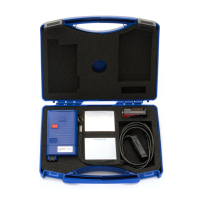
Proper storage and transportation are essential for the longevity of the QNix 8500. It should not be stored at temperatures exceeding 60°C (140°F) to prevent damage to the graphic display. Exposure to strong magnetic fields should be avoided. For extended storage, batteries should be removed and stored separately. The gauge is not waterproof and should not be exposed to water.
Changing probes is simple: press the button on the back of the gauge to release and pull out the probe or adapter cable. After inserting a new probe, the display shows its type, serial number, and software version.
The gauge is powered by two AA alkaline or rechargeable batteries. Battery status is indicated in three stages: "Change batteries soon" (backlight still active), "Measurements still possible" (backlight deactivated), and "Measurements no longer possible." All menu settings and readings are saved during battery changes, though date and time settings may be lost if the change takes longer than two minutes. Empty batteries must be disposed of at appropriate collection points.
Troubleshooting guidance is provided for incorrect or dubious readings, issues with automatic substrate selection, and discrepancies in available features. Users are advised to check the correct substrate selection, ensure proper zero reference setting, and consider custom calibration for specific alloys. If features are missing, it may be due to a basic version or an older firmware, suggesting a firmware update or contacting the dealer.
The manual also covers installing PC software, USB-RF-Dongle drivers, setting gauge options via PC software (useful for naming calibrations and batches), loading new languages, and updating gauge and probe software. These PC-based tools facilitate advanced configuration and maintenance.
| Type | Coating Thickness Gauge |
|---|---|
| Probe Type | Integrated |
| Interface | USB |
| Operating Temperature | 0°C to 50°C |
| Measuring Principle | Magnetic Induction and Eddy Current |
| Display | LCD |
| Power Supply | 2x AAA batteries |
| Battery Type | AAA |