7
Mechanical Maintenance
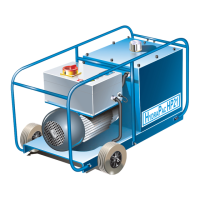
Preparation
• Disconnect and remove the hose set and its control cord from the HydraPac.
• Remove the Tank Cover 35* using a 5 mm allen key.
• Remove the drain plug with a 13mm spanner and drain the oil.
• Disconnect the electrical connection from the solenoid on the Valve Set 3 and 4 using a 4mm flat screwdriver.
• Remove the steel hydraulic pipe connecting the pump to the Valve Set 3 and 4 using a 20 mm spanner.
Removing the Valve Set 3 and 4
• Note the relative positions of the Male and Female couplers. Unscrew and remove the Hydraulic Quick Couplers 2A/B using a
24mm spanner.
• Unscrew the Bulkhead Adaptors 1 and remove the Valve Set comprising Directional Valve 3 and the Combination Valve 4 using a
27 and a 24 mm spanner.
Separating the Valve Set 3 and 4
• Unscrew and remove the four M5 Socket Screws 102 located in the Directional Valve 3 using a 4 mm allen key
To Strip the Combination Valve 4
• Unscrew the four M4 Socket Head Cap Screws 103 securing each of the two Spring Domes 106 using a 3 mm allen key.
• Remove the two Spring Domes 106 and take out the Springs 108 and Bearing Pads 107.
• Remove the two Plungers 109 from the Combination Valve body 4 taking care to identify each ones own location.
Directional Valve 3
The only component on this unit that can be replaced is the solenoid coil. This can be removed by unscrewing the nylon securing nut
and sliding off the coil. Care should be taken not to lose the square section rubber cushion between the nut and the coil and the 'O'
ring behind the coil.
Assembly of the coil is simply the reverse to the stripping procedure above.
Removing the Pump
• Remove the eight M10 Nyloc Nuts 36 using a 17 mm spanner.
• Slide the Manifold Flange 7 off the Studs 15.
• Slide the four Pump Elements 8 off the Studs 15 taking care to keep them intact once free of the Eccentric Shaft Bearing 14 by
supporting the piston with a finger.
Removing the Electric Motor
• Push the connecting block for the solenoid out of the Hirschmann Cap and disconnect the two wires using a 4 mm flat
screwdriver.
• Unscrew and remove the Gland Clamp Screw 29 using a 17 mm spanner and feed the wire through the Gland 29.
• Support the Electric Motor 16 and remove the two M6 socket head cap screws located inside the Tank 35* using a 5 mm allen
key.
• Slide the Electric Motor 16 away from the Tank 35*.
• The Eccentric Shaft Bearing 14 can be removed with a conventional bearing puller.
Note: Only remove this item if it has to be replaced or the motor stripped for extensive maintenance.
WARNINGS
Before commencing with any maintenance whatsoever, the Isolator on the HydraPac Control Box must be turned
"OFF" and the Power Supply Trailing Cable be disconnected from the power supply.
Due to the high hydraulic operating pressures, it is imperative that only suitably qualified, trained and equipped
personnel be permitted to service or repair these units.
Item numbers in bold refer to the General Assembly and Valve Set drawings and Parts Lists on pages 10 - 16.
Dismantling the HydraPac