1. DP4K-L series accessory kit
7
8
5
6
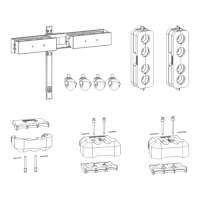
Image 1-13
6. Repeat this procedure from step 2 to install the second set of insulation shells.
1.7 Installing insulation shell s projector sid e hoses
downwards
Necessary parts
• Insulation shells hoses projector rear-left side upwards.
• Insulation shells hoses projector rear-right side.
How to install the insulation shells for hoses downwards oriented?
1. Check if the insulation shells to install are the correct one. Two sets are needed. One marked with text
’LEFT SIDE HOSES DOWN and one marked with the text ’RIGHT SIDE’.
2. Disassemble one set by removing the two spring cotters (reference 8 image 1-14) and pull out the pins
(reference 7 image 1-14).
3. Pivot the lower insulation shell (smallest piece, reference 5 image 1-14) into position as illustrated.
4. Place the upper insulation shell into position (reference 6 image 1-14).
Caution: In case the projector model has only 4 hoses then insert the dummy sealing block (reference
10 image 1-5) in the free slots of the insulation shells.
5. Join both insulation shells together by inserting the two pins (reference 7 image 1-14). Secure each pin
with a spring cotter (reference 8 image 1-14).
10
R5905882 DP4K-L ACCESSORY KIT 06/09/2017
 Loading...