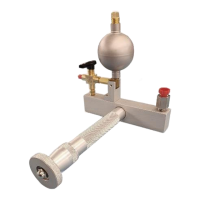
Note: Plug (#7) is needed only due to a manufacturing step requirement. This plug has no
function in the operation of the Tester, and it is permanently attached to the Manifold.
The user should not attempt to drive this Plug under any circumstance. This action
could cause damage to both parts, leading to leaks.
2. FILLING TESTER WITH FLUID
CAUTION: WHEN ADDING OR DRAINING FUILDS, UTILIZE APPROPRIATE SKIN AND
EYE PROTECTION. USE A WORK AREA THAT PREVENTS
CONTAMINATION OF THE WORK SURFACE.
Note: Refer to Figure 6 to identify item numbers.
A. Pressure Tester 2311FA is supplied empty, allowing users to fill it with the appropriate
liquid according to its intended use (refer to section 1.5 RECOMMENDED FLUIDS).
For the first filling, or after the Tester has been emptied so its working fluid can be
changed, applying the procedure below ensures that this task will be accomplished
correctly–without leaving air bubbles trapped inside this equipment.
1. Verify that the Master Gauge connected at the Adapter (#14) has sufficient range
and accuracy for the test to be performed. Verify that it is securely installed on the
Tester.
Note: If needed, use Teflon tape to help prevent leaks.
2. Verify that the fluid to be used in the Tester is compatible with the unit and the
system to be tested (refer to section 1.5 RECOMMENDED FLUIDS for the list of
recommended fluids).
3. Install a fitting (#18) (not supplied) in the outlet of the Selector Valve (#9), which is a
1/8” NPT port. This fitting must match the hose or tubing that connects the Pressure
Tester with the unit or system to be tested.