56-101-00212 Revision E Page | 13
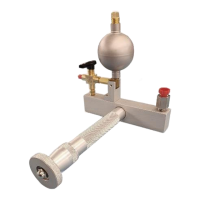
3. Remove the Vented Plug (#16) from the Reservoir (#3).
Note: Place a rag over the Vented Plug (#16) while removing it to avoid possible
exhaust spray.
4. Fill the Reservoir (#3) completely with the same type of fluid that was used during the
previous steps.
5. Rotate the Screw Handle (#1) fully counterclockwise (CCW).
6. Refill the Reservoir (#3) until the level is approximately 1/8 inch under the top edge
of the fitting.
7. Put the Vented Plug (#16) back in its place on the reservoir.
8. Turn the Selector Valve arrow (#9) to point toward the Outlet Fitting (#18).
9. Repeat step 3.4.A.1 above. If the required test pressure is not achieved yet, this
cycle can be repeated as many times as needed.
10. After all testing is completed, rotate the Screw Handle (#1) CCW until the Master
Gauge reaches zero pressure. If this Handle reaches full CCW before the Master
Gauge reaches zero, skip step 3.4.A.11 and perform step 3.4.A.12 and on.
CAUTION: DO NOT KEEP ROTATING THE SCREW HANDLE CCW AFTER THE
GAUGE INDICATES ZERO PRESSURE.
11. Turn the Selector Valve (#9) toward the Reservoir (#3) and disconnect the test line
between the Tester and the unit or system that was being tested.
12. If the Screw Handle (#1) reaches full CCW before the Master Gauge reaches zero,
hold a rag over the Vented Plug (#16), because some overflow through it may occur,
and turn the Selector Valve (#9) toward the Reservoir (#3). Rotate the Screw Handle
(#1) fully CW.
Note: If a large volume of fluid was used during the test, to collect it back it is
advisable to turn the Tester upside down, if the connecting hose allows it, and
point the Vented Plug toward a container to receive the fluid.
13. Return the Selector Valve (#9) to the outlet position and repeat step 3.4.A.10. This
cycle can be repeated as many times as necessary, to collect back the fluid pumped
during the test.