7. GOVERNOR SETUP MENU
Menü LED A ashes
Status LED o
Menü LED A ashes
Status LED o
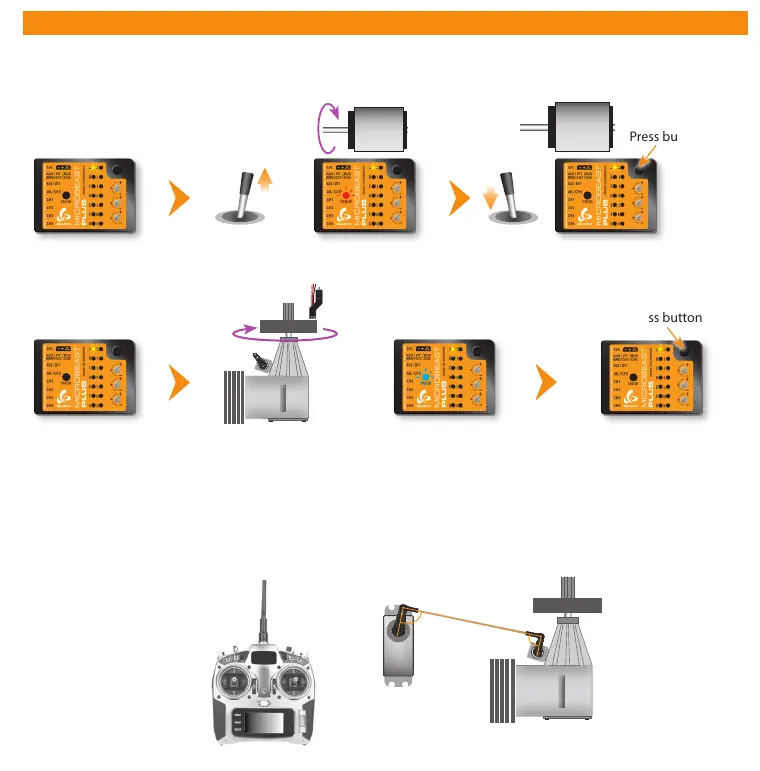
Press button briey
Stop
Nitro/Gas heli
Electric heli with brushless phase sensor
Menu LED A ashes
Status LED o
Carefully add throttle until motor starts to turn
Status LED is solid red as long as motor turns
Motor o
position
Turn clutch bell by hand
Status LED solid blue
when magnet triggers sensor
Press button briey
Status LED o when no
magnet under sensor or when
second magnet is passed
(this may vary)
Governor menu point A - Test mode (Menu LED A ashing slowly)
If the RPM Governor was activated at Setup menu point N (setting „electric“ or „nitro/gas“ heli) you will access the Governor
menu immediately afterwards. At menu point A we check if the rpm sensor is functioning properly and if the rpm sensor wire
is connected correctly.
Thrust in mid
stick position
Servo arm and throttle
lever in parallel and
perpendicular to linkage rod
Additionally when using a helicopter with combustion engine you may adjust the throttle servo positions in the transmitter
(servo throw and servo center) and setup the throttle on the heli (throttle linkage rod length and servo arm position) if
necessary. Attach the servo horn at thrust mid stick position. The throttle linkage must form a right angle with the servo horn.
Adjust the length of the linkage according to the instructions of the helicopter so that it also is positioned perpendicular to the
linkage lever at the carburetor. The carburetor must be opened halfways (note the markings on the carburetor!). Then adjust
the servo throw so the carburetor can be fully opened and fully closed without jamming the throttle servo.
 Loading...