UK UK
98 99
DE DE
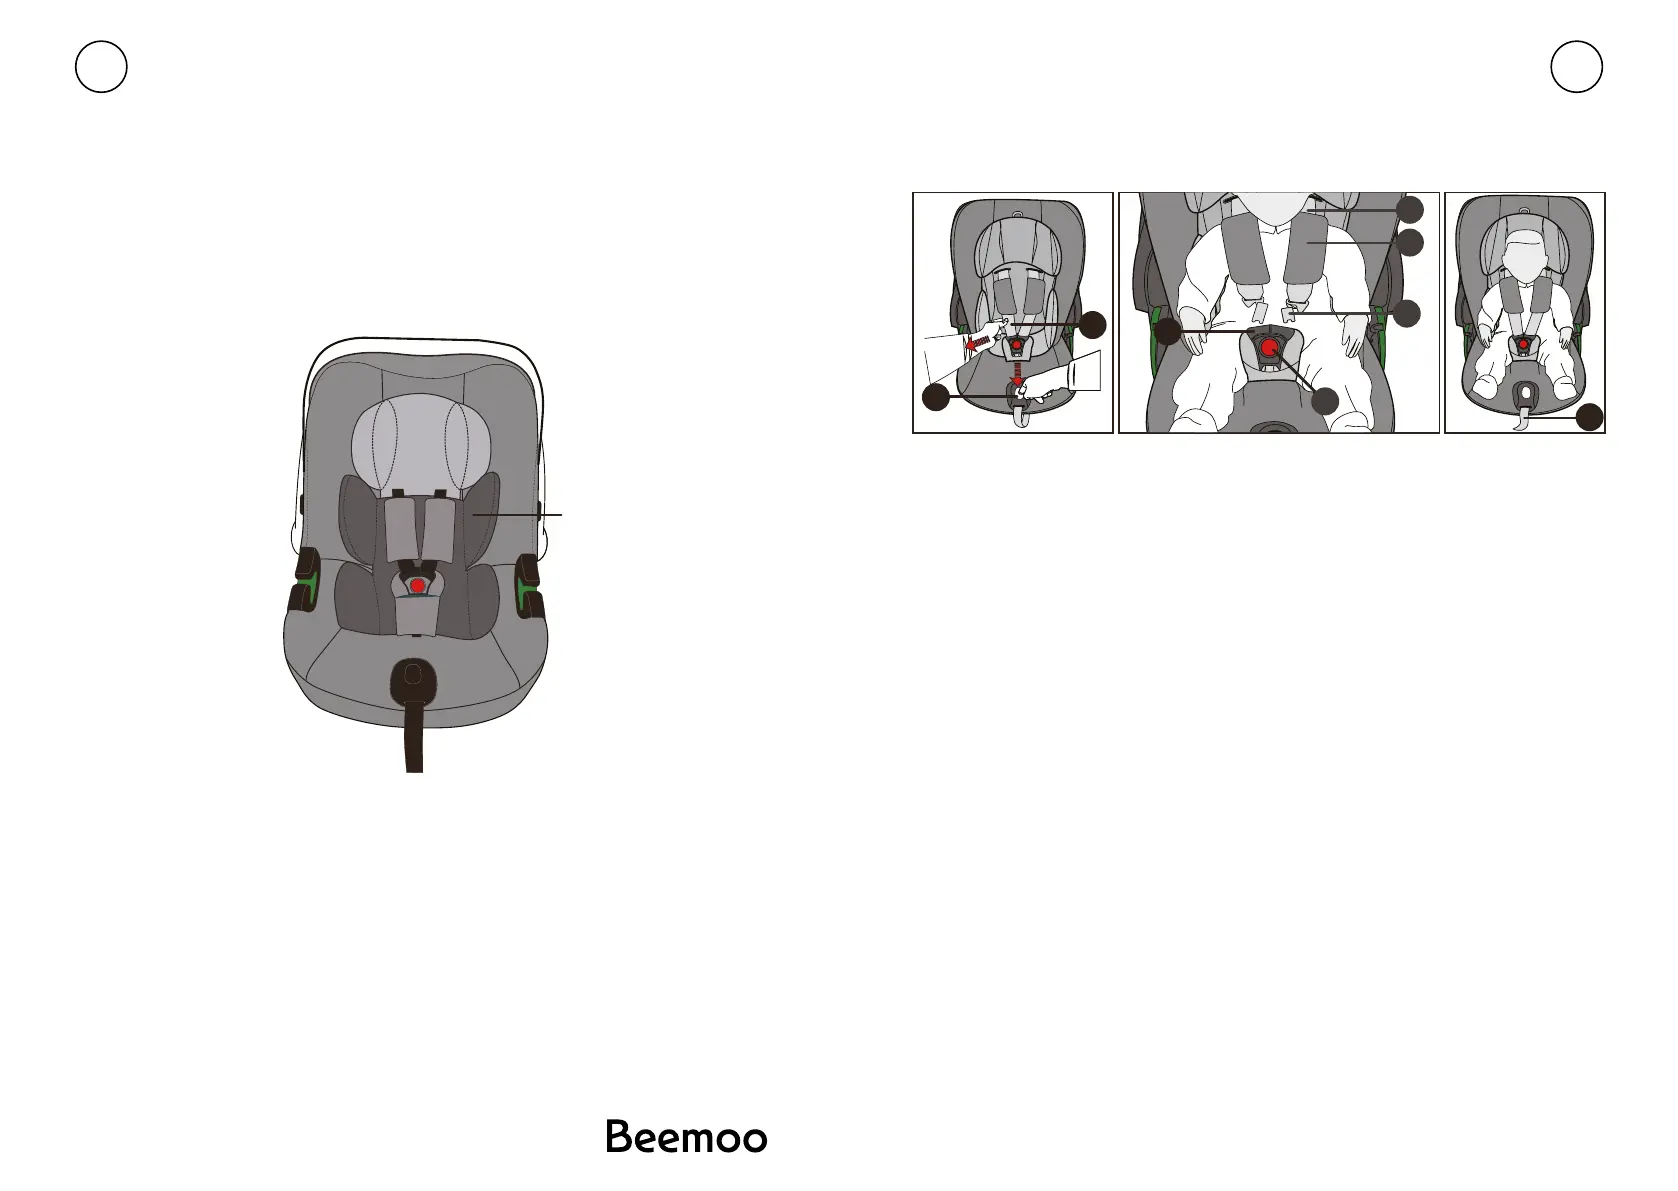
ENTFERNEN DER NEUGEBORENENEINLAGE
Die Neugeboreneneinlage (X) kann ab einer Größe von 61 cm (ca. 3 Monate) entfernt
werden, um mehr Platz für das Kind zu schaen. Um die Neugeboreneneinlage (X) zu
entfernen, önen und entfernen Sie die Schulterpolster. Anschließend entfernen Sie die
Neugeboreneneinlage und legen die Schulterpolster wieder auf die Schultergurte.
ANSCHNALLEN MIT DEM Y-GURTSYSTEM
HINWEIS: Stellen Sie sicher, dass sich in der Babyschale keine losen Gegenstände
und Spielsachen benden.
HINWEIS: Stellen Sie sicher, dass die Kopfstütze richtig eingerastet ist, bevor Sie den
Sitz benutzen.
• Lösen Sie die Schultergurte (e), indem Sie den Verstellknopf am Zentralversteller (d)
drücken und gleichzeitig beide Schultergurte nach oben ziehen.
• Önen Sie die Gurtschnalle, indem Sie den roten Knopf (h) fest drücken. HINWEIS:
Ziehen Sie immer am Schultergurt (e) und nicht an den Gurtpolstern (f).
• Setzen Sie das Kind in den Autositz.
• Legen Sie den Schultergurt (e) direkt über die Schultern des Kindes.
HINWEIS: Stellen Sie sicher, dass die Schultergurte (e) nicht verdreht sind.
• Legen Sie beide Schlosszungen (g) zusammen und verriegeln Sie sie mit einem
hörbaren „KLICK“ im Gurtschloss (i).
• Ziehen Sie vorsichtig am zentralen Verstellgurt (j), um die Schultergurte (e)
festzuziehen, bis sie dem Körper Ihres Kindes entsprechen.
Um die Sicherheit Ihres Babys zu gewährleisten, überprüfen Sie Folgendes:
• Der Kindersitz wird so befestigt, dass das Kind zur Rückseite des Autos zeigt (die
Füße des Kindes zeigen zur Rückenlehne des Fahrzeugsitzes).
• Die Babyschale darf nur auf dem Beifahrersitz verwendet werden, wenn der Airbag
des Fahrzeugs deaktiviert ist.
The newborn inlay (x) may be removed
after the baby is 76 cm (approx. 3 months)
to provide more space for the child. To
remove the newborninlay (x) open and
remove the shoulder pads. Then remove the
newborn inlay and place the shoulder pads
back on the shoulder belts.
Note! Ensure that the headrest is correctly locked in place before
using the seat.
09
10
To ensure your baby’s safety, check that:
• Loosen shoulder belts (e) by pressing the adjustment button on
central adjuster (d) and simultaneously pulling both shoulder belts up.
• Undo the belt buckle by pressing red button (h) firmly.
• the infant car seat is secured with the child facing the rear of the car
(the child’s feet point towards the backrest of the infant car seat).
• the infant car seat is only used on the front passenger seat if there is
no front airbag that can impact on the infant car seat.
STRAPPING WITH Y-SHAPED BELT SYSTEM
Note! Ensure that the infant car seat is free from toys and hard objects.
• Loosen shoulder belts (e) by pressing the adjustment button on
central adjuster (d) and simultaneously pulling both shoulder belts up.
• Undo the belt buckle by pressing red button (h) firmly.
Note! Please always pull on shoulder belt (e) and not on belt pads (f).
• Put your child into the child seat.
• Place shoulder belt (e) directly over your child’s shoulders.
Note! Ensure that the infant car seat is free from toys and hard objects.
Note! Please always pull on shoulder belt (e) and not on belt pads (f).
• Put your child into the child seat.
• Place shoulder belt (e) directly over your child’s shoulders.
Note! Ensure that shoulder belts (e) are not twisted.
• Place both buckle tongues together and lock them in place in belt
buckle (i) with an audible “CLICK”.
• Pull cautiously on central adjustment belt (j) in order to tighten
shoulder belts (e) until they fit your child’s body.
CONNECTING THE INFANT CAR SEAT WITH BASE
Before first use
STRAPPING WITH Y-SHAPED BELT SYSTEM
40-87cm Rearward facing ISOFIX+Support leg+shaped belt.
Remove the leg support first, when the base is green, it means the
installation is correct
(x)
Removing the Newborn Inlay
d
e
g
f
e
h
i
j
 Loading...