17 VIRTUALIZER 3D FX2000 User Manual
• STOR: On the fth page, you can select the Store Enable mode. In the “ON”
mode, the VIRTUALIZER 3D receives controller 112 as the direct storage
command—the current settings are stored on the program location
corresponding to the controller value without waiting for a conrmation.
Inthe “OFF” mode, controller 112 is ignored.
◊ CAUTION: The Store Enable mode is aimed to transfer several
presets at once from an external PC to the VIRTUALIZER 3D (see also
chapter 5.1). In this mode, you can very easily overwrite your program
locations by unintentionally sending controller 112 values to the
FX2000! Therefore, we strongly recommend to switch off this mode
immediately after use. When the FX2000 is switched on, this mode is
automatically set to off (“OFF”).
• DUMP: Select the System Exclusive mode (“SysEx”) using the sixth page.
In this mode, the FX2000 is ready to “dump” its complete storage content,
including all settings, to a MIDI sequencer. Start your MIDI sequencer and
turn the JOG WHEEL. The data transfer is indicated by “GO”.
• DR.EN: In this mode, the FX2000 can receive SysEx data from another MIDI
device. To load this data, turn the JOG WHEEL slightly so that the display
blinks. Start your sequencer, and all of your settings, including preset
parameter settings, are received by your VIRTUALIZER 3D. Data transfer
is interrupted by turning the JOG WHEEL slightly so that “----” appears in
thedisplay.
◊ During a SysEx data transfer, all audio functions of the VIRTUALIZER 3D
are inactive.
3.6.2 INPUT mode
With the help of the 2nd EDIT CONTROL, you can specify whether your FX2000
works as a mono (“MONO”) or a stereo unit (“STER”). In mono mode, input 1
is used exclusively. Since the VIRTUALIZER 3D is a real “True Stereo” device,
the DSP processes the signal for many eects separately for both channels
(seechapter7.1). For eects 13 - 15 and 38, right and left channel parameters can
even be edited separately.
◊ For effects 42 - 44, 58, and 59, a signal must be present at both inputs
for optimal stereo results.
3.6.3 OUTPUT mode
Use the 3rd EDIT CONTROL to determine the FX2000’s OUTPUT mode.
Theselection of settings depends on your FX2000’s application. If you’re using
the VIRTUALIZER 3D in connection with a mixing console (aux bus), activatethe
Mix External (“EXTN”) output mode. The FX2000’s output signal is then
100%wet.
If you’re using the FX2000 with a guitar amplier that has an eects loop,
selectthe Mix Internal (“INTN”) output mode. Then, use the MIX/BYPASS control
to adjust the eect volume. For further information, see chapters 4.2 and 4.4.
3.6.4 Dual engine conguration (CONFIG)
You can use the 4th EDIT CONTROL to decide how the FX2000’s eects
combinations (presets 61 - 71) should be structured. Since the FX2000 is a true
Dual Engine unit, you can choose between serial 1 (“SER1”), serial 2 (“SER2”)
and parallel (“PARA”). See g. 3.1, 3.2 and 3.3 to understand how these settings
inuence the composition of the eects combinations.
In the example of preset 61 (chorus & reverb), you can decide, whether the
chorus and reverb eects run separately from each other or whether the signal,
treatedby the chorus, passes the reverb eect.
3.7 Restoring the factory presets
To restore the FX2000 to its preset factory state, press and hold the STORE and
PRESET keys while switching on the unit. “INIT” appears in the DISPLAY and
counting takes place from R 1 to R 100.
◊ This overwrites all changes you have made and restores the
factory presets!
4. Applications
The BEHRINGER VIRTUALIZER 3D is a exible unit that can be used in various
applications. Prior to a presentation of the FX2000’s many uses, please note the
following remarks on how to set signal levels correctly.
4.1 Level setting
Take care to set all levels properly on the FX2000! Low levels deteriorate the
dynamics of the music signal, which results in a poor, weak and noisy sound.
Onthe other hand, excess levels overdriving the converters in the VIRTUALIZER 3D
should also be avoided. Digital distortion is (unlike its analog counterpart)
extremely unpleasant, since it does not occur gradually butabruptly.
Please use the OPERATING LEVEL switch and the input level meter of the FX2000.
Make sure that the Clip LEDs ickers only rarely. Ensure that they never light up
all the time!
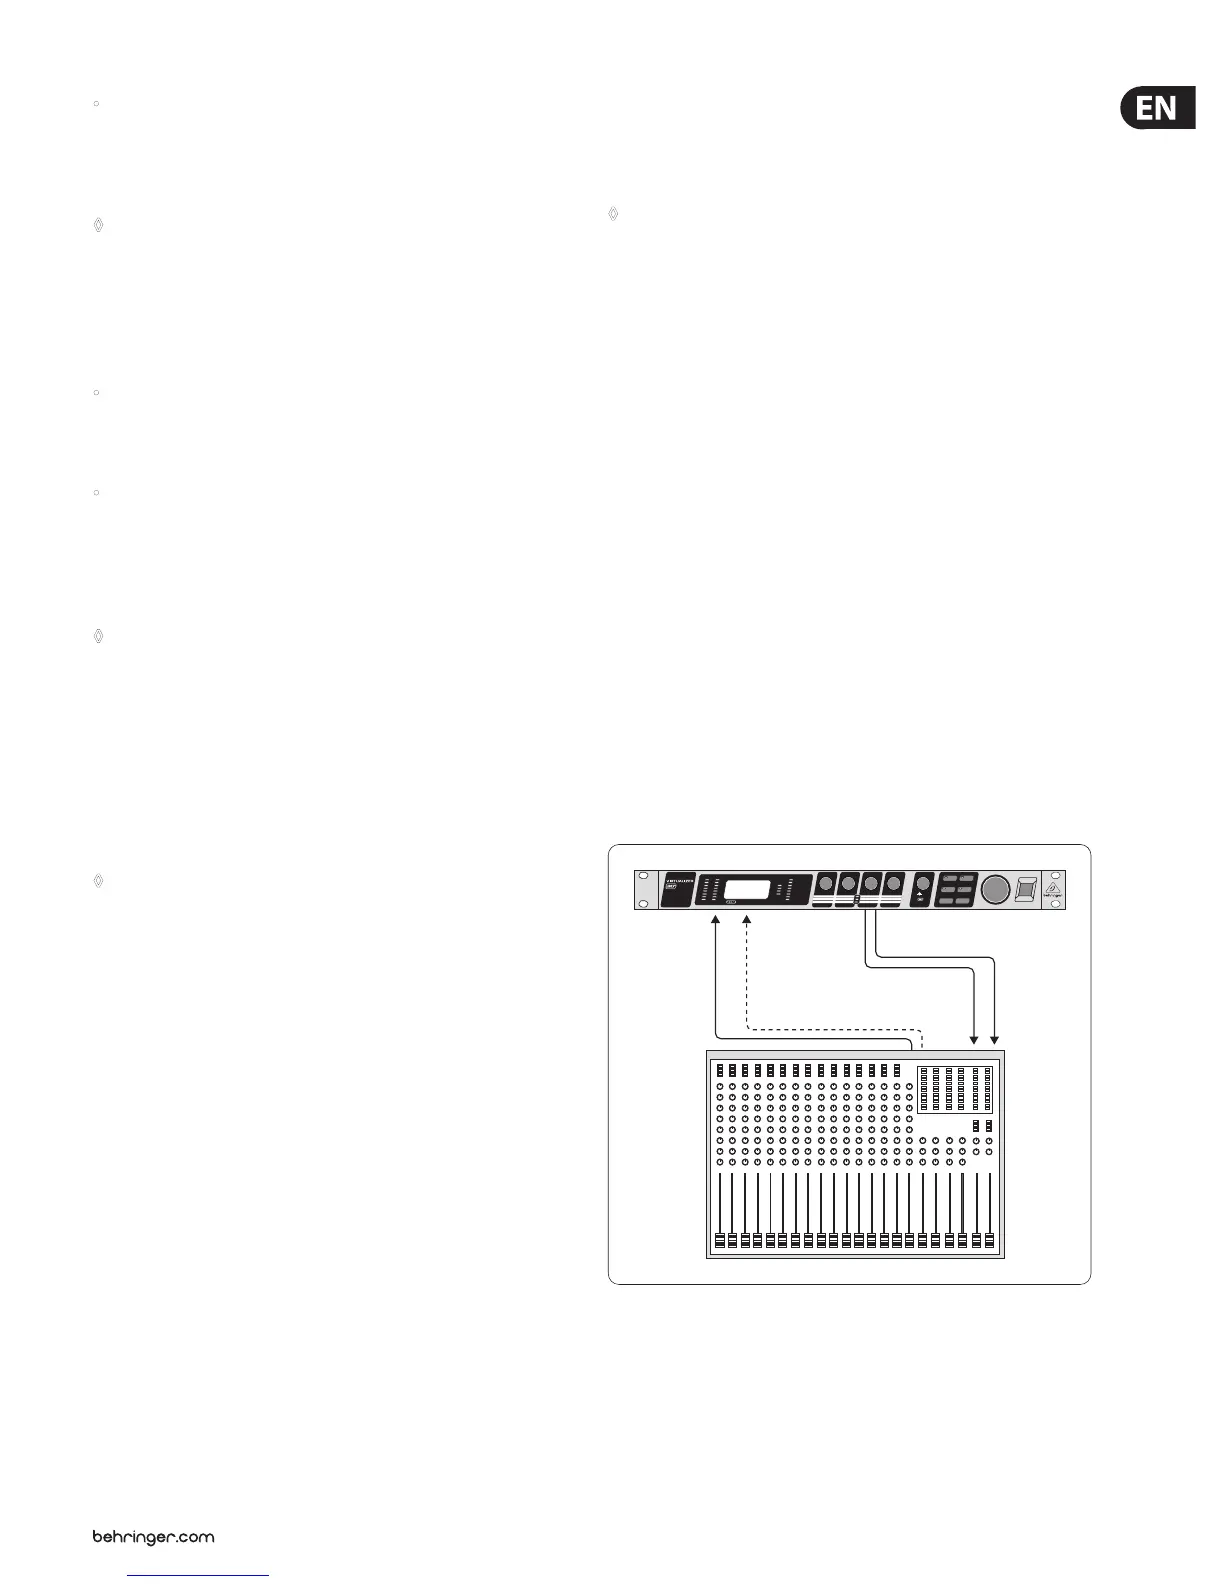
4.2 Using the VIRTUALIZER 3D in the aux bus
Using the FX2000 in the aux bus lets you feed signals from one, several or
all channels of your console into the VIRTUALIZER 3D. When miking a drum
kit, forexample, you can use the aux controls to adjust the reverberation
independently for each channel. Thus, you are able to assign a strong reverb to
the snare rather than the toms. Cabling the VIRTUALIZER 3D in the aux bus should
be carried out as follows:
In L In R
Out L Out R
AUX Send
1 (& 2)
AUX
Return
Fig. 4.1: Wiring aux busses