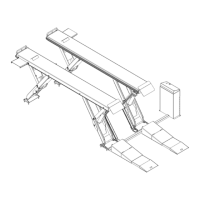
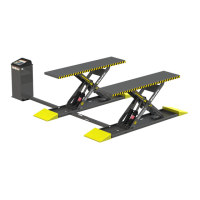
LR-10000 Low-Rise Scissor Lift 27 P/N 5900075 — Rev. B — August 2021
Test the Lift
Before putting your Lift into normal operation, we recommend raising and lowering it a few times with a
typical Vehicle on it. This will help you get a feel for how to operate it and help get any residual air out
of the Hydraulic System (sometimes called “bleeding” the system).
Tip Residual air in the Hydraulic System can cause the Lift to shake, move erratically, or
squeak; this is normal when you first start using the Lift. It will soon stop doing this, as
the Hydraulic System is self-bleeding.
To test your Lift:
1. Check the items listed in Lift Operation Safety.
If you find any issues, resolve them
before
raising the Vehicle.
2. Make sure both Platforms are fully lowered.
3. Drive the Vehicle over the Platforms and situate it correctly.
⚠ CAUTION Make sure to situate the Vehicle so that neither the front nor the rear wheels are
over the Platforms. If you raise the Platforms with the wheels over the Platforms,
you could damage the wheels.
4. Put the Vehicle in park, put on the parking brake, and turn off the Vehicle. If the Vehicle is a manual
transmission, put it into first gear before turning it off.
5. Walk around the Vehicle and make sure there are no obstructions or any other issues that will
interfere with the raising of the Platforms.
6. Locate the manufacturer’s recommended Lifting Points for the Vehicle you are raising.
If you are unsure where the Lifting Points are, consult Vehicle Lifting Points for Frame Engaging
Lifts, which was provided with the Lift, or the manufacturer of the Vehicle. If you no longer have
Vehicle Lifting Points for Frame Engaging Lifts, you can get a replacement on the ALI website.
⚠ WARNING Do not ‘eyeball’ the best location for the Lift Pads.
The Lift Pads must hit the
manufacturer’s recommended Lifting Points
. If you do not, the Vehicle
could become unstable and fall, which could damage the Vehicle, damage the Lift,
or injure or even kill anyone under the Vehicle.
7. Put the Lift Pads under the Vehicle so that they are
directly under
the Lifting Points for the
Vehicle you are raising.
If necessary, use the included Lift Pad Extensions for extra height. You can also stack them.
8. On the Power Unit, press and hold the Raise button to raise the Lift until
just before
the Lift
Pads make contact with the Lifting Points on the underside of the Vehicle.
9. Check to make sure the Lift Pads will make solid contact with the Lifting Points when raised
further, adjust them if necessary.
10. Raise the Lift until the tires of the Vehicle are a few inches off the ground.
11. Stop and visually check the Lift Pads are making solid contact with the Lifting Points.
If any of the Lift Pads are
not
making solid contact with the Lifting Points, lower the Lift and adjust
the Lift Pads so that they make better contact.
12. Gently rock the Vehicle to make sure the Vehicle is stable and balanced.