10 Introduction
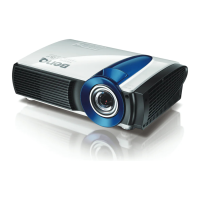
Remote control effective range
The remote control must be held at an angle within 30 degrees perpendicular to the projector's IR
remote control sensor(s) to function correctly. The distance between the remote control and the
sensor(s) should not exceed 8 meters (~ 26 feet).
Make sure that there are no obstacles between the remote control and the IR sensor(s) on the
projector that might obstruct the infra-red beam.
6. OK
Confirms the selected On-Screen Display
(OSD) menu item.
7. SOURCE
Displays the source selection bar.
8. KEYSTONE
Displays the keystone correction page.
9. PIC MODE
Selects an available picture setup mode.
10.
Toggles projector audio between on and off.
11. LIGHT MODE
Selects an available light mode.
12. ECO BLANK
Used to hide the screen picture.
Do not block the projection lens from
projecting as this could cause the blocking
object to become heated and deformed or
even cause a fire.
13. NETWORK
Displays the network settings menu.
14. INFO
Displays the projector information.
15. FREEZE
Freezes the projected image.
16.
Decreases the projector volume.
17.
Increases the projector volume.
18. ZOOM+/ZOOM-
Magnifies or reduces the projected picture
size.
19. QUICK INSTALL
Quickly selects several functions to adjust the
projected image and displays the test pattern.
20. ASPECT
Selects the display aspect ratio.
• Operating the projector from the front • Operating the projector from the top