EN EN
ATOM & ATOMS USER MANUALUSER MANUAL ATOM & ATOMS
3534
3.3 Assistance Modes of the Pedal Assistance System
There are multiple power assistance modes available.
Select the power mode, AUTO, BOOST, SPORT, ECO +, ECO and NO ASSIST, depending on what best suits
your cycling conditions.
Seethe“DISPLAYPANEL”sectiontondouthowtoswitchbetweenassistancemodes.
AUTO Use when you want to obtain gradual power.
BOOST Use when you want to get maximum power from the system.
SPORT Usewhenclimbingdicultterrains.
ECO + Use when you want a more comfortable ride, e.g. when climbing a steep hill.
ECO Use when you want to travel as far as possible.
NO ASSIST Use when you want to travel without assisted power. You can continue to use the other
functions of the display panel.
3.4 Range of the Pedal Assistance System
The range of the system will vary, depending on the following riding conditions, among others:
• Frequent starts and stops.
• Gear ratio of the drivetrain.
• Numerous steep slopes.
• Poor road conditions.
• Transporting heavy loads.
• Cycling into a strong headwind.
• Low ambient temperature.
• Deteriorated battery.
• When using the light (only applicable to models equipped with battery-powered lights).
• Ifthebicycleisnotinasuitablecondition,e.g.lowpressureinthetyres,insucientlubricationofthechain
orabrakenotttedcorrectly.
3.5 Starting Pedalling
Beforerestingyourfeetonthepedals,youmustsitontheseatandholdthehandlebarrmly.Specialcare
should be taken if you start pedalling when using a high assistance mode (BOOST mode, or SPORT mode),
as the motor will respond with maximum thrust and you may lose control. To facilitate acceleration, the motor
provides an additional initial thrust as soon as you start pedalling. So minimal force is necessary to put the
bicycleinmotion,helpingyoutojointhetracquicklyandsafely.
WARNING
Start pedalling with a short gear ratio (higher gears) and low assistance mode
(ECO mode). As well as providing greater control and safety on the bicycle,
it requires less energy consumption and, therefore, ensures a longer range.
Please note that starting with a higher assistance mode (ECO +, SPORT and
BOOST modes) may put the user's safety at risk.
WARNING
When the user pushes the bike while walking alongside it, they must make
sure that the system is disconnected.
4. DISPLAY PANEL
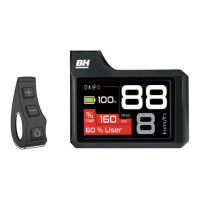
4.1 Overview of the Display Panel
Central Display Panel with a screen located in the centre of the handlebar, with a remote control located on the
left side of the handlebar:
1. POWER button.
2. (+) button.
3. (-) button.
4. Lights indicator.
5. Bicycle instant speed indicator.
6. Pedal assistance mode indicator colour.
7. Range indicator.
8. Battery level indicator.
9. Bicycle secondary information indicator.
10. Error indicator
NOTE
The range is calculated based on the riding conditions during the last
kilometre and the remaining capacity of the battery.
4.2 Display Panel Operation
4.2.1. Switching the Pedal Assistance System On and O
The pedal assistance system is turned on by holding down the POWER
buttonfor3seconds.Thepedalassistancesystemisturnedobyholding
down the POWER button again for 3 seconds.
The bicycle can be used normally without any type of assistance.
WARNING
After turning the system on, make sure that you do not start riding without
checking the assistance mode. By default, it starts with the assistance mode
selectedbeforeitwaslastswitchedo.
NOTE
Wait for 3 seconds after turning on the system before you start applying
pressure on the pedals. During this 3-second period, the assistance system is
starting up and calibrating the torque sensor. Otherwise, if you press the pedal
beforehand, this may weaken assistance and error 14 may even be displayed
onthescreen(seeTroubleshootingsection).Toxthis,youshouldrebootthe
system without applying pressure on the pedals for a period of 3 seconds.
Remote Control
3
1
2
Central Screen
7
10
9
6
5
4
8
3 sec
 Loading...