Do you have a question about the BIFFI ICON3000 Series and is the answer not in the manual?
Defines the intended use of the Biffi ICON3000 electric actuator in industrial settings.
Provides safety guidelines for installing the actuator in potentially explosive environments.
Lists the key international standards and regulations relevant to the actuator's design and operation.
Outlines the warranty period and conditions for the product, including limitations.
Specifies essential checks to perform upon receiving the actuator to ensure proper condition and functionality.
Details the recommended procedures for storing the actuator to maintain its condition and warranty.
Lists crucial checks to conduct on the actuator prior to its installation on site.
Defines the acceptable ambient temperature ranges for standard and special versions of the actuator.
Explains the process of removing the coupling block from the actuator for machining or maintenance.
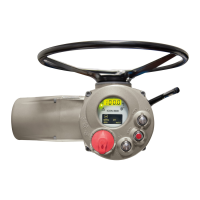
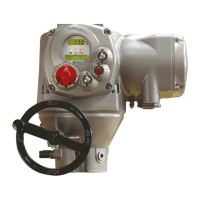
Describes how to engage and use the handwheel for manual operation of the actuator.
Provides instructions on how to physically attach the actuator to the valve, including coupling types.
Details the procedures and requirements for making electrical connections to the actuator.
Outlines necessary protection devices to be provided at the plant for the actuator's mains line.
Guides the user through the process of safely removing the terminal board enclosure for access.
Continues instructions on terminal board enclosure removal, focusing on cable entries and sealing.
Covers the terminal board connections, grounding, and wiring diagram usage.
Provides specific instructions for handling and reassembling explosion-proof enclosures.
Offers guidance for installing the actuator in areas with potentially explosive dusts.
Details how to inspect and maintain the actuator's lubrication levels and recommended lubricants.
Explains the procedure for manually operating the actuator using the handwheel.
Describes handwheel operation when power is unavailable, utilizing the lithium battery for status updates.
Covers the steps and precautions for operating the actuator via electrical means.
Details how to control the actuator using the on-unit selector and push-buttons.
Explains the information displayed on the actuator's local interface, including status and position.
Describes how to lock the 3-position selector to prevent unauthorized changes.
Explains how to control the actuator remotely using external devices.
Details the different wiring options and commands for remote operation.
Describes the standard version's monitor and auxiliary output relays and their functions.
Explains the Emergency Shut Down (ESD) functionality and its configuration.
Covers the use of interlock inputs to inhibit actuator movement in specific directions.
Provides initial operating instructions and checks for first-time use.
Introduces optional modules that can extend the actuator's functionality.
Describes the Fieldbus interface card for connecting the actuator to various fieldbus networks.
Explains the Analog Input/Output card for 4-20mA signals.
Provides an overview of the actuator's base card and its components.
Details the absolute encoder's function for position measurement and retention.
Details the components and functions of the actuator's local control interface.
Explains how to configure actuator parameters via the local interface menus.
Guides the user on how to access the actuator's configuration data for viewing.
Describes the procedure to enter the set-up mode for configuring actuator parameters, including password entry.
Lists the actions that will cause the actuator interface to exit view or set-up modes.
Details the routines for configuring actuator parameters like stroke limits, torque, and controls.
Explains how to configure the actuator's opening and closing limits based on position or torque.
Describes how to set the output torque limits for opening and closing the actuator.
Covers the configuration of the Emergency Shut Down (ESD) function and its priorities.
Explains the configuration options for controlling the actuator remotely using various wiring methods.
Details the configuration of control modes and LED colors for local operation.
Describes the configuration of monitor and auxiliary output relays for status indication and diagnostics.
Explains the positioning function, including dead band, polarity, and input signal configuration.
Details how to configure the actuator's action upon loss of input signals.
Covers the configuration of the 4-20 mA analog output for position or torque signals.
Explains the configuration of interlock inputs to inhibit actuator movement.
Describes the routine for adjusting actuator travel time using configurable ON/OFF pulses.
Details the setup for actuators equipped with a fieldbus interface card.
Covers miscellaneous configuration routines like time, date, and torque limits.
Explains how to set and adjust the actuator's time and date for logging purposes.
Describes how to configure torque limits for alarms and end-of-travel detection.
Details the configuration and status check for the internal lithium battery.
Explains the torque bypass feature to temporarily disable torque alarms during specific operations.
Describes the setting for detecting valve jamming based on time and position variation.
Allows viewing the current actuator configuration without making changes.
Provides access to view data identifying the actuator, entered by the manufacturer.
Allows viewing data relevant to the valve, which should be entered by the user.
Provides access to view maintenance-related data.
Allows viewing the log of all present alarms and warnings.
Displays information on actuator working conditions compared to a reference torque profile.
Shows actuator working conditions against a reference torque curve for process analysis.
Provides access to view general and recent operational data for maintenance analysis.
Allows viewing the last, next, and start-up maintenance dates.
Describes how to view configured data logger parameters and collected data.
Outlines recommended periodic inspections and general maintenance checks for the actuator.
Refers to troubleshooting sections for causes of actuator failure and spare parts ordering.
Provides instructions for safely replacing the actuator's internal lithium battery.
Offers steps to diagnose and resolve issues where the actuator's electronics fail to power on.
Guides on troubleshooting scenarios where DC output voltage is missing from the terminals.
Provides checks for when the actuator fails to respond to remote control commands.
Addresses issues related to an overheating motor that prevents startup.
Helps diagnose problems where the motor operates but the valve does not move.
Offers solutions for difficulties encountered when trying to engage the manual override lever.
Provides guidance on resolving issues where the valve fails to seat properly.
Discusses causes and solutions for situations where valve operation demands excessive torque.
Addresses problems where the actuator fails to stop at the fully open or closed positions.
Explains that stroke limits may need recalibration if the display shows "---".
Explains alarm and warning conditions indicated by the actuator and how to interpret them.
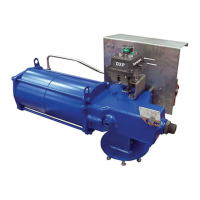
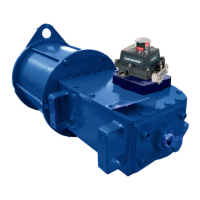
Illustrates and lists the individual component parts of the actuator assembly.
Provides safety instructions specific to ICON3000/ICON3000AD actuators, including general and installation guidelines.
General safety instructions for ICON3000/ICON3000AD actuators and their configurations.
Details proper installation procedures, focusing on nameplate checks and environmental suitability.
Explains the meaning of various markings found on the actuator's label for certification and identification.
Lists the relevant general standards and directives applicable to the actuator.
Outlines the warranty and terms of sale for the product.
Specifies Emerson's liability limitations regarding product use and installation.
Covers procedures for storing and pre-installing the actuator, including checks before installation.
Outlines storage procedures for extensions and electronic cards.
Lists checks for installing extensions or electronic cards before the main installation.
Provides installation guidelines, especially concerning hazardous area classifications and working conditions.
Specifies the ambient temperature ranges for different actuator models.
Lists temperature ranges for specific ICON models.
Identifies conduit entry types and sizes for the base actuator.
Details the thread form/size for entries on the base actuator.
Describes the thread form/size for an entry on an extension for the control compartment.
Covers the requirements for making electrical connections, including terminal types and torques.
Specifies wiring methods for Ex-e terminal enclosures.
Explains sealing of entries and ground connections for extensions.
Provides specific attention points for installing the actuator in dusty, potentially explosive environments.
Covers general maintenance aspects for the actuator.
Details the recommended schedule and procedures for periodic inspection of the actuator.
Provides steps for safely disassembling and re-assembling explosion-proof enclosures.
Outlines the procedures and requirements for performing repairs on the actuator.
Safety instructions applicable to ICON3000 series actuators, covering general and installation aspects.
General safety instructions for ICON3000 series actuators and their configurations.
Illustrates the base unit and units with extensions for identification.
Specific installation instructions, emphasizing nameplate checks and environmental suitability.
Details the markings on the actuator label, including ATEX and IECEx certifications.
Lists applicable general standards, directives, and norms for the actuator.
Outlines warranty and terms of sale for the product.
Specifies manufacturer liability limitations related to product usage and installation.
Covers storage procedures and checks required before installation for extensions and cards.
Outlines storage procedures for extensions and electronic cards.
Lists checks for installing extensions or electronic cards before the main installation.
Installation guidelines for hazardous areas, including working conditions and entry identification.
Specifies ambient temperature ranges for ICON3000 models and their extensions.
Lists temperature ranges for specific ICON models.
Identifies conduit entry types and sizes for the base actuator.
Details the thread form/size for entries on the base actuator.
Describes the thread form/size for an entry on an extension for the control compartment.
Details thread forms/sizes for entries on extensions for the terminal board compartment.
Covers electrical connection requirements for external ATEX-certified apparatus.
Specifies wiring methods for Ex-e terminal enclosures.
Explains sealing of entries and ground connections for extensions.
Provides specific attention points for installing in dusty, potentially explosive environments.
Covers general maintenance for actuators with extensions.
Details periodic inspection for actuators with optional extensions.
Provides steps for safe disassembly and re-assembly of explosion-proof enclosures.
Outlines procedures and requirements for performing repairs on actuators with extensions.
Safety instructions applicable to ICON3000/ICON3000AD actuators, covering general and installation aspects.
General safety instructions for ICON3000/ICON3000AD actuators and their configurations.
Specific installation instructions, emphasizing nameplate checks and environmental suitability.
Explains the markings on the actuator label, including ATEX and IECEx certifications.
Lists applicable general standards, directives, and norms for the actuator.
Outlines warranty and terms of sale for the product.
Specifies manufacturer liability limitations related to product usage and installation.
Covers storage procedures and checks required before installation.
Outlines storage procedures for extensions and electronic cards.
Lists checks for installing extensions or electronic cards before the main installation.
Installation guidelines for hazardous areas, including working conditions and entry identification.
Specifies ambient temperature ranges for ICON3000/ICON3000AD models.
Lists temperature ranges for ICON-010 and ICON-020 models.
Identifies conduit entry types and sizes for the base actuator.
Details the thread form/size for entries on the base actuator.
Describes the thread form/size for an entry on an extension for the control compartment.
Covers electrical connection requirements for external ATEX-certified apparatus.
Specifies wiring methods for Ex-e terminal enclosures.
Explains sealing of entries and ground connections for extensions.
Provides specific attention points for installing in dusty, potentially explosive environments.
Covers general maintenance for actuators with extensions.
Details periodic inspection for actuators with optional extensions.
Provides steps for safe disassembly and re-assembly of explosion-proof enclosures.
Outlines procedures and requirements for performing repairs on actuators with extensions.
Safety instructions applicable to ICON3000 actuators, covering general and installation aspects.
General safety instructions for ICON3000 actuators and their configurations.
Illustrates the base unit and units with extensions for identification.
Specific installation instructions, emphasizing nameplate checks and environmental suitability.
Details the markings on the actuator label, including ATEX and IECEx certifications.
Lists applicable general standards, directives, and norms for the actuator.
Outlines warranty and terms of sale for the product.
Specifies manufacturer liability limitations related to product usage and installation.
Covers storage procedures and checks required before installation.
Outlines storage procedures for extensions and electronic cards.
Lists checks for installing extensions or electronic cards before the main installation.
Installation guidelines for hazardous areas, including working conditions and entry identification.
Specifies ambient temperature ranges for ICON3000 models.
Lists temperature ranges for specific ICON models.
Identifies conduit entry types and sizes for the base actuator.
Details the thread form/size for entries on the base actuator.
Describes the thread form/size for an entry on an extension for the control compartment.
Details thread forms/sizes for entries on extensions for the terminal board compartment.
Covers electrical connection requirements for external ATEX-certified apparatus.
Specifies wiring methods for Ex-e terminal enclosures.
Explains sealing of entries and ground connections for extensions.
Provides specific attention points for installing in dusty, potentially explosive environments.
Covers general maintenance for actuators with extensions.
Details periodic inspection for actuators with optional extensions.
Provides steps for safe disassembly and re-assembly of explosion-proof enclosures.
Outlines procedures and requirements for performing repairs on actuators with extensions.
| Category | Controller |
|---|---|
| Series | ICON3000 |
| Operating Temperature | -40°C to +85°C (-40°F to +185°F) |
| Input Signal | 4-20 mA |
| Enclosure Rating | IP66, NEMA 4X |
| Mounting | Direct Mounting on Actuator |
| Communication | HART |
| Housing Material | Aluminum |