Do you have a question about the BIFFI ICON-040 and is the answer not in the manual?
Critical safety guidelines for installing actuators in potentially explosive environments.
Details on actuator markings and their significance for safety and compliance.
Procedures for physically mounting the actuator onto the valve assembly.
Guidelines for making all necessary electrical connections to the actuator.
Specific guidance for maintaining explosion-proof integrity during maintenance.
Special considerations for installing the actuator in dusty hazardous areas.
Connecting power and operating the actuator electrically.
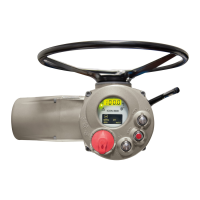
Using the local push-buttons and selector for actuator control.
Configuring and using remote control modes for the actuator.
How the Emergency Shut Down (ESD) signal overrides commands.
Initial startup procedures and checks before first-time operation.
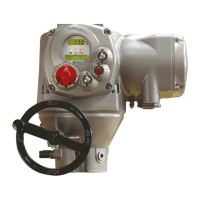
Overview of the components and functions of the local control interface.
Details on how to configure actuator settings via the local interface menus.
Procedures for accessing and modifying actuator settings, including password entry.
Main menu for configuring actuator parameters like limits, torque, and controls.
Routines for configuring actuator parameters based on valve type.
Configuring opening and closing limits, and direction.
Setting output torque limits for opening and closing.
Configuring the actuator's response to an Emergency Shut Down signal.
Configuration options for remote control wiring and modes.
Configuring local control modes and LED colors.
Configuring the positioning function for inching or modulating control.
Configuring actuator action upon loss of input or bus signals.
Configuring the 4-20 mA analog output signal for position or torque.
Procedures for changing the actuator's access password.
Routine checks and inspections recommended for standard actuator maintenance.
Diagnostic steps for when the actuator's electronics fail to power up.
Troubleshooting steps for missing DC output voltage at the terminals.
Diagnosing issues when remote control commands are not effective.
Troubleshooting procedure for an overheated motor that fails to start.
Steps to diagnose why the motor runs but the actuator doesn't move the valve.
Troubleshooting steps if the manual override lever is difficult to engage.
Addressing issues where the valve does not achieve proper seating.
Diagnosing and resolving situations where valve operation demands excessive torque.
Troubleshooting for failure to stop at open or closed limits.
Steps to resolve when the position display shows "---".
Understanding and responding to actuator warning and alarm messages.
Guidelines for correctly installing the actuator according to specifications.
Special precautions for installation in dusty hazardous environments.
Recommended periodic inspection frequency and checks.
Procedures for safely disassembling and reassembling explosion-proof enclosures.
Mandatory checks before installing extensions or additional entries.
Special precautions for installation in dusty hazardous environments.
Recommended periodic inspection frequency and checks.
Procedures for safely disassembling and reassembling explosion-proof enclosures.
Guidelines for correctly installing ICON3000/ICON3000AD actuators.
Special precautions for installation in dusty hazardous environments.
Recommended periodic inspection frequency and checks.
Procedures for safely disassembling and reassembling explosion-proof enclosures.
Special precautions for installation in dusty hazardous environments.
Special precautions for installation in dusty hazardous environments.
| Model | ICON-040 |
|---|---|
| Input Signal | 4-20 mA |
| Application | Valve Control |
| Brand | BIFFI |
| Operating Temperature | -20°C to +70°C |
| Enclosure Rating | IP66 |
| Communication | HART |
| Housing Material | Aluminum |