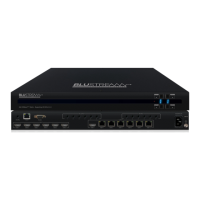
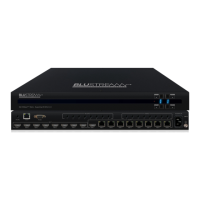
Rear Panel
1 2 3 4
5 6 7 8
9 1110
1 RJ45 – TCP/IP control (Connect to
LAN)
2 RS232 port – Connect to this port
for the control of the matrix from a
computer or control processor.
3 IR inputs 3 to 8 – 3.5mm stereo
jack (IR sensor or control processor
input). Sends 5V IR out to
corresponding zones HDBT IR Tx
port to control the zones TV/local
hardware.
4 IR outputs 1 to 8 – 3.5mm stereo
jack for routed IR 5V emitter
outputs for discrete source control,
determined by the source input
selected in that zone.
5 IR extension receiver input –
3.5mm stereo plug input for
connection of a remote IR 5V
sensor or control processor for
remote IR control of the matrix.
6 EDID DIP switch – Used for global
EDID settings
7 POH power port – Use included
24V/6A DC adaptor to power the
remote HDBaseT receivers.
8 Power port – Use included 12V/5A
DC adaptor to power the matrix
switcher.
9 HDMI inputs 1 to 8 – Connect HDMI
sources.
q HDMI outputs 1 to 2 – Output for
displays.
w HDBT outputs 3 to 8 – Output for
remote displays.
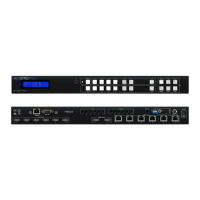
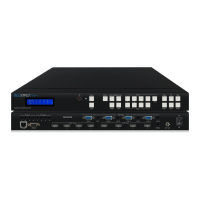
Front Panel
1 2 4
11
5
12
6
13
7
14
8
15
9
16
3
10
1 LCD display – Shows the status of
input-output selection, menu and
EDID info.
2 IR receiver window – Receives IR
from a hand held remote control or
processor.
3 Power LED indicator – Indicates the
power status of the matrix.
4 Power button – Press to toggle the
power of the matrix on/o.
5 HDMI output selection button 1 to
8 – Press to select the output from
1 to 8.
6 All button for HDMI outputs – Press to
select all of the outputs from 1 to 8.
7 Menu button – Press to enter EDID
setup mode. Three EDID segments
will display on the LCD panel listed
as: INPUT, VIDEO and AUDIO, for
example: IN1 1080P 2.0CH, means
to set 1080P 2.0CH EDID to INPUT1.
The blinking segment is the
adjustable parameter.
8 Up – Press to change up through
the adjustable values.
9 ESC – Press to quit EDID setup
menu.
q Lock LED indicator – Indicate the
status of the key lock.
w Lock button – Press to lock the
buttons on the front panel.
e HDMI input selection button 1 to
8 – Press to select the input from
1 to 8.
r PTP – Press to mirror all inputs and
outputs (e.g. output 1 to input 1,
output 2 to input 2 and so on).
t Select – Press to select an EDID
parameter to change. Selected
segment will blink.
y Down – Press to change down
through the adjustable values.
u Enter – Press to set EDID to
specified INPUT or copy EDID from
specified OUTPUT to specified
INPUT.
 Loading...