www.blustream.com.au | www.blustream.co.uk
MFP62 USER MANUAL
04
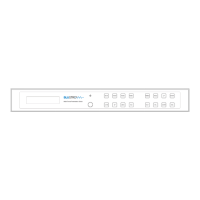
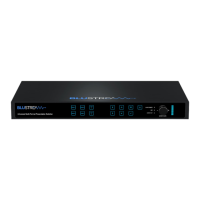
Panel Description - Front
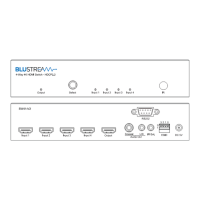
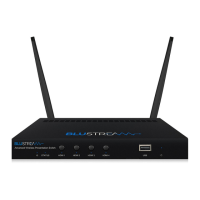
Panel Description - Rear
1 LCD display – Shows the status of input/output selection,
EDID etc
2 Power button – Press to power on/o the Switcher.
Illuminates blue when powered on
3 Mutes all audio output
4 Input selection - To select the input signal between HDMI 1
to 3, DP, USB-C and VGA
5 Timing selection - To select scaler output video resolution
6 Menu button – Press to enter EDID, Network and MIC setup
menu
7 Up selection button – Press to change segment’s value
8 Enter button – Press to select current menu item.
9 IR receiver window
q L/R In button - Press to select analogue audio input to be
embedded onto all video signals
w Vol +/- button - Press to adjust the volume of the audio
output for 2ch PCM signals only
e Down selection button – Press to change segment’s value
r ESC button – Press to escape the current setup menu
1 TCP/IP (RJ45) – Connect to LAN for TCP/IP control of
Switcher and Web GUI
2 RS-232 port – For control of the Switcher from PC or third
party control processor
3 Coaxial digital audio output – Extract audio from the
selected input signal
4 L/R analogue audio outputs (RCA) – Extracted audio from
the selected input signal. Note: Input signal must be PCM
2ch audio
5 Upgrade port (Micro USB) - For firmware upgrade
6 SC/MB switch - For firmware upgrade of scaler or main
board
7 HDMI input 1 - Connect to HDMI source. Supports up to 4K
60Hz 4:4:4 video and 2ch PCM audio only
8 Status LED - Illuminates when an input or output has an
active connection to a source or display
9 HDMI input 2 to 3 - Connect to HDMI source. Supports up
to 4K 60Hz 4:4:4 video and multi channel audio
q DisplayPort™ input - Connect to DisplayPort source.
Supports up to 4K 60Hz 4:4:4 and DP1.2
w USB-C input - Connect to USB-C source. Note: this port
does not support charging via USB. Supports up to 4K
60Hz 4:4:4, DP1.2 and Alt mode
e VGA input - Connect to VGA source. Supports up
1920x1200 (including 1080p)
r L/R In - 3.5mm Analogue audio input for embedding audio
onto HDMI outputs
t HDMI outputs - Connects to HDMI display. Both outputs
display the same signal concurrently
y MIC IN - Supports balanced and unbalanced microphones
including 48V phantom power
u MIC input selection - Select between 48V phantom power,
line level and mic level input sensitivity
i IR selection - Select between 5V or 12V IR on the IR CTRL
connection. See full manual for pin out
o IR CTRL receiver input – 3.5mm stereo jack for connection
of an IR receiver or control processor for remote IR control
of the switcher
p Power port – Use included 24V/1A DC adaptor to power
the switcher
1
9
2 3 5
10 11 13
6 7 8
12
1
12
3 4
13 16 19
5 6
18
2
7 9 10 11
14
15 178
4