9
WWW.NIKOLAOUTOOLS.GR WWW.NIKOLAOUTOOLS.GR
EN EN
• When working in closed spaces, connect the machine to an extracon system.
• Never clean the band saw blade or the saw blade guard with a hand-held brush or scraper while the band saw blade is running. Hardened band saw blades
endanger operaonal safety and must be cleaned regularly.
• For your personal protecon, wear safety goggles and hearing protecon when working. Wear a hair net if you have long hair. Roll up loose sleeves to above
the elbows.
• Before starng work, all protecve and safety devices must be securely mounted on the machine.
• When working, always posion the saw blade guard as close as possible to the workpiece.
• Always hold the workpiece so that your hands are as far away from the band saw blade as possible.
• Always hold the workpiece so that your ngerps point away from the band saw blade.
• When the machine is not being used, e.g. when you have nished working, release the tension of the band saw blade. Aach an appropriate note to the
machine for the next user, to instruct them how to tension the band saw blade.
• Safely fold unused band saw blades and store them in a dry place. Check for defects (teeth, cracks) before use. Do not use faulty band saw blades.
• Wear protecve gloves when handling the band saw blade or raw materials.
• Use the push sck to manually feeding narrow workpieces.
• When cung round or unevenly shaped wood, use a suitable holding device that prevents the workpiece from twisng.
• Secure long workpieces against lng at the end of the cung operaon, e.g. unwinding stand.
• Lower the upper guide (6) down as close as possible to the workpiece for all cung procedures (see secon Upper guide (6)).
• The workpiece must always be guided with both hands and held at on the saw table (7). This prevents the band saw blade (28) from jamming.
• The workpiece must always be fed with even pressure, i.e. with just enough pressure for the band saw blade to cut through the material easily, without
jamming.
• Always use the parallel guide (21) for every cung procedure that it is intended for.
• It is beer to make a cut in one pass than cung in several secons, as this may require the workpiece to be retracted. If retracon is, nevertheless,
unavoidable, the band saw must be switched o rst. Only pull the workpiece back aer the band saw blade (28) has come to a standsll.
• When sawing, the workpiece must always be guided by its longest side.
• Cauon! A push sck (1) must be used when machining narrow workpieces. The push sck must always be kept to hand on the holder on the side of the saw.
• Cauon! Aer each new adjustment, we recommend a trial cut in order to check the set dimensions.
Switching on and sawing
Before switching on the device, make sure that:
1. You have inspected the machine for obvious defects, such as defecve safety devices, loose, worn or damaged parts, correct seang of screws or other parts,
and have remedied the defects.
2. You have checked the band saw blade for damage and replaced it if damaged.
3. You have prepared and adjusted the machine for the cut.
4. You are not wearing gloves.
5. You are wearing eye or hearing protecon.
Before switching on
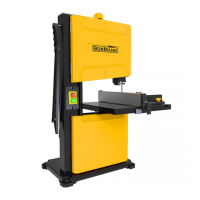
1. Connect the machine rmly to the base with 4 screws and nuts. The base (19) has a hole in each corner for screws (not included in delivery).
2. Insert the machine plug into a wall socket.
3. Connect the connecon for dust extracon (18) to a vacuum cleaner. Switch the vacuum cleaner on.
4. Lower the upper guide (6) unl it is 2 to 3 mm above the workpiece.
Switching on and sawing
1. Press the ON buon I (31) on the ON/ OFF switch.
2. Wait unl the band saw blade (28) has reached full speed.
3. Cut with a uniform forward moon using gentle pressure. Never move the workpiece backwards while the band saw blade is running.
4. If you want to change sengs on the machine for the next cut: Press the OFF buon O (32).
Straight cuts
Notes
• Always use the rip fence for straight cuts to prevent the workpiece from lng or slipping.
• The rip fence can be mounted on both sides of the saw blade.
• Aer each new adjustment, we recommend a trial cut in order to check the set dimensions.
Mounng the parallel stop (Fig. A)
1. Open the quick release lever of the parallel guide (21).
2. Push the parallel guide from the side onto the saw table (7).
3. Move the parallel guide (21) on the saw table. Make sure that both scales are set to the same value.
4. Close the quick release lever of the parallel guide (21).
You can now switch on the machine and saw straight cuts.