Installation
9
Compress 7400i AW – 6721840487 (2021/10)
5.1.1 Transport fitting
The heat pump is equipped with a transport fitting (screw) which is
clearly identified by a red marking. The transport fitting prevents the
heat pump from being damaged in transit. Unscrew transport fitting.
Fig. 10 Transport fitting
[1] Transport fitting
[2] Red marking
5.2 Unpacking
▶ Remove the packaging according to the instructions on the
packaging.
▶ Take out enclosed accessories.
▶ Check that all package contents are present.
5.3 Checklist
Each installation is different. The checklist below provides a general
description of the installation process.
1. Install and fix the heat pump on a solid surface.
2. Install condensate tube of the heat pump and possibly the pipe trace
heating.
3. Connect heat pump to the indoor unit.
4. Connect CAN-BUS cable to heat pump and indoor unit.
5. Connect power supply of the heat pump.
6. Mount side panels and cover of heat pump.
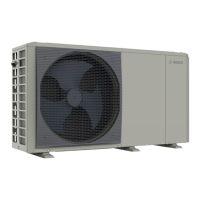
5.4 Mounting method
5.4.1 Assembly of the heat pump
CAUTION
Risk of trapping or injury!
The heat pump may tilt if it is not fixed correctly.
▶ Fix the heat pump to the floor.
NOTICE
Installation problems/faults if installed on sloping surface!
This will hamper the assembly of the side panels and cover.
The condensate drainage and functionality will be impaired.
▶ Make sure that the inclination of the heat pump in the horizontal and
vertical direction is no more than 1%.
▶ Screw the heat pump to the subsurface using suitable screws.
▶ Align the heat pump horizontally using the adjustable feet.
Fig. 11 Fastening the heat pump
[1] Adjustable feet
[2] 4 pieces M10 X120 mm (not included in scope of delivery)
[3] Level subsurface with sufficient load bearing capacity, e.g.
concrete foundations
5.5 Connection
5.5.1 Water connecting pipe
NOTICE
Damage due to risk of frost!
If the condensate freezes and cannot be routed away from the heat
pump, the evaporator may be damaged.
▶ Always install pipe trace heating if ice is likely to form in the
condensate hose.
Remove condensate via a frost-free drain of the heat pump, possibly
equipped with pipe trace heating. The drain must slope sufficiently to
prevent water from accumulating in the pipe.
The condensate can be routed to either a gravel bed, a stone box or into
a rainwater gully.
▶ Route 32 mm plastic pipe from the condensate connection to a drain.
▶ Connection of pipe trace heating Chapter 7.1.
1 2
1 2
3
3
 Loading...