10 | English
1 609 92A 3XH | (7.6.17) Bosch Power Tools
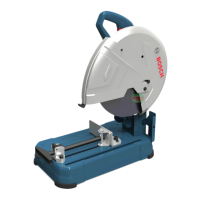
12 Hex key (8 mm)
13 Base plate
14 Clamping jaw
15 Workpiece support for workpieces with cross section of
max. 40 x 40 mm
16 Locking screw for angle stop
17 Transport safety-lock
18 Tool arm
19 Transport handle
20 Blade guard
21 Spark guard
22 Tool spindle
23 Clamping flange
24 Washer
25 Hexagon bolt
Accessories shown or described are not part of the standard deliv-
ery scope of the product. A complete overview of accessories can
be found in our accessories program.
Technical Data
Assembly
Delivery Scope
Carefully remove all parts included in the delivery from their
packaging.
Remove all packaging material from the machine and the ac-
cessories provided.
Before starting the operation of the machine for the first time,
check if all parts listed below have been supplied:
– Cut-off grinder with mounted cutting disc
–Hex key 12
Stationary or Flexible Mounting
To ensure safe handling, the machine must be mounted
on a level and stable surface (e. g., workbench) prior to
using.
Mounting to a Working Surface (see figure A)
– Fasten the power tool with suitable screw fasteners to the
working surface. The mounting holes 11 serve for this pur-
pose.
Flexible Mounting (not recommended!)
In the exceptional case that it should not be possible to firmly
bench-mount the power tool, you can provisionally place the
legs of base plate 13 on a suitable surface (e. g. a workbench,
level floor, etc.) without bolting the machine down.
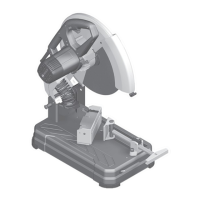
Changing the Tool (see figures B1–B2)
Actuate the spindle lock 5 only when the tool spindle
22 is stopped. Otherwise, the machine can become dam-
aged.
Do not touch the cutting disc after working before it
has cooled. The cutting disc becomes very hot while work-
ing.
Use only cutting discs that correspond to the characteristic
data given in these operating instructions and are checked ac-
cording to EN 12413 and marked appropriately.
Use any intermediate layers provided with the cutting disc.
Place unused cutting discs in an enclosed container or in the
original packaging. Store cutting discs lying flat.
Removing the Cutting Disc
– Bring the power tool into the working position. (see “Re-
leasing the Machine (Working Position)”, page 11)
– Swing back the retracting blade guard 4 to the stop.
– Turn the hexagon bolt 25 using the hex key provided 12
and at the same time press the spindle lock 5 until it engag-
es.
– Hold the spindle lock pressed and unscrew the hexagon
bolt 25.
– Remove the washer 24 and the clamping flange 23.
– Remove the cutting disc 6.
Installing the Cutting Disc
– Mount the new cutting disc onto the tool spindle 22 in such
a manner that its label faces away from the tool arm.
–Mount the clamping flange 23, the washer 24 and the hex-
agon bolt 25.
Press the spindle lock 5 until it engages and retighten the
hexagon bolt 25 turning in clockwise direction. (Tightening
torque approx. 18–20 Nm)
– Slowly guide the retracting blade guard 4 down until the
cutting disc is covered off.
– Make sure that the retracting blade guard 4 operates prop-
erly.
After mounting the cutting disc and before switching on,
check whether the cutting disc is properly mounted and if it
can rotate freely.
– Make sure that the cutting disc does not graze against the
retracting blade guard 4, the blade guard 20 or against
other parts.
– Run the machine for approx. 30 seconds.
Should significant vibrations occur, switch off the machine
immediately; remove and install the cutting disc again.
Cut-off grinder GCO 14-24 J
Article number
3 601 M37 2..
Rated power input
W 2400
No-load speed
min
-1
3800
Soft starting
Weight according to
EPTA-Procedure 01:2014 kg 18.0
Protection class
/II
Permissible workpiece dimensions (maximum/minimum) see page 12.
The values given are valid for a nominal voltage [U] of 230 V. For differ-
ent voltages and models for specific countries, these values can vary.
Dimensions of suitable cutting discs
Cutting disc diameter, max.
mm 355
Cutting discs width, max.
mm 3
Mounting hole diameter
mm 25.4
OBJ_BUCH-2521-004.book Page 10 Wednesday, June 7, 2017 2:44 PM
 Loading...