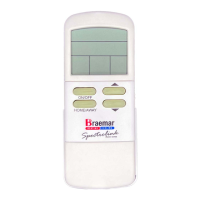
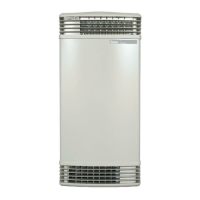
The Braemar Ecostar Gas Space Heater is a heating device that can be operated via a remote control. The remote control offers both manual and automatic modes of operation, allowing users to set specific temperatures and schedules for heating.
Function Description:
The Braemar Ecostar Gas Space Heater's primary function is to provide space heating. It utilizes a remote control for user interaction, offering a range of settings and modes to optimize heating efficiency and comfort. The remote control communicates with the heater, allowing for adjustments to temperature, operating mode, and scheduling.
Important Technical Specifications:
- Batteries: The remote control requires 3 x AAA batteries. Good quality alkaline batteries are recommended for optimal performance.
- Temperature Range: The heater allows for temperature settings to be increased or decreased in 1°C increments.
- Fault Diagnosis: The heater incorporates inbuilt fault diagnosis software. If a fault is detected, the heater will turn off, and the remote control will flash "RESET" along with a fault code (FC). The control panel indicators on the heater's front will also flash the fault code.
- Power Failure: In the event of a power failure, the heater will shut down and require a manual re-start once power is restored.
Usage Features:
Quick Start:
- Insert 3 x AAA batteries into the remote control.
- Set the time and day on the remote control.
- Press the ON/OFF button to turn the remote control on.
- Increase the temperature setting using the UP arrow button.
- The heater can be operated using either the remote control or the controls on the heater's front panel.
Setting the Time and Day:
- With the remote control off, press and hold the SET button for 3 seconds.
- Use the UP or DOWN arrow buttons to adjust the current time (ensuring AM/PM is correct).
- Press SET to confirm the time.
- Use the UP or DOWN arrow buttons to adjust the current day.
- Press SET to confirm the day and return to normal operation.
Fitting the Batteries:
- Remove the battery door from the back of the remote control by pushing the top and sliding down.
- Insert the 3 AAA batteries, ensuring correct orientation.
MANUAL Mode Operation:
In MANUAL mode, the heater turns on and off to maintain the set temperature until manually turned off by the user.
- Turning the Heater ON: Press the ON/OFF button. If the room temperature is below the set temperature, the heater will start. The display will flash "ON" and "WAIT" during startup. Flame and fan symbols will appear once burners ignite and the fan starts.
- Turning the Heater OFF: Press the ON/OFF button. The display reverts to OFF mode. The room fan continues to run until the heater cools sufficiently.
- Adjusting Room Temperature:
- Increase: Press the UP arrow button (1°C increment).
- Decrease: Press the DOWN arrow button (1°C increment).
- Selecting ECO Mode: Press the ECO button (with the remote control on). "E" will flash on the display, indicating ECO mode is active. In ECO mode, the heater will not run at a high gas rate. To exit, press ECO again.
- Activating CHILD LOCK: Press the LOCK button. "L" will flash on the display, indicating the remote control is locked. This does not lock the heater's front panel controls, which can be locked independently. When CHILD LOCK is active, all remote control buttons except OFF are disabled. If the remote control is turned off while locked, it cannot be turned back on until CHILD LOCK is exited. To exit, press LOCK again.
- Using HOME/AWAY Feature: Press the HOME/AWAY button to switch between HOME and AWAY. Different temperatures can be set for manual HOME and AWAY modes, providing an easy way to switch between two set temperatures.
AUTO Mode Operation:
In AUTO mode, the heater automatically turns on and off to maintain the programmed temperature. It also advances through four daily time periods (WAKE, AWAY, HOME, SLEEP), adjusting the set temperature for each period.
- Turning the Heater ON: Press the ON/OFF button, then press the MAN/AUTO button to set the remote control to AUTO mode. If the room temperature is below the set temperature for the current time period, the heater will start. The remote control displays the time period and operates according to its set temperature. It automatically advances to the next time period.
- Turning the Heater OFF: Press the ON/OFF button. The display reverts to OFF mode. The room fan continues to run until the heater cools sufficiently.
- Adjusting Room Temperature: Same as MANUAL mode.
- Selecting ECO Mode: Refer to "Selecting ECO mode" under "Manual mode operation."
- Activating CHILD LOCK: Refer to "Activating CHILD LOCK" under "Manual mode operation."
- Using HOME/AWAY Feature: Press the HOME/AWAY button to switch between the current and next time period.
- If leaving home before the programmed AWAY time, press HOME/AWAY to advance to the AWAY period immediately.
- If arriving home earlier than the programmed HOME time, press HOME/AWAY to advance to the HOME period immediately.
Setting the AUTO Program:
The heater comes with default program settings. Users can change these settings and record them for future reference.
Default Program Settings:
| Time Period |
Start Time (Default) |
Set Temperature (°C) (Default) |
| WAKE |
6:00 am |
20 |
| AWAY |
8:30 am |
15 |
| HOME |
5:00 pm |
21 |
| SLEEP |
10:30 pm |
15 |
Enter Programming Mode:
1.1. With the remote control ON, press the PROG button. The option being changed will flash.
Select the Day or Group of Days to Program:
2.1. Press UP or DOWN arrow buttons to scroll through day selection options:
* Individual weekdays: MON, TUE, WED, THU, FRI
* Weekday block: MONTUEWEDTHUFRI
* Individual weekend days: SAT, SUN
* Weekend block: SATSUN
* Seven-day block: MONTUEWEDTHUFRISATSUN
2.2. Press SET to select the displayed day(s).
Select Time and Temperature for Each Time Period:
3.1. Press UP or DOWN arrow to adjust the start time for the WAKE period (e.g., to 6:30 am).
3.2. Press SET to lock in the time.
3.3. Press UP or DOWN arrow to adjust the temperature for the WAKE period (e.g., to 22°C).
3.4. Press SET to lock in the temperature. The display will then change to allow setting the start time and temperature for the AWAY period.
Repeat steps 3.1 to 3.4 for WAKE, AWAY, HOME, and SLEEP. The display returns to the previous state once all time periods are programmed.
Resetting to Factory Default Program Settings:
With the remote control OFF, press and hold the small, recessed button between the ON/OFF and UP arrow buttons, then press the PROG button.
- ON/OFF: Turns the heater on or off.
- HOME/AWAY: Switches between current/next time period in AUTO mode; switches between HOME/AWAY in MANUAL mode.
- UP ARROW: Increases temperature set point or setting in program mode.
- DOWN ARROW: Decreases temperature set point or setting in program mode.
- SET: Enters time/day setting mode; accepts values in program mode.
- PROG: Enters program setting mode when the remote control is ON.
- MAN/AUTO: Switches between MANUAL and AUTO operation.
- ECO: Enters or exits ECO mode.
- CHILD LOCK: Activates or de-activates child lock.
- RESET: Resets a fault condition.
Display Features:
- Flame Symbol:
- Inner flame flashing: Low gas rate.
- Outer flame flashing: High gas rate.
- Temperature Display: Shows approximate current temperature. Temporarily displays set temperature when UP/DOWN arrow is pressed, reverts to current temperature after 5 seconds.
- Time Display: Shows current time (once set).
- Room Fan Symbol: Rotates when the room fan is running.
- Battery Symbol: Indicates low battery; replace 3 x AAA batteries.
- Service Call Symbol: Indicates a service call is required.
- ON: Remote control is on; heater operates to achieve set temperature.
- OFF: Remote control is off; heater will not operate.
- RESET: Flashes with a number in the time display and flashing LEDs on the heater's control panel, indicating a fault. Press RESET until it disappears.
- MAN: MANUAL mode selected. Heater runs to achieve set temperature until turned off or adjusted.
- AUTO: AUTOMATIC mode selected. Heater runs to achieve pre-programmed temperatures at pre-programmed times.
- WAIT: Flashes with ON when a heat signal is sent until the remote control detects the heater is on.
- HOME/AWAY/WAKE/SLEEP: Four daily time periods. In AUTO mode, they are pre-programmed with start times and temperatures. In MANUAL mode, HOME and AWAY set two different temperatures.
- MON TUE WED THU FRI SAT SUN: Displays the current day (once set).
Maintenance Features:
Fault Messages:
The heater's fault diagnosis software helps identify issues. If a fault occurs, the remote control will flash "RESET" and a fault code (FC). The heater's control panel will also flash the fault code. Quote this code when requesting service.
| FC |
Potential Remedy |
| 1 |
Press RESET on remote control. |
| 2 |
Check flue terminal is not obstructed. Press RESET on remote control. |
| 5 |
Service call. |
| 7 |
Check gas is turned on. Press RESET on remote control. |
| 9 |
Service call. |
| 10 |
Check inlet and outlet louvres are not obstructed. Press RESET on remote control. |
| 11 |
User reset. |
| 12 |
User reset. |
| 13 |
Check flue terminal is not obstructed. Press RESET on remote control. |
| 15 |
Check inlet and outlet louvres are not obstructed. Press RESET on remote control. |
| 19 |
Service call. |
- Power Failure: A manual re-start is required after power restoration.
- Repeated Faults: If a fault recurs after a USER RESET or power cycling the heater, a service call may be required. Contact 1300 650 644 or a local Braemar dealer.