EasyManua.ls Logo

Brildor Combo Craft Express - User Manual

Brildor Combo Craft Express
12 pages
Print Icon
To Next Page IconTo Next Page
Loading...
USER MANUAL
COMBO
HEAT
PRESS
MACHINE
The user manual is universal for all heater combo versions and is
suitable for all colors of machines.
brildor.com
brildor.com
Question and Answer IconNeed help?

Do you have a question about the Brildor Combo Craft Express and is the answer not in the manual?

Summary

Know the Machine

Pressure Knob

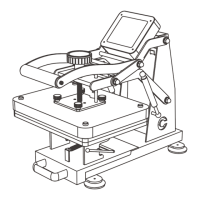
Mechanism for adjusting the pressure applied during heat pressing.

Pressure Handle

Lever used to lower and raise the heating element onto the item.

Silicone Pad

Heat-resistant pad that protects the heating element and ensures even pressure distribution.

Slide-Out Drawer Handle

Handle to easily slide the printing bed in and out for loading/unloading items.

Digital Control Meter

Interface displaying time, temperature, and usage count, used for setting parameters.

Control Box

Housing for the machine's electronic components and controls.

Heating Platen

The heated surface that transfers the design onto the substrate.

Power Switch

Button to turn the heat press machine on and off.

Combo Heat Press Attachments

Flat Heat Press

Standard attachment for heat pressing flat items like t-shirts and tote bags.

Plate Heat Press

Attachment designed for applying transfers onto plates.

Hip Flask Heat Press

Specialized attachment for heat pressing hip flasks.

Cap Heat Press

Attachment for heat pressing designs onto caps and hats.

Pen Heat Press

Attachment used for applying transfers onto pens.

Mug;Tumbler Heat Press

Attachment for heat pressing designs onto cylindrical items like mugs and tumblers.

Heating Board (20 x30 cm)

A flat heating element measuring 20x30cm for general heat pressing.

Heating Board (15 x20 cm)

A smaller flat heating element measuring 15x20cm.

Plate Heater (8 inch)

A round heating element specifically for pressing plates, 8 inches in diameter.

Plate Heater (10 inch)

A round heating element for pressing plates, 10 inches in diameter.

30 oz Mug;Tumbler Press Attachment

Dedicated attachment for heat pressing 30oz mugs and tumblers.

Cap Heater

Specialized heating element for applying designs to caps.

Pen Heater

Attachment designed for heat pressing pens.

Hip Flask Heater

Heating element for transferring designs onto hip flasks.

Control Panel Operations

Control Panel Overview

Identification of the digital display, indicators, and control buttons on the panel.

Switching Temperature Units

Instructions on how to toggle between Celsius (°C) and Fahrenheit (°F).

Clearing Usage Counter

Procedure to reset the machine's number of uses counter.

Setting Printing Parameters

Setting Time

Steps to enter, adjust, and exit time setting mode for printing.

Setting Temperature

Steps to enter, adjust, and exit temperature setting mode for printing.

Starting and Stopping Printing

How to initiate the countdown and halt the printing process.

Temperature Compensation

Adjusting temperature compensation value for accurate heating.

Advanced Operations and Usage

Restoring Default Values

Procedure to reset machine parameters to factory defaults.

How to Print a T-Shirt

Step-by-step guide for heat pressing designs onto t-shirts.

Mug;Tumbler Attachment Guide

Installing the Mug;Tumbler Attachment

Instructions for connecting the mug/tumbler heating element to the machine.

How to Print a Tumbler

Detailed steps for heat pressing designs onto tumblers.

Plate Heater Guide

Installing the Plate Heater

Instructions for attaching the plate heating element to the machine.

How to Print a Plate

Detailed steps for heat pressing designs onto plates.

Hip Flask Heater Guide

Installing the Hip Flask Heater

Instructions for attaching the hip flask heating element to the machine.

How to Print a Hip Flask

Detailed steps for heat pressing designs onto hip flasks.

Cap Heater Guide

Installing the Cap Heater

Instructions for attaching the cap heating element to the machine.

How to Print a Cap

Detailed steps for heat pressing designs onto caps.

Pen Heater Guide

Installing the Pen Heater

Instructions for attaching the pen heating element to the machine.

How to Print a Pen

Detailed steps for heat pressing designs onto pens.

Printing Parameters and FAQs

Printing Parameters for Products

Recommended temperature and time settings for various items.

Safety Instructions

Important safety precautions for operating the heat press machine.

Frequently Asked Questions (FAQs)

Answers to common issues and questions regarding print quality.

Overview

The Craft Express Combo Heat Press Machine is a versatile device designed for sublimation printing on a wide variety of items. This user manual is universal for all heater combo versions and is suitable for all colors of machines, ensuring broad applicability.

Function Description:

The Combo Heat Press Machine serves as a comprehensive solution for transferring designs onto various substrates using heat and pressure. It is equipped with multiple interchangeable heating attachments, allowing it to perform flat heat pressing, plate pressing, hip flask pressing, cap pressing, pen pressing, and mug/tumbler pressing. The core function involves heating a platen to a specified temperature and applying pressure for a set duration, facilitating the transfer of sublimation ink from a printed design onto the target item. The machine features a digital control meter for precise temperature and time management, ensuring consistent and high-quality results across different applications. Its slide-out drawer design enhances user convenience and safety during operation.

Important Technical Specifications:

  • Power: 1000W MAX±5%
  • Voltage: 220V/110V, 50~60Hz
  • Temperature Range: 0-482 °F (0-250°C)
  • Time Range: 0-999 seconds
  • Dimensions (Main Unit): Approximately 66 cm (length) x 31.5 cm (width) x 71.5 cm (height) when assembled with the flat platen. The base unit is approximately 48 cm (length) x 31.5 cm (width) x 41 cm (height).

Heating Attachments Available:

The machine supports a range of specialized heating attachments, each designed for specific product types:

  • Heating Board (Flat Platen):
    • CEHBPJ-B2330: Size 20x30cm
    • CEHBPJ-B1520: Size 15x20cm
  • Plate Heater:
    • CEHBPJ-KP8: Size 8 in
    • CEHBPJ-KP10: Size 10 in
  • Mug/Tumbler Press Attachment:
    • CEHBPJ-JB: For 30oz mugs/tumblers
  • Cap Heater:
    • CEHBPJ-KM
  • Pen Heater:
    • CEHBPJ-KB
  • Hip Flask Heater:
    • CEHBPJ-KH

Usage Features:

Control Panel Operation:

The digital control panel allows users to precisely manage time, temperature, and other settings.

  • Time Setting: Users can enter time setting mode, adjust the value using Plus/Minus buttons, and exit the mode.
  • Temperature Setting: Similar to time, temperature can be set by entering temperature setting mode, adjusting the value, and exiting.
  • Temperature Unit Switch: A dedicated button allows switching between Fahrenheit (°F) and Celsius (°C).
  • Number of Uses: The control panel displays the number of uses (counter). This can be cleared by long-pressing the Time button for 8 seconds.
  • Start Printing: Pressing the Start button initiates the countdown. The countdown also starts automatically when the handle is pressed down. Pressing the Start button again stops the countdown.
  • Temperature Compensation: If the actual heater temperature deviates from the displayed value, a compensation value can be set. This involves long-pressing the Start button for 8 seconds, adjusting the value, and then long-pressing again to exit.
  • Restore Default Values: After entering temperature compensation settings, users can cycle through other parameters (power, current, time interval) and adjust them back to their default values if accidentally changed. Default values are 0 for temperature difference, 16 for power, 100 for current, and 3 for time interval.

Printing Procedures (General Steps):

The general workflow for printing involves:

  1. Preparation: Fix the image onto the item using heat-resistant tape. Place protective paper on the silicone pad and over the item to prevent ink transfer and protect the item.
  2. Machine Setup: Turn on the machine. Set the desired printing time and temperature on the digital control meter.
  3. Heating: Allow the machine to heat up to the set temperature.
  4. Placement & Pressure: Slide out the drawer (if applicable), place the item on the attachment, and adjust the printing pressure using the pressure knob.
  5. Pressing: Once the machine reaches the target temperature, press down the handle. The countdown will begin automatically.
  6. Completion: After the countdown, the machine will beep. Lift up the handle.
  7. Finishing: Carefully remove the item (it will be hot) and allow it to cool down. Check the printout result.

Installation of Attachments:

The process for installing different heating attachments generally follows these steps:

  1. Power Off: Always turn off the machine before changing attachments.
  2. Remove Existing Attachment: Unplug the connect cable from the current heating platen and remove any screws securing it.
  3. Install New Attachment: Place the new heating attachment, secure it with screws (if applicable), and plug in its connect cable to the main unit.
  4. Completion: Ensure the installation is complete and secure before turning the machine back on.

Printing Parameters (Examples for Sublimation Blanks):

The manual provides a table of recommended printing parameters (temperature and time) for various products. These are based on Craft Express's sublimation blanks and serve as a reference. Users are advised to test their own products to find optimal parameters.

  • T-shirt: 374 °F, 60 s
  • Pillow Cover: 374 °F, 60 s
  • Photo Slate: 374 °F, 600 s
  • MDF Plaque: 356 °F, 150 s
  • Glass Cutting Board: 356 °F, 300 s
  • Aluminum Ornament: 356 °F, 50 s
  • Shopping Bag: 374 °F, 60 s
  • Pen: 428 °F, 420 s
  • Hip Flask: 356 °F, 60 s
  • Plate: 356 °F, 220 s
  • Cap: 356 °F, 80 s
  • Stainless Steel Tumbler: 356 °F, 60 s

Troubleshooting (FAQS):

The manual includes a section addressing common printing issues:

  • Colors are lighter: Indicates low temperature, uneven pressure, or short time.
  • Printed picture is vague: Suggests long printing time causing ink spread.
  • Colors are less bright: Points to high pressure or high temperature.
  • Printed picture is partially vague: Implies uneven heat.
  • Colors are different: Indicates uneven pressure or uneven surface of the printed item.
  • The paper sticks on the printed item: Suggests high temperature or poor coating quality of the item.

Maintenance Features:

While the manual does not explicitly detail maintenance procedures, it emphasizes safety instructions that indirectly contribute to the longevity and proper functioning of the device:

  • Safety Instructions:
    • Do not touch the heating platen and silicone pad when the machine is heating up or is still very hot to prevent burns.
    • This machine is not intended for use by children.

Proper handling and adherence to operational guidelines are crucial for maintaining the machine's performance and ensuring user safety. Regular cleaning of the platens and attachments, as well as checking electrical connections, would be implied best practices for any heat press machine, though not explicitly stated in this excerpt. The modular design, allowing for easy attachment changes, also facilitates focused cleaning and inspection of individual components.

Brildor Combo Craft Express Specifications

General IconGeneral
BrandBrildor
ModelCombo Craft Express
CategoryPower Tool
LanguageEnglish