EasyManua.ls Logo

Brother BAS-342G - User Manual

Brother BAS-342G
84 pages
Print Icon
To Next Page IconTo Next Page
Loading...
BAS-342G
Please read this manual before using the machine.
Please keep this manual within easy reach for quick reference.
DIRECT DRIVE
PROGRAMMABLE ELECTRONIC PATTERN SEWER
INSTRUCTION MANUAL

Table of Contents

Other manuals for Brother BAS-342G

Questions and Answers

  • A
    Andrea CarpenterSep 4, 2025
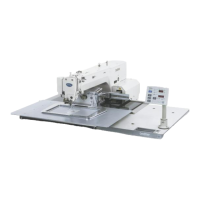
    How to fix uneven upper thread trailing length on Brother BAS-342G?
    • C
      Caroline HenrySep 4, 2025
      Uneven upper thread trailing length can result from: * Incorrect thread take-up spring tension and height; adjust the tension and height of the thread take-up spring. * Sub-tension being too weak; turn the sub-tension nut to adjust the tension. * The fixed knife not cutting cleanly; sharpen the fixed knife or replace it with a new one.
  • A
    ashley49Sep 18, 2025
    How to correct the lower thread winding amount on my Brother Sewing Machine?
    • T
      Todd ClarkSep 18, 2025
      If the lower thread winding amount is incorrect, adjust the position of the bobbin presser.
  • K
    kochstacySep 16, 2025
    What to do if the work clamp doesn't lift to the maximum height on my Brother BAS-342G Sewing Machine?
    • B
      brentcastanedaSep 16, 2025
      If the work clamp doesn't lift to the maximum height, it may be because the cylinder joint position is incorrect; adjust the position of the cylinder joint.
  • V
    Vanessa WilliamsSep 14, 2025
    Why does the lower thread wind to one side on my Brother BAS-342G?
    • B
      bryanlawrenceSep 14, 2025
      If the lower thread winds to one side, it may be because the bobbin winder tension assembly height is incorrect; adjust the height of the bobbin winder tension assembly.
  • J
    Jeffrey FoxSep 12, 2025
    How to adjust the work clamp lift amount on a Brother BAS-342G Sewing Machine?
    • R
      robinsonjoannaSep 12, 2025
      If the work clamp lift amount is incorrect, adjust the position of the work clamp lifter lever.
  • J
    Jack HallSep 12, 2025
    How to fix a thread wiper that doesn't operate correctly on a Brother BAS-342G Sewing Machine?
    • C
      Crystal CarrollSep 12, 2025
      If the thread wiper isn't working correctly: * The thread wiper might be obstructing the needle; adjust the height of the thread wiper. * The thread wiper position is incorrect; adjust the stroke of the thread wiper.
  • A
    Austin MendozaSep 9, 2025
    What to do if the work clamp doesn't lift or drop on my Brother BAS-342G?
    • A
      Ashley WheelerSep 9, 2025
      If the work clamp doesn't lift or drop, it could be because: * The work clamp moves stiffly; apply a suitable amount of grease to the sliding parts of the work clamp slider. * The air tube of the presser lifter cylinder is bent or damaged; straighten the bend in the tube or replace it.
  • D
    doris48Sep 7, 2025
    Why is the upper thread not being trimmed on my Brother BAS-342G?
    • S
      Sierra MartinezSep 7, 2025
      The upper thread may not be trimmed because: * The movable knife is not cutting cleanly; replace it with a new one. * The fixed knife is not cutting cleanly; sharpen it or replace it. * The movable knife is not picking up the upper thread; adjust the position of the shuttle race thread guide. * The movable knife position is incorrect; adjust its position. * The sub-tension is too weak; turn the sub-tension nut to adjust it.
  • S
    Sylvia WeaverSep 5, 2025
    What causes a poor stitch finish on the underside of the material with my Brother BAS-342G?
    • J
      jessicaparkerSep 5, 2025
      A poor stitch finish on the underside of the material can be due to: * The shuttle race thread guide not separating the threads enough; adjust its position. * Incorrect tightening of the upper thread; adjust the upper thread tension. * Uneven upper thread trailing length; adjust the sub-tension.
  • V
    victoria05Aug 20, 2025
    Why does the upper thread keep breaking on my Brother Sewing Machine?
    • S
      Sue FuentesAug 20, 2025
      The upper thread may break due to several reasons: * The upper thread tension might be too strong, so adjust it. * The needle might be incorrectly installed; ensure it is correctly installed. * The thread might be too thick for the needle; select a matching thread. * The thread take-up spring tension and height might be incorrect; adjust them. * There may be damage or burring on the rotary hook, needle hole plate, or needle; repair or replace the affected part. * If using synthetic thread, heat may be causing the breakage; use a cooling tank. * The thread might be threaded incorrectly; ensure it is threaded correctly.

Summary

SAFETY INSTRUCTIONS

Safety indications and their meanings

Explains the meanings of danger, caution indications, and various symbols used in the manual and on the machine.

Notes on safety

Environmental requirements

Specifies ambient temperature, relative humidity, and electrical noise requirements for proper operation.

Installation

Details requirements for safe and proper installation, including grounding and cord securing.

CAUTION

Sewing Precautions

General precautions for safe sewing operation, including wearing protective gear and turning off power.

Cleaning Precautions

Precautions for safe cleaning procedures, including using protective gear and turning off power.

Maintenance and Inspection Safety

Emphasizes qualified technicians for maintenance and disconnecting power before work.

Warning Labels

Label Explanations and Safety Guidance

Explains specific warning labels regarding high voltage, moving parts, hands in parts, and grounding.

1. NAMES OF MAJOR PARTS

2. SPECIFICATIONS

3. TABLE PROCESSING DIAGRAM

4. INSTALLATION

4-1. Removing the machine head fixing bolts

Describes the process of removing machine head fixing bolts before installation.

4-2. Installing the control box

Details how to install the control box, including checks for model compatibility and placement.

4-3. Installing the oil pan and support lever base

Explains the installation of the oil pan and support lever base components.

4-4. Installing the machine head

Guides on how to place the machine head onto the table, with safety notes.

4-5. Tilting back and returning the machine head

Instructions for safely tilting and returning the machine head to its position, with safety precautions.

4-6. Installing the gas spring

Details the procedure for installing the gas spring to support the machine head.

4-7. Installing the operation panel

Steps for mounting the operation panel onto the sewing machine table.

4-8. Installing the solenoid valve assembly

Describes the installation of the solenoid valve assembly underneath the work table.

4-9. Connecting the air tubes

Guides on connecting the air tubes to the pneumatic system.

4-10. Installing the air hose

Instructions for connecting the air hose and opening the cock.

4-11. Adjusting the air pressure

Explains how to adjust the air pressure using the regulator to 0.5 MPa.

4-12. Adjusting the speed controller

Details how to adjust lifting and lowering speeds for the work clamp using valve knobs.

4-13. Connecting the cords

Step-by-step guide for connecting various electrical cords to the PC boards.

4-14. Connecting the ground wire

Emphasizes the importance of secure ground connections for safety and operation.

4-15. Securing the cords and air tubes

Instructions for securing cords and air tubes using holders and checking cord management.

4-16. Installing the eye guard

Details the installation of the eye guard as a safety device.

4-17. Installing the cotton stand

Instructions for fitting and securing the cotton stand for thread supply.

4-18. Lubrication

Guidance on lubricating the sewing machine before first use and after periods of non-use.

4-19. Connecting the power cord

Instructions for connecting the power cord to a grounded AC power supply.

4-20. Checking the safety switch

Procedure to check the safety switch installation and correct it if necessary.

5. PREPARATION BEFORE SEWING

5-1. Installing the needle

Step-by-step instructions for correctly installing the sewing needle, with safety warnings.

5-2. Operating the 2-pedal foot switch

Explains how the two-pedal foot switch functions for starting and controlling the machine.

5-3. Threading the upper thread

Detailed guide on how to thread the upper thread through the machine, including using threading mode.

5-4. Winding the lower thread

Instructions for winding the lower thread onto the bobbin, including adjustments for winding amount.

5-5. Installing the bobbin case

Guides on how to correctly insert the bobbin case into the rotary hook.

5-6. Thread tension

Provides a reference for upper and lower thread tension settings.

5-6-1. Lower thread tension

Details how to adjust the lower thread tension to the weakest possible setting.

5-6-2. Upper thread tension

Explains how to adjust upper thread tension and trailing length.

5-7. Home position detection

Describes the procedure for performing home position detection for the machine.

5-8. Setting 2-step operation for the work clamp

How to configure the work clamp for two-step lowering operation.

6. USING THE OPERATION PANEL (BASIC OPERATIONS)

6-1. Name and function of each operation panel item

Identifies and explains the function of each key and indicator on the operation panel.

6-2. Loading sewing data

Instructions for loading sewing data from a CF card into the machine's memory.

6-3. Setting the program number

How to select and set the program number for sewing.

6-4. Setting the X-scale and Y-scale

Guides on adjusting the X and Y scale settings for sewing patterns.

6-5. Setting the sewing speed

Explains how to set the sewing speed in RPM.

6-6. Checking the sewing pattern

How to use test feed mode to verify needle movement and pattern accuracy.

6-7. Setting the height of the intermittent presser foot

Procedure to adjust the height setting for the intermittent presser foot.

7. USING THE OPERATION PANEL (ADVANCED OPERATIONS)

7-1. List of advanced functions

Overview of advanced functions accessible via key combinations.

7-2. Setting memory switches

How to access and modify memory switch settings for various machine functions.

7-3. List of memory switch settings

A comprehensive table detailing memory switch numbers, ranges, items, and initial values.

7-4. Using the lower thread counter

How to set and use the lower thread counter to prevent running out of thread.

7-5. Using the production counter

Instructions for setting and using the production counter for tracking sewn items.

7-6. Setting the split number

How to set split numbers for programs containing pauses or multiple sections.

7-7. Using user programs

How to record, use, and manage custom user programs with specific settings.

7-8. Using cycle programs

Instructions for creating and using cycle programs to sew patterns in a specific sequence.

7-9. Direct selection (combination table)

Table showing key combinations for directly selecting user programs and cycle programs.

7-10. X and Y parallel movement of sewing pattern

How to adjust the sewing pattern's position using parallel movement.

7-11. Clearing memory data (reinitialization)

Steps to reinitialize memory data to restore default settings or clear specific data.

8. USING CF CARDS

8-1. Notes on handling CF cards

Important precautions for handling, storing, and using CF cards with the machine.

8-2. Structure of a CF card folder

Explains the folder structure on a CF card for storing control programs and data.

8-3. Data read;write mode

Details how to switch to and use data read/write modes for CF cards.

8-3-1. Reading all sewing data from the CF card at once

Procedure for copying all sewing data from a CF card to the machine's internal memory.

8-3-2. Writing all sewing data to the CF card at once

Procedure for copying all sewing data from the machine's internal memory to a CF card.

9. SEWING

9-1. Sewing

Step-by-step guide on how to start and perform a sewing operation using the machine.

9-2. Using the STOP switch

How to use the STOP switch to halt sewing and how to resume or clear the stop.

9-3. Using the thread wiper switch

Explains the function of the thread wiper switch for on/off control.

10. CLEANING

10-1. Cleaning the rotary hook

Instructions for cleaning the rotary hook assembly, including removing the bobbin case.

10-2. Draining the oil

Procedure for draining oil from the oiler when it becomes full.

10-3. Checking the regulator

How to check the regulator for water collection and drain it.

10-4. Cleaning the control box air inlet ports

Guidance on cleaning air inlet ports of the control box using a vacuum cleaner.

10-5. Cleaning the eye guard

Instructions for cleaning the eye guard with a soft cloth, avoiding solvents.

10-6. Checking the needle

How to check the needle for damage or bending before sewing.

10-7. Lubrication

Refers to section 4-18 for lubrication instructions.

11. STANDARD ADJUSTMENTS

11-1. Adjusting the thread take-up spring

How to adjust the height and tension of the thread take-up spring for correct thread trailing.

11-2. Adjusting arm thread guide R

How to adjust the position of the arm thread guide R for material type.

11-3. Adjusting the needle bar height

Procedure to adjust the needle bar height for correct alignment.

11-4. Adjusting the needle bar lift amount

How to adjust the needle bar lift amount for proper needle and hook timing.

11-5. Adjusting the driver needle guard

How to adjust the driver needle guard for correct needle contact.

11-6. Adjusting the needle clearance

How to adjust the clearance between the needle and the rotary hook.

11-7. Adjusting the shuttle race thread guide

Guidance on installing and positioning the shuttle race thread guide.

11-8. Adjusting the rotary hook lubrication amount

How to adjust the oil supply to the rotary hook for proper lubrication.

11-9. Adjusting the position of the movable knife

Procedure to adjust the position of the movable knife for thread trimming.

11-10. Replacing the movable and fixed knives

Steps for replacing the movable and fixed knives used for thread trimming.

11-10-1. Installing the feed plate

How to install the feed plate correctly, aligning it with the index mark.

11-11. Adjusting the thread wiper

How to adjust the position and stroke of the thread wiper for proper operation.

11-12. Presser foot installation position

How to set the correct installation position for the presser foot.

11-13. Changing the intermittent stroke

How to adjust the intermittent stroke by changing the position of the stepping clamp link.

11-14. Adjusting the work clamp lift amount

How to adjust the maximum lift amount for the work clamp.

11-15. Adjusting the air pressure

How to adjust the air pressure to 0.5 MPa using the regulator.

12. TABLE OF ERROR CODES

Switch-related errors

Lists error codes related to switch operations and their remedies.

Upper shaft motor-related errors

Lists error codes related to the upper shaft motor and their remedies.

Feed mechanism-related errors

Lists error codes related to the feed mechanism and their remedies.

Work clamp-related errors

Lists error codes related to the work clamp and their remedies.

Communication and memory-related errors

Lists error codes related to communication and memory issues and their remedies.

Data editing-related errors

Lists error codes related to data editing and their remedies.

P.C. board-related errors

Lists error codes related to PC boards and their remedies.

13. TROUBLESHOOTING

Work clamp issues

Addresses common problems related to the work clamp's lifting and dropping functions.

Thread wiper issues

Troubleshooting for the thread wiper not operating correctly.

Lower thread winding issues

Addresses problems with uneven lower thread winding and incorrect winding amounts.

Needle and thread issues

Troubleshooting for thread slipping, uneven trailing length, and guide position.

Upper thread breaks

Lists causes and remedies for upper thread breakage.

Lower thread breaks

Lists causes and remedies for lower thread breakage.

Skipped stitches occur

Troubleshooting guide for skipped stitches.

Needle is broken

Lists causes and remedies for needle breakage.

Needle deflection

Addresses issues with needle deflection and appropriate needle selection.

Thread jamming

Troubleshooting for thread jamming issues.

Upper thread is not trimmed

Addresses problems with the movable or fixed knife not trimming the upper thread.

Poor stitch finish on underside of material

Troubleshooting for poor stitch quality on the underside of the material.

Incorrect tightening of the thread

Addresses issues with thread tension and trailing length.

Sewing machine does not operate when the power is turned on and the foot switch is depressed

Troubleshooting for the machine not starting, checking safety switch functionality.

14. 7-SEGMENT DISPLAY

Brother BAS-342G Specifications

General IconGeneral
BrandBrother
ModelBAS-342G
CategorySewing Machine
LanguageEnglish

Related product manuals