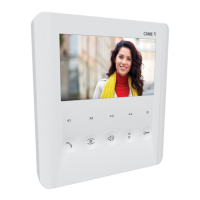
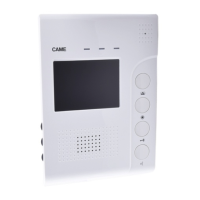
The CAME PLX A is a user-friendly intercom system designed for residential and professional use, offering a range of communication, access control, and safety features. This device is part of the CAME.COM product line, identified by the model number FA01624-EN.
General Precautions
Before installation and use, it is crucial to read and follow the manufacturer's instructions carefully. Installation, programming, commissioning, and servicing must be performed by qualified technicians who are trained in relevant regulations and accident-prevention measures. Always disconnect the power supply before any cleaning or maintenance. The device is designed for a specific purpose, and the manufacturer disclaims liability for damage resulting from improper, incorrect, or unreasonable use. For transport, the product should remain in its original packaging within a closed environment. In case of malfunction, discontinue use and contact customer services via the provided website (https://www.came.com/global/en/contact-us) or telephone. The manufacture date is on the product label, and general conditions of sale are available in official CAME price lists.
Function Description
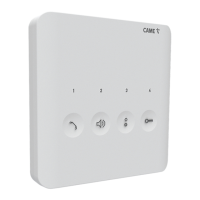
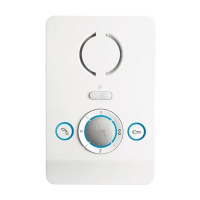
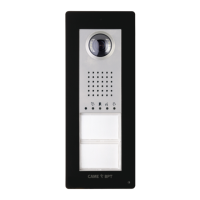
The PLX A features a clean, minimalist design with four main buttons, each with multiple functions depending on configuration and context.
Button 1 (Call/Panic Signal):
- Activate/Deactivate Communication: Press this button to initiate or end a call.
- PANIC SIGNAL: Press and hold for more than 2 seconds to send a PANIC SIGNAL to the porter (if available). A white LED will light up to confirm receipt and remain on until the porter calls back. This signal takes priority over all other calls.
- LED Key (Flashing): Indicates a call in progress.
- LED Key (On): Indicates a PANIC SIGNAL in progress (no receiver communication).
Button 2 (Ringtone/Audio Volume & Auxiliary 2/Porter Call):
- Ringtone Volume Adjustment: Press to cycle through ringtone volumes: LOW, MEDIUM, HIGH, OFF. A red LED indicates when the volume is off.
- Audio Volume Adjustment: Press during a conversation to adjust the audio volume.
- Auxiliary 2 / Porter Call: Signals a request to be called back by the porter.
Button 3 (Door/Gate Release):
- DOOR RELEASE / GATE RELEASE Command: Sends a command to open a door or gate.
- GATE RELEASE to Porter: Press and hold for more than 3 seconds to send a GATE RELEASE command to the porter (if enabled).
- LED Key (Flashing): Indicates calling.
- LED Key (On): Indicates the gate/door is open, if correctly configured. The door status function is active by default, but the GATE RELEASE function requires correct configuration.
Buttons 1, 2, 3 (Intercom/Auxiliary Functions):
The functions of these buttons depend on the installation configuration:
- Intercom: If configured as an INTERCOM, Button 1 serves as INTERCOM 1, Button 2 as INTERCOM 2, and Button 3 as INTERCOM 3.
- Second Function (with Button 4): If the SECOND FUNCTION is activated using Button 4, Button 1 serves as INTERCOM 4, Button 2 as INTERCOM 5, and Button 3 as INTERCOM 6.
- Auxiliary: If configured as an AUX, Button 1 serves as AUX 1, Button 2 as AUX 3, and Button 3 as AUX 4.
Button 4 (Second Function/Auxiliary 5/Automatic Door Release):
- Temporary Second Function (Intercom): If configured as an INTERCOM, this button temporarily enables the SECOND FUNCTION, allowing INTERCOM calls 4 to 6 to be activated. When active, white LEDs on buttons 1, 2, 3, and 4 will flash for approximately 10 seconds. The function can be disabled by pressing the button again.
- Auxiliary 5: If configured as an AUX, it serves as AUX 5.
- Automatic Door Release: Press and hold for more than 3 seconds to enable/disable this function. This function is only available when the line is free.
- LED Key (On): Indicates AUTOMATIC DOOR RELEASE function enabled.
- LED Key (Off): Indicates AUTOMATIC DOOR RELEASE function disabled.
Usage Features
Standard Functions:
- Call in progress: Indicated by a visual cue (e.g., flashing LED).
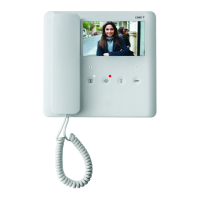
- Answer a call: Press the call button to answer an incoming call.
- Communication activated: Once a call is answered, audio communication is established.
- Open the door for the calling entry panel: Press the door release button to open the door.
- End the call: Press the call button again to end the conversation.
Intercommunication:
- Initiating an Intercom Call: Press the call button to select the desired internal receiver. The calling receiver will sound to indicate a free line, and the called receiver will ring with its chosen ringtone.
- Answering an Intercom Call: On the called receiver, press the call button to activate audio communication.
- Call from Entry Panel during Intercom: During an internal conversation, an incoming call from an entry panel is signaled by a beep repeating every 5 seconds on internal receivers.
- Busy Line: If an intercom call cannot be made due to a busy line, 3 consecutive beeps will sound.
- Call Transfer: With an active call, select the internal receiver to which you want to transfer the call. To activate audio communication between two internal receivers, press the call button on the called receiver. The entry panel call will be put on hold. To allow internal receiver 2 to communicate with the entry panel, internal receiver 1 presses its call button. Internal receiver 2 can then communicate with the entry panel. The internal receiver with the incoming call can transfer it.
Auxiliary Controls:
- Press an AUX button to activate the desired auxiliary command (e.g., switching on a light, opening a gate). Accessory devices may be required for these commands to function correctly.
Porter Functions (if system has a porter desk):
- Call Notification from Porter: When the LED on the porter call button lights up, it indicates the porter wishes to be called back. The LED turns off when communication with the porter begins.
- Request to be Called Back by Porter: Press the porter call button to send a request signal to the porter. The system must be correctly configured for this.
- Sending a Panic Signal to Porter: Press and hold the call button for 2 seconds to send a PANIC signal to the porter. A white LED indicates the signal has been received.
- Alarm Signal: If an alarm contact connected to the receiver entrance is activated, a signal is sent to the porter, and an intermittent acoustic signal sounds on the receiver.
Open-Gate Function/Status:
- Press and hold the gate release button for a prolonged period to send an open/close command to an operator. The LED indicates the status of the operator. This requires correct system setup and configuration. The function must be activated on the receiver during system programming when the call is associated.
Door Status Function:
- The LED next to the door release button indicates the current door status. This requires correct system setup. The function is active during communication with the entry panel, and the signal refers to the entrance associated with that panel.
Automatic Door-Release Function:
- This function allows automatic entrance opening when the call button on the entry panel is pressed. It is useful for professional practices.
- To enable/disable, press and hold the button for more than 3 seconds. The LED switches on when enabled. The call ends automatically with this function.
Configuring Melodies:
- Entering Configuration Mode: Press and hold the ringtone volume button for 3 seconds. A short buzzing sound and a red flashing LED confirm entry into configuration mode.
- Configuring Entry Panel Call Melody: Press the ringtone volume button to listen to melodies in sequence. Press again to select the melody and exit configuration.
- Configuring Landing Call Melody: Press the door release button to select the melody and continue configuration. Two short beeps confirm entry into landing-call configuration mode. Press the ringtone volume button to listen to melodies in sequence. Press the ringtone volume button again to select the melody and exit configuration.
- Configuring Number of Rings per Call: Press the door release button to select the melody and continue configuration. Three short beeps confirm entry into configuration mode for the number of rings per call. Press the ringtone volume button as many times as the desired number of rings (1 to 12). Three seconds after the last press, the selected call plays back with the chosen number of rings.
Technical Specifications
- Power supply from BUS (V DC): 15 to 20
- Consumption in stand-by mode (mA): <1
- Maximum consumption (mA): 30
- Single LED consumption (mA): 1
- Storage temperature (°C)*: -25 to +70
- Operating temperature (°C): +5 to +40
- IP Rating: IP 30
- Average life (hours)**: 150,000
*Before installation, ensure the product has been stored or transported at room temperature, especially if exposed to very high or low temperatures.
**The average product life is an indicative estimate, dependent on compliant usage, installation, maintenance, and environmental conditions.
Maintenance Features
Cleaning the Device:
Use a soft, slightly damp cloth for cleaning. The cloth can be moistened with water, an ammonia solution, an oil-based soap (e.g., Marseille soap), or a gentle makeup remover (e.g., cleanser or micellar water). Always wipe the surface with a damp cloth (wet with just water) after cleaning. Avoid using alcohol-based solutions or solutions containing surfactants.
Dismantling and Disposal:
At the end of its life cycle, dispose of the packaging and the device responsibly, in compliance with local laws. Recyclable components are marked with a symbol and a material ID marker.
These instructions are to be supplied with the device. Data and information are subject to change without prior notice.