21Instruction manual C873G, C866G & C848GPlease keep this instruction manual for future reference
GAS CONVERSION AND ADJUSTMENTS
If the appliance is prearranged for a type of gas different from the available type, the burner
nozzles must be changed and the control card must be set up with the parameters relative to the
new configuration.
CHANGING THE NOZZLES:
Choose the required nozzles with reference to the following “Technical Specifications” table.
Proceed as follows:
› Remove the pan stands and burners from the hob.
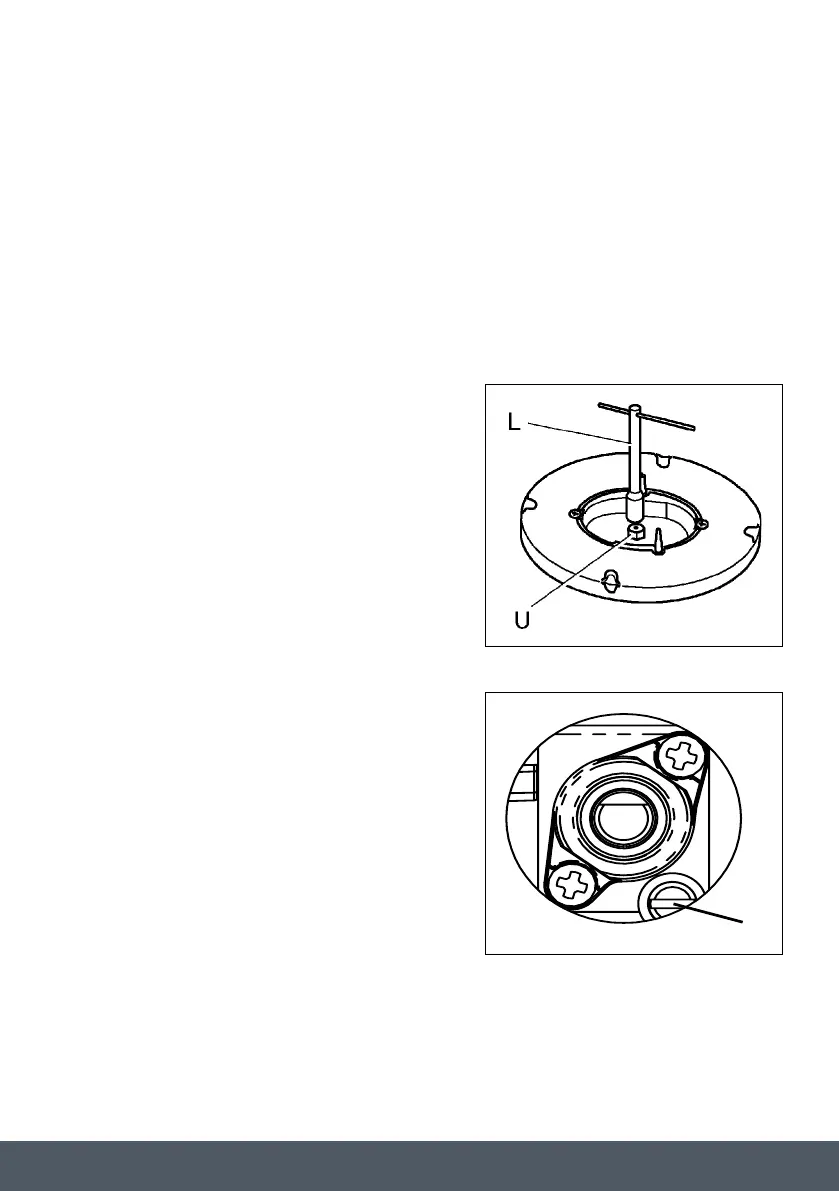
› Unscrew nozzles U (Fig.6) using a socket spanner (L),
and replace with the correct nozzle for the available
gas type.
› Secure the nozzle without over-tightening.
ADJUSTING THE BURNERS
The lowest flame point must always be properly adjusted
and the flame must remain on even if there is an abrupt
shift from the maximum to the minimum position.
If this is not so, it is necessary to adjust the lowest flame
point as follows:
› Start the burner up.
› Turn the knob to the minimum position (small flame).
› Remove the knob from the tap rod.
› Introduce a flat-tip screwdriver in the hole F of the
tap (Fig.7) and turn the by-pass screw up to a proper
adjustment of the lowest flame point.
G A S CONVERSION AND ADJUSTMENTS
If the appliance is prearranged for a type of gas different from the available type, the burner nozzles
must be changed and the control card must be set up with the parameters relative to the new
configuration.
C H A N G I N G THE NOZZLES:
Choose the required nozzles with reference to the following “Technical Specifications” table.
Proceed as follows:
› Remove the pan stands and burners from the hob.
› Unscrew nozzles U (Fig.5) and U1/U2 (Fig.6) using a socket spanner (L),
and replace with the correct nozzle for the available gas type.
› Secure the nozzle without over-tightening.
Fig.5
Fig.6
GAS CONVERSION AND ADJUSTMENTS
If the appliance is prearranged for a type of gas different from the available type, the burner
nozzles must be changed and the control card must be set up with the parameters relative to
the new configuration.
C H A N G I N G THE NOZZLES:
Choose the required nozzles with reference to the following “Technical Specifications” table.
Proceed as follows:
› Remove the pan stands and burners from the hob.
› Unscrew nozzles U (Fig.6) using a socket spanner
(L), and replace with the correct nozzle for the
available gas type.
› Secure the nozzle without over-tightening.
Fig.6
ADJUSTING THE BURNERS
› Start the burner up.
› Turn the knob to the minimum position
(small flame).
› Remove the knob from the tap rod.
› Introduce a flat-tip screwdriver in the hole F of
the tap (Fig.7) and turn the by-pass screw up to a
proper adjustment of the lowest flame point.
F
Fig.7
The lowest flame point must always be properly adjusted and the flame must remain on
even if there is an abrupt shift from the maximum to the minimum position.
If this is not so, it is necessary to adjust the lowest flame point as follows:
FIG.6
FIG.7