Do you have a question about the Carel pCO2000AM0 and is the answer not in the manual?
Crucial safety instructions for installation, operation, and handling of the pCO2 controller and its components.
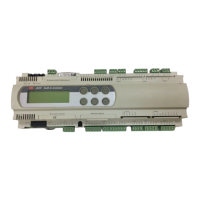
Specifications common to all pCO2 versions and details for individual SMALL, MEDIUM, LARGE models regarding I/O.
Details on pCO2 programmability using EasyTools, including advantages and applications.
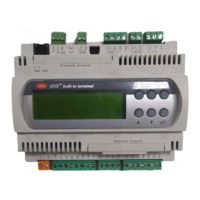
Customization options for user terminals, including display types and button configurations.
Capabilities of the user terminal for programming, monitoring, diagnostics, and parameter adjustments.
List of product codes for pCO2 controllers, terminals, and optional accessories.
Detailed explanation of the function of each connector, signal, and I/O pin on the pCO2 board.
Instructions for adjusting the display contrast on 4x20 LCD and graphic display models.
Characteristics of the 4x20 LCD display models, including dimensions and optional features.
Characteristics of the LED display models, including digits, color, size, and indicator LEDs.
Characteristics of the graphic LCD display models, including resolution and dimensions.
Specifications for panel-mounted 4x20 LCD displays, including optional back-lit version.
Specifications for panel-mounted graphic LCD displays, including resolution and dimensions.
Characteristics of the 3-digit LED display, including LED digits and buttons.
Description of integrated display and keypad versions for pCO2 SMALL, MEDIUM, LARGE models.
Details of the pCO terminal keypad, including mechanical buttons, LEDs, and cover.
Explanation of button functions on standard Carel terminals and associated LED indicators.
Configurable fonts, large format display, and graphic object display for terminals with graphic displays.
Description of components on the graphic display board, including connectors for optional cards.
Instructions for mounting the pCO controller onto a DIN rail using its rear tabs.
Details on power supply requirements for the pCO controller, including voltage, power, and transformer specifications.
Guidance on suitable installation environments and warnings regarding electrical connections.
Instructions for connecting various analogue sensors (NTC, PT1000, 0/1V, 0/10V, 0/20mA, 4/20mA) to pCO2 inputs.
Instructions for connecting Carel AS*2 active temperature and humidity probes to pCO2 inputs.
Instructions for connecting 2-wire NTC temperature probes to pCO2 analogue inputs.
Instructions for connecting 2-wire PT1000 temperature probes to pCO2 analogue inputs for high-temperature applications.
Instructions for connecting SPK* active pressure probes or 0/20mA, 4/20mA sensors to pCO2 inputs.
Instructions for configuring analogue inputs as clean digital inputs for ON/OFF functions.
Summary table of analogue input distribution across pCO2 versions (SMALL, MEDIUM, LARGE).
Instructions for connecting up to 18 digital inputs for safety devices, alarms, and status monitoring.
Connection diagram for digital inputs powered by 24Vac, showing common configurations.
Connection diagram for digital inputs powered by 24Vdc, showing common configurations.
Connection diagram for digital inputs powered by 230Vac, with warnings about voltage independence.
Summary table of digital input distribution across pCO2 versions (SMALL, MEDIUM, LARGE).
Instructions for connecting up to six optically-isolated 0/10V analogue outputs powered externally.
Instructions for connecting digital outputs with electromechanical relays and solid-state relays (SSR).
Diagram and explanation for connecting electromechanical relay digital outputs.
Details on using SSR outputs for devices requiring unlimited switching cycles.
Summary table of digital output distribution and SSR availability across pCO2 versions.
Instructions for connecting the user terminal to the pCO2 using a telephone cable.
Procedure for installing pCOT terminals on panels or walls, including drilling templates and connections.
Procedure for installing pCOI terminals on panels, including drilling templates and electrical connections.
Step-by-step guide for installing the EPROM on the graphic display terminal board.
Instructions for setting the pCO2 address using dip-switches for pLAN network configuration.
Instructions for setting terminal addresses using rear dip-switches for pLAN network connectivity.
Explanation of how terminals can be private or shared on a pLAN network, managing data and commands.
Diagrams illustrating pLAN network connections between pCO2 boards using AWG20/22 cables.
Guidelines for remotely locating terminals up to 50m with telephone cable or 200m with shielded cable.
Procedure for remote terminal installation up to 50m using telephone cable and ferrites.
Procedure for remote terminal installation up to 200m using AWG24 shielded cable with twisted pairs.
Summary of technical specifications for the pLAN network, including communication standard and maximum length.
Details on programming keys for transferring programs between PC, pCO2, and the key.
Information on expanding pCO2 memory with an additional board for application software or data logs.
Details on the RS485 serial board for interfacing pCO2 with supervisory networks.
Details on the RS232 modem interface card for connecting pCO2 to a standard HAYES modem.
Information on using a serial printer with specific pCO terminals and port settings.
Details on the optional serial printer card for pCO graphic terminals.
Interface board for controlling OEM humidifier parameters from the pCO2 controller.
Explanation of the pCO board's LEDs (red, yellow, green) for status indication and connection to WinLoad32.
Procedure for starting an alternative program from the programming key without altering the pCO2 resident software.
Instructions for updating pCO controller software using the WinLoad32.exe program and a PC.
Illustrative examples of electrical connections for the pCO2 controller to various devices.
Shows a special configuration facilitating device wiring, considering maximum terminal current.
General technical specifications of the pCO controller, including environmental and electrical conditions.
Detailed electrical specifications of the pCO controller, including power, CPU, memory, and operating parameters.
Specifications for pCO analogue inputs, including conversion type, number, and accuracy for various sensor types.
Specifications for pCO digital inputs, including opto-isolated types, voltage ratings, and impulse detection times.
Specifications for pCO analogue outputs, including number, type, accuracy, and settling times.
Specifications for pCO digital outputs, including electromechanical relay and SSR types, and switching parameters.
Details on terminal and pLAN driver connections, including maximum distances for telephone and AWG24 cables.
General characteristics and electrical specifications of PCOI* and PCOT* user terminals.
Instructions for panel mounting PCOT* and PCOI* terminals, including drilling templates and dimensions.
Instructions for wall mounting terminals using a special bracket and a standard switchbox for cable passage.
Dimensional drawings of pCO2 LARGE, MEDIUM, and SMALL controllers.
Dimensional drawings of PCOT*, PCOI*, and PCOT32RN* user terminals.
Checks to perform when the unit fails to power up, indicated by the power LED being off.
Troubleshooting steps for general LCD issues like strange characters or blank display.
Checks to perform for incorrect readings from analogue and digital input signals.
Steps to verify pressure probe readings and ensure correct sensor configuration and scaling.
Guidance on checking NTC probe signal values and resistance for accurate temperature readings.
Steps to diagnose unusual alarm signals from digital inputs, related to contact status and wiring.
Troubleshooting steps for the pCO controller repeatedly entering Watch-dog mode (switching off/on).
Checks for issues with the serial connection to the local supervisor, including card presence and configuration.
Troubleshooting steps for remote supervisor connection issues, checking Gateway and modem status.
Steps to resolve user terminal lock-out issues where buttons do not respond.
| Brand | Carel |
|---|---|
| Model | pCO2000AM0 |
| Category | Controller |
| Language | English |