EasyManua.ls Logo

Carrier 23XL User Manual

Carrier 23XL
116 pages
To Next Page IconTo Next Page
Page #1 background imageLoading...
Page #1 background image
Manufacturer reserves the right to discontinue, or change at any time, specifications or designs without notice and without incurring obligations.
PC 211 Catalog No. 532-306 Printed in U.S.A. Form 23XL-3SS Pg 1 7-99 Replaces: New
Book 2
Tab 5e
Start-Up, Operation and Maintenance
Instructions
SAFETY CONSIDERATIONS
Screw liquid chillers are designed to provide safe and
reliable service when operated within design specifica-
tions. When operating this equipment, use good judgment
and safety precautions to avoid damage to equipment and
property or injury to personnel.
Be sure you understand and follow the procedures and
safety precautions contained in the chiller instructions, as
well as those listed in this guide.
DO NOT VENT refrigerant relief valves within a building. Outlet
from rupture disc or relief valve must be vented outdoors in accor-
dance with the latest edition of ANSI/ASHRAE 15 (American
National Standards Institute, American Society of Heating, Refrigera-
tion, and Air Conditioning Engineers), latest edition. The accumula-
tion of refrigerant in an enclosed space can displace oxygen and cause
asphyxiation.
PROVIDE adequate ventilation in accordance with ANSI/
ASHRAE 15, especially for enclosed and low overhead spaces. Inha-
lation of high concentrations of vapor is harmful and may cause heart
irregularities, unconsciousness, or death. Misuse can be fatal. Vapor is
heavier than air and reduces the amount of oxygen available for
breathing. Product causes eye and skin irritation. Decomposition
products are hazardous.
DO NOT USE OXYGEN to purge lines or to pressurize a chiller for
any purpose. Oxygen gas reacts violently with oil, grease, and other
common substances.
NEVER EXCEED specified test pressures. VERIFY the allowable
test pressure by checking the instruction literature and the design pres-
sures on the equipment nameplate.
DO NOT USE air for leak testing. Use only refrigerant or dry
nitrogen.
DO NOT VALVE OFF any safety device.
BE SURE that all pressure relief devices are properly installed and
functioning before operating any chiller.
DO NOT WELD OR FLAMECUT any refrigerant line or vessel until
all refrigerant (liquid and vapor) has been removed from chiller.
Traces of vapor should be displaced with dry air or nitrogen and the
work area should be well ventilated. Refrigerant in contact with an
open flame produces toxic gases.
DO NOT USE eyebolts or eyebolt holes to rig chiller sections or the
entire assembly.
DO NOT work on high-voltage equipment unless you are a qualified
electrician.
DO NOT WORK ON electrical components, including control cen-
ters, switches, starters, or oil heater (if applicable) until you are sure
ALL POWER IS OFF and no residual voltage can leak from capaci-
tors or solid-state components.
LOCK OPEN AND TAG electrical circuits during servicing. IF
WORK IS INTERRUPTED, confirm that all circuits are deenergized
before resuming work.
DO NOT syphon refrigerant.
AVOID SPILLING liquid refrigerant on skin or getting it into the
eyes. USE SAFETY GOGGLES. Wash any spills from the skin with
soap and water. If liquid refrigerant enters the eyes, IMMEDIATELY
FLUSH EYES with water and consult a physician.
NEVER APPLY an open flame or live steam to a refrigerant cylinder.
Dangerous over pressure can result. When it is necessary to heat
refrigerant, use only warm (110 F [43 C]) water.
DO NOT REUSE disposable (nonreturnable) cylinders or attempt to
refill them. It is DANGEROUS AND ILLEGAL. When cylinder is
emptied, evacuate remaining gas pressure, loosen the collar, and
unscrew and discard the valve stem. DO NOT INCINERATE.
CHECK THE REFRIGERANT TYPE before adding refrigerant to
the chiller. The introduction of the wrong refrigerant can cause dam-
age or malfunction to this chiller.
Operation of this equipment with refrigerants other than those cited
herein should comply with ANSI/ASHRAE 15 (latest edition). Con-
tact Carrier for further information on use of this chiller with other
refrigerants.
DO NOT ATTEMPT TO REMOVE fittings, covers, etc., while
chiller is under pressure or while chiller is running. Be sure pressure is
at 0 psig (0 kPa) before breaking any refrigerant connection.
CAREFULLY INSPECT all relief devices, rupture discs, and other
relief devices AT LEAST ONCE A YEAR. If chiller operates in a
corrosive atmosphere, inspect the devices at more frequent intervals.
DO NOT ATTEMPT TO REPAIR OR RECONDITION any relief
device when corrosion or build-up of foreign material (rust, dirt, scale,
etc.) is found within the valve body or mechanism. Replace the
device.
DO NOT install relief devices in series or backwards.
USE CARE when working near or in line with a compressed spring.
Sudden release of the spring can cause it and objects in its path to act
as projectiles.
DO NOT STEP on refrigerant lines. Broken lines can whip about and
release refrigerant, causing personal injury.
DO NOT climb over a chiller. Use platform, catwalk, or staging. Fol-
low safe practices when using ladders.
USE MECHANICAL EQUIPMENT (crane, hoist, etc.) to lift or
move inspection covers or other heavy components. Even if compo-
nents are light, use mechanical equipment when there is a risk of slip-
ping or losing your balance.
BE AWARE that certain automatic start arrangements CAN
ENGAGE THE STARTER, TOWER FAN, OR PUMPS. Open the
disconnect ahead of the starter, tower fan, or pumps. Shut off the
chiller or pump before servicing equipment.
USE only repair or replacement parts that meet the code requirements
of the original equipment.
DO NOT VENT OR DRAIN waterboxes containing industrial brines,
liquid, gases, or semisolids without the permission of your process
control group.
DO NOT LOOSEN waterbox cover bolts until the waterbox has been
completely drained.
DOUBLE-CHECK that coupling nut wrenches, dial indicators, or
other items have been removed before rotating any shafts.
DO NOT LOOSEN a packing gland nut before checking that the nut
has a positive thread engagement.
PERIODICALLY INSPECT all valves, fittings, and piping for corro-
sion, rust, leaks, or damage.
PROVIDE A DRAIN connection in the vent line near each pressure
relief device to prevent a build-up of condensate or rain water.
23XL
Hermetic Screw Liquid Chillers with HCFC-22
and HFC-134a, 50/60 Hertz
PIC II Controls

Table of Contents

Other manuals for Carrier 23XL

Question and Answer IconNeed help?

Do you have a question about the Carrier 23XL and is the answer not in the manual?

Carrier 23XL Specifications

General IconGeneral
BrandCarrier
Model23XL
CategoryChiller
LanguageEnglish

Summary

SAFETY CONSIDERATIONS

INTRODUCTION

ABBREVIATIONS AND EXPLANATIONS

23XL CHILLER FAMILIARIZATION

Chiller Identification Nameplate

Identifies the chiller model, serial number, and key specifications.

System Components

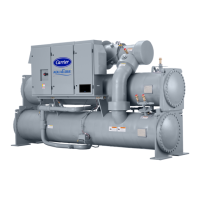
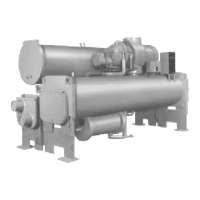
Lists and briefly describes the main components of the chiller system.

SERIAL NUMBER BREAKDOWN

Explains the breakdown and meaning of the chiller's serial number.

Power Up the Controls and Check the Oil Heater

Software Configuration

Setting up the chiller's software and parameters for operation.

Input the Design Set Points

Configuring operational set points for the chiller's performance.

Input the Local Occupied Schedule (OCCPC01S)

Setting the time schedule for local chiller operation.

Input Service Configurations

Entering service-related parameters and settings for the chiller.

Perform A Control Test

COOLER AND CONDENSER PRESSURE TRANSDUCER AND WATERSIDE FLOW DEVICE CALIBRATION

Calibrating pressure transducers and waterside flow devices for accurate readings.

Charge Refrigerant Into Chiller

TRIMMING REFRIGERANT CHARGE

Adjusting the refrigerant charge for optimal chiller performance.

INITIAL START-UP

Preparation

Pre-start checks and verifications before initial chiller operation.

Dry Run to Test Start-Up Sequence

Performing a dry run to verify the start-up sequence.

To Prevent Accidental Start-Up

Methods to prevent unintended chiller starts during service.

REFRIGERATION CYCLE

MOTOR COOLING CYCLE

LUBRICATION CYCLE

Summary

Provides a brief overview of the lubrication system.

Details

Explains the specific components and functions of the oil system.

Oil Reclaim System

Oil Loss Prevention

Slide Valve Principle

Explains how the slide valve controls capacity using oil pressure.

STARTING EQUIPMENT

Unit Mounted Solid-State Starter (Optional)

Describes the optional solid-state starter for reduced voltage starting.

Unit Mounted Wye-Delta Starter (Optional)

Describes the optional wye-delta starter for reduced voltage starting.

CONTROLS

Definitions

Defines key terms like Analog Signal and Discrete Signal.

General Controls Overview

Overview of the microprocessor-based control system.

PIC II System Components

Details the components of the PIC II control system.

CVC Operation and Menus (Fig. 17-23)

Explains how to operate the Chiller Visual Controller and navigate its menus.

OVERRIDE OPERATIONS

To Override a Value or Status

Step-by-step guide to overriding values or statuses on the CVC.

TIME SCHEDULE OPERATION (Fig. 22)

To Remove an Override

Steps to remove an override and return to automatic control.

TO VIEW AND CHANGE SET POINTS (Fig. 23)

SERVICE OPERATION

Accessing and using the service operation programs.

PIC II System Functions

CAPACITY CONTROL

PIC II controls chiller capacity via slide valve based on water temperature.

ECW CONTROL OPTION

Option to use entering chilled water temp for slide valve modulation.

CONTROL POINT DEADBAND

Tolerance range for chiller control point to maintain temperature.

PROPORTIONAL BANDS AND GAIN

Adjusting slide valve response to temperature changes.

DEMAND LIMITING

PIC II limits slide valve opening based on active demand limit set point.

OCCUPANCY SCHEDULE

How schedules determine chiller operation times.

Safety Controls

Shunt Trip (Option)

Function of the shunt trip option as a safety trip mechanism.

Default Screen Freeze

Ramp Loading

Capacity Override (Table 5)

Low Discharge Temperature Control

Oil Sump Temperature Control TC (Frame 1 and 2) Chillers Only

Water Treatment

Remote Start/Stop Controls

Refrigerant Leak Detector

Condenser Pump Control

Condenser Freeze Prevention

Auto. Restart After Power Failure

Water/Brine Reset

RESET TYPE 1

Automatic chilled water temp reset based on remote sensor input.

RESET TYPE 2

Automatic chilled water temp reset based on remote sensor input.

RESET TYPE 3

Automatic reset based on cooler temperature difference.

Demand Limit Control Option

Hot Gas Bypass (Optional) Algorithm (See Fig. 24 and 25)

Lead/Lag Control

Lead/Lag System Requirements

Lists requirements for implementing lead/lag control.

COMMON POINT SENSOR INSTALLATION

Information on installing common point sensors for lead/lag.

LEAD/LAG OPERATION

Lead/Lag Chiller Configuration and Operation

How to configure and operate lead/lag chillers.

Standby Chiller Configuration and Operation

Lag Chiller Shutdown Requirements

Ice Build Control

ICE BUILD INITIATION

How the ice build time schedule activates the ice build option.

START-UP/RECYCLE OPERATION

Procedures for starting up or recycling during ice build.

TEMPERATURE CONTROL DURING ICE BUILD

How temperature is controlled during ice build.

TERMINATION OF ICE BUILD

RETURN TO NON-ICE BUILD OPERATIONS

Attach to Network Device Control

ATTACHING TO OTHER CCN MODULES

Connecting and viewing other CCN modules.

Service Operation

TO ACCESS THE SERVICE SCREENS

Steps to access service screens, including password entry.

TO LOG OUT OF NETWORK DEVICE

HOLIDAY SCHEDULING (Fig. 28)

START-UP/SHUTDOWN/ RECYCLE SEQUENCE (Fig. 29)

Local Start-Up

Initiating a local start-up sequence for the chiller.

Shutdown Sequence

Automatic Soft Stop Amps Threshold

Chilled Water Recycle Mode

BEFORE INITIAL START-UP

Job Data Required

List of essential job data needed before initial start-up.

Equipment Required

List of tools and equipment needed for start-up.

Check Chiller Tightness

Procedures for checking the chiller for leaks.

TO PRESSURIZE WITH DRY NITROGEN

Method for pressurizing with dry nitrogen for leak testing.

Leak Test Chiller

If the pressure readings are normal for chiller condition

Steps for leak testing when pressure is normal.

If the pressure readings are abnormal for chiller condition

Steps for leak testing when pressure is abnormal.

Chiller Dehydration

Perform dehydration as follows:

Step-by-step guide for performing chiller dehydration.

Inspect Wiring

Check Starter

MECHANICAL STARTER

Checks for mechanical starters, including wiring and connections.

Carrier Comfort Network Interface

Software Configuration

Input the Design Set Points

Configuring operational set points for the chiller's performance.

Input the Local Occupied Schedule (OCCPC01S)

Setting the time schedule for local chiller operation.

Input Service Configurations

Entering service-related parameters and settings for the chiller.

Perform a Control Test

CCM Pressure Thermistors

Checking all thermistor temperature sensors.

CCM Pressure Transducers

Checking all pressure transducers.

Pumps

Checking pump outputs and associated inputs.

Slide Valve

Checking the slide valve operation.

Pumpdown/Lockout

Procedures for pumpdown and lockout.

Terminate Lockout

Procedures to terminate pumpdown lockout.

COOLER CONDENSER PRESSURE TRANSDUCER AND WATERSIDE FLOW DEVICE CALIBRATION

To calibrate these transducers:

Steps for calibrating cooler and condenser transducers.

CHILLER EQUALIZATION WITHOUT A PUMPOUT UNIT

CHILLER EQUALIZATION WITH PUMPOUT UNIT

OPERATING INSTRUCTIONS

Operator Duties

Responsibilities of the chiller operator.

Prepare the Chiller for Start-Up

Steps to prepare the chiller before starting.

To Start the Chiller

Procedure for starting the chiller.

Check the Running System

Monitoring the chiller's operation after start-up.

To Stop the Chiller

Preparation for Extended Shutdown

Cold Weather Operation

Slide Valve Operation

Refrigeration Log

PUMPOUT AND REFRIGERANT TRANSFER PROCEDURES

Preparation

Preparing for refrigerant transfer using pumpout systems.

Operating the Optional Pumpout Unit

TO READ REFRIGERANT PRESSURES during pumpout or leak testing:

Methods for reading refrigerant pressures during pumpout.

Chillers with Isolation Valves

TRANSFER ALL REFRIGERANT TO CHILLER CONDENSER VESSEL

Transferring refrigerant to the condenser vessel.

TRANSFER ALL REFRIGERANT TO CHILLER COOLER VESSEL

Transferring refrigerant to the cooler vessel.

RETURN CHILLER TO NORMAL OPERATING CONDITIONS

Chillers with Storage Tanks

TRANSFER REFRIGERANT FROM PUMPOUT STORAGE TANK TO CHILLER

Transferring refrigerant from the pumpout tank to the chiller.

TRANSFER REFRIGERANT FROM CHILLER TO PUMPOUT STORAGE TANK

Transferring refrigerant from the chiller to the pumpout tank.

Establish a vacuum for service

GENERAL MAINTENANCE

Refrigerant Leak Testing

Methods for testing refrigerant leaks.

Test After Service, Repair, or Major Leak

Leak testing after service or repairs.

TO PRESSURIZE WITH DRY NITROGEN

Method for pressurizing with dry nitrogen for leak testing.

WEEKLY MAINTENANCE

Check the Lubrication System

Observing oil levels in sight glasses weekly.

SCHEDULED MAINTENANCE

Service Ontime

Resetting the service timer for tracking maintenance intervals.

Inspect the Control Panel

General cleaning and tightening of connections for the control panel.

Changing Oil and Oil Filter

Procedures for changing the oil and oil filter.

Changing Oil Filter

Changing Oil

Oil Separator Coalescer

Refrigerant Filter/Drier

Inspect Refrigerant Float System

Inspect Relief Valves and Piping

Inspect the Heat Exchanger Tubes

COOLER

Inspecting and cleaning cooler tubes.

CONDENSER

Inspecting and cleaning condenser tubes.

Water Treatment

Inspect the Starting Equipment

Check Pressure Transducers

TROUBLESHOOTING GUIDE

Overview

Introduction to the PIC II features for troubleshooting.

Checking Display Messages

Checking Temperature Sensors

RESISTANCE CHECK

Procedure to check sensor resistance.

CHECK SENSOR ACCURACY

Verifying sensor accuracy against a known temperature.

COOLER CONDENSER PRESSURE TRANSDUCER AND WATERSIDE FLOW DEVICE CALIBRATION

To calibrate these transducers:

Steps for calibrating cooler and condenser transducers.

Control Algorithms Checkout Procedure

CONTROL ALGORITHM STATUS

Viewing maintenance screens for control algorithms.

Control Test

Testing various chiller outputs and controls.

TRANSDUCER REPLACEMENT

Table 9 — CVC Primary and Secondary Messages and Custom Alarm/Alert Messages with Troubleshooting Guides

A. MANUAL STOP

Primary and secondary messages for manual stops.

B. READY TO START

Primary and secondary messages related to readiness for start-up.

C. IN RECYCLE SHUTDOWN

Primary and secondary messages for recycle shutdowns.

Table 9 — CVC Primary and Secondary Messages and Custom Alarm/Alert Messages with Troubleshooting Guides (cont)

D. PRE-START ALERTS

Alerts that delay start-up, requiring correction.

E. START-UP IN PROGRESS

Messages indicating the chiller is in the process of starting.

Table 9 — CVC Primary and Secondary Messages and Custom Alarm/Alert Messages with Troubleshooting Guides (cont)

F. NORMAL RUN

Messages indicating normal chiller operation.

G. NORMAL RUN WITH OVERRIDES

Messages indicating normal operation with overrides active.

H. OUT-OF-RANGE SENSOR ALARMS

Alarms triggered by sensors outside their normal range.

Table 9 — CVC Primary and Secondary Messages and Custom Alarm/Alert Messages with Troubleshooting Guides (cont)

I. CHILLER PROTECT LIMIT FAULTS

Faults related to chiller protective limits.

Table 9 — CVC Primary and Secondary Messages and Custom Alarm/Alert Messages with Troubleshooting Guides (cont)

I. CHILLER PROTECT LIMIT FAULTS (cont)

Continues listing faults related to chiller protective limits.

Table 9 — CVC Primary and Secondary Messages and Custom Alarm/Alert Messages with Troubleshooting Guides (cont)

J. CHILLER ALERTS

Alerts related to chiller operations.

Table 9 — CVC Primary and Secondary Messages and Custom Alarm/Alert Messages with Troubleshooting Guides (cont)

J. CHILLER ALERTS (cont)

Continues listing alerts related to chiller operations.

Control Modules

RED LED (Labeled as STAT)

Status indication of the STAT LED on modules.

GREEN LED (Labeled as COM)

Status indication of the COM LED on modules.

Notes on Module Operation

Chiller Control Module (CCM) (Fig. 43)

INPUTS

Describes the inputs for the Chiller Control Module.

OUTPUTS

Describes the outputs for the Chiller Control Module.

Integrated Starter Module (ISM) (Fig. 44)

INPUTS

Describes the inputs for the Integrated Starter Module.

OUTPUTS

Describes the outputs for the Integrated Starter Module.

Replacing Defective Processor Modules

INSTALLATION

Steps for installing a replacement processor module.

Solid-State Starters

SCR REMOVAL/INSTALLATION

Physical Data

Table 11 — 23XL Heat Exchanger Weights

Weights of heat exchanger components.

Table 12 — 23XL Compressor Weights

Weights of the 23XL compressor assemblies.

Table 13 — 23XL Component Weights

Weights of various chiller components.

Table 14A — 23XL Waterbox Cover Weights (Frame 1 and 2 Machines)*

Table 14B — 23XL Waterbox Cover Weight (Frame 4 Machines)*

Table 15 — Optional Storage Tank and/or Pumpout System Physical Data

Table 16 — Optional Storage Tank and/or Pumpout System Electrical Data

Table 17A — 23XL Waterbox Cover Weights (TC Frame 1 and 2 Chillers)*

Table 17B — 23XL Waterbox Cover Weight (TD Frame 4 Chillers)*

Table 18 — 23XL Compressor Torque Specification Chart for Metric amd American Fasteners

INITIAL START-UP CHECKLIST FOR 23XL HERMETIC SCREW LIQUID CHILLER

23XL PIC II SETPOINT TABLE CONFIGURATION SHEET

23XL PIC II TIME SCHEDULE CONFIGURATION SHEET OCCPC01S

ICE BUILD 23XL PIC II TIME SCHEDULE CONFIGURATION SHEET OCCPC02S

23XL PIC II TIME SCHEDULE CONFIGURATION SHEET OCCPC03S

23XL PIC II ISM_CONF TABLE CONFIGURATION SHEET

23XL PIC II OPTIONS TABLE CONFIGURATION SHEET

23XL PIC II SETUP1 TABLE CONFIGURATION SHEET

23XL PIC II SETUP2 TABLE CONFIGURATION SHEET

23XL PIC II LEADLAG TABLE CONFIGURATION SHEET

23XL PIC II RAMP_DEM TABLE CONFIGURATION SHEET

23XL PIC II TEMP_CTL TABLE CONFIGURATION SHEET

23XL BROADCAST (BRODEF) CONFIGURATION SHEET

Related product manuals