BYPASS CONTROLLER STAND-ALONE
OPERATION
When the bypass controller is operated in the Stand-
Alone mode, communications with a monitor thermostat is
not required. The bypass controller should be addressed out-
side the scanning range of the monitor thermostat. During
Stand-Alone mode, the bypass controller operates in Bypass
Damper Pressure mode. The following features are disabled
in Stand-Alone operation: System Setup, Changeover Cycle,
Indoor-Air Quality support, and Pressure Sensor Auto Zero.
BYPASS CONTROLLER CONFIGURATION
Configuration can be done manually with the information
buttons on the bypass controller, or by computer with the
system network software. Refer to each specific section in
this manual for detailed instructions on configuring the by-
pass controller options.
A special start-up category of options (category 8.0) has
been designated as the start-up category. This category con-
tains options that must be configured correctly before the
bypass controller will operate correctly.After installation, con-
figure the start-up (8.0) category first. The start-up category
will automatically be displayed when entering programming
mode after the bypass controller is powered up for the first
time (or when the bus and element addresses are set to 0).
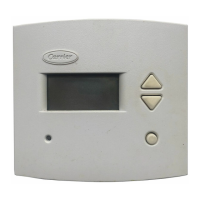
Manual Configuration — To manually configure the
bypass controller, press both upper or both lower informa-
tion buttons simultaneously. See Fig. 7 and 8. The configu-
ration screen will display the word "category" and the cur-
rent category number is displayed the lower right corner
(numbered from 1 to 14). Press the left upper or lower in-
formation buttons to access the different configuration cat-
egories. Press the select (right lower information) button to
accept the current category for modification. The word "op-
tion" will be displayed and the current option number and
configuration of the option are shown. The escape (right up-
per information) button can be used to return to the category
screen. The categories will loop around when scrolling from
14 back to 1.
The left upper and lower information buttons are used to
toggle through the options of each category. The option num-
ber is displayed in the lower right corner of the screen. See
Table 1 for categories and options. When the desired option
is shown on the screen, press the select button. The config-
urable data will flash. The left information buttons are used
to toggle the data values. When the desired setting is shown
press the select button to store the change. To exit without
saving changes, press both upper or both lower information
buttons or press the escape button. If the bypass controller
is in programming mode for 3 minutes without any user
input, the bypass controller reverts back to normal display
operation.
Each option is discussed in detail in this manual. Refer to
the appropriate section for more information.
Computer Configuration — To configure the bypass
controller on the network, Carrier network software must be
running.
BYPASS CONTROLLER DISPLAY
This section describes those functions that relate to infor-
mation displayed by the bypass controller. To configure
the bypass controller the installer utilizes the information
buttons.
Fig. 7 — Bypass Controller
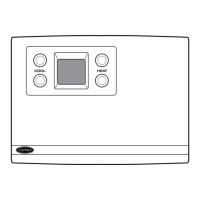
Fig. 8 — Bypass Controller Programming Buttons
8

 Loading...