17-EN 18-EN
– 9 –
4 Installation
REQUIREMENT
Strictly comply with the following rules to prevent damage of the indoor units and human injury.
y Do not put a heavy article on the indoor unit. (Even units are packaged)
y Carry in the indoor unit as it is packaged if possible. If carrying in the indoor unit unpacked by necessity, be sure
to use buffering cloth, etc. to not damage the unit.
y To move the indoor unit, hold the hooking metals (4 positions) only.
Do not apply force to the other parts (refrigerant pipe, drain pan, foamed parts, or resin parts, etc.).
y Carry the package by two or more persons, and do not bundle it with plastic band at positions other than
specied.
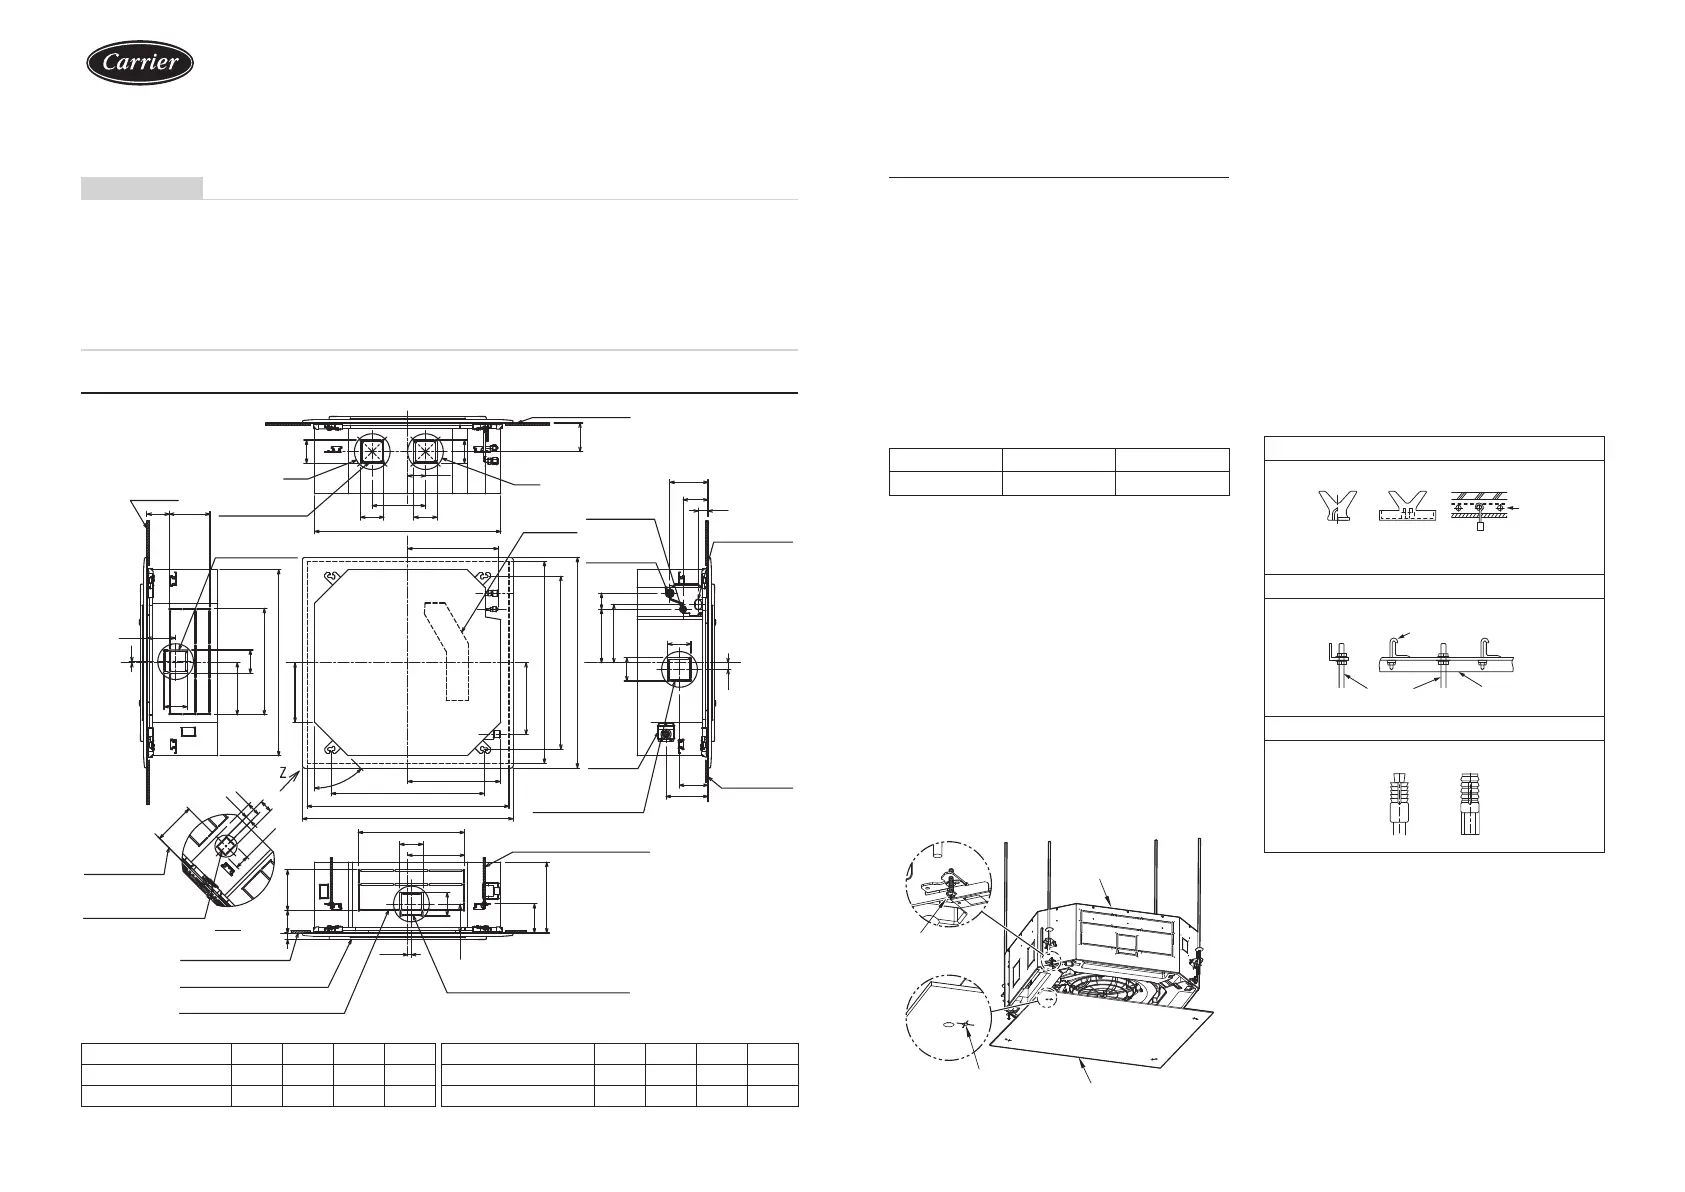
External view (Unit: mm)
D
D
A
Ceiling bottom surface
129
105
105
Ø162
80
105105
240
840 Unit external dimension
Ø162
408
Electrical
control box
Refrigerant pipe
connecting port
(Liquid) B
Refrigerant pipe
connecting port
(Gas) C
172
112
44
Take-in port of wires
Ceiling bottom
surface
Drain pipe
connecting
port
Knockout square hole
for divide duct
For Ø150
72241.5
263
105
105
30
129
189
Hanging bolt M10 or Ø3/8
(Locally procured)
480
105
256.5
105
132
10130
129
16.5
Knockout square hole for divide duct
For Ø150
Knockout square hole for humidier
Ceiling panel (sold separately)
Ceiling bottom surface
Z view
Knockout for simple OA
For Ø100
Ceiling bottom
surface
187
64
57
61
28.5
129
5
105
105
235
480
840
269
323
Knockout square hole
for divide duct
For Ø150
Knockout square
hole for divide duct
For Ø150
Ceiling bottom
surface
101
45º
416.5
690 ± 20 Hanging bolt pitch
860 to 910 Ceiling opening dimension
950 Panel external dimension
950 Panel external dimension
780 Hanging bolt pitch
860 to 910 Ceiling opening dimension
Model A B C D Model A B C D
009S ~ 012S 256 Ø6.4 Ø9.5 120 024S ~ 030S 256 Ø9.5 Ø15.9 120
015S ~ 018S 256 Ø6.4 Ø12.7 120 036S ~ 056S 319 Ø9.5 Ø15.9 183
Opening a ceiling and
installation of hanging bolts
y Consider the piping / wiring before the unit is hung
when determining the location of the indoor unit
installation and orientation.
y After the location of the indoor unit installation
has been determined, open the ceiling and install
hanging bolts.
y The dimensions of the ceiling opening and hanging
bolt pitches are given in the outline drawing and the
attached installation pattern.
y When a ceiling already exists, lay the drain pipe,
refrigerant pipe, indoor unit / outdoor unit connection
wires, and remote controller wires to their connection
locations before hanging the indoor unit.
Procure hanging bolts and nuts for installing the indoor
unit (these are not supplied).
Hanging bolt M10 or W3/8 4 pieces
Nut M10 or W3/8 12 pieces
◆ Using the installation pattern
(accessory)
The installation pattern is provided inside the
packaging cap.
<For existing ceiling>
Use the installation pattern positioning a ceiling
opening and hanging bolts.
<For new ceiling>
Use the installation pattern to position the ceiling
opening when hanging a ceiling.
y After the hanging bolts have been installed, install
the indoor unit.
y Hook the four holes in the installation pattern to the
panel xing screws of the indoor unit.
y When hanging a ceiling, open the ceiling along the
outside dimensions of the installation pattern.
Indoor unit
Panel xing
screw
Hole
Installation pattern (Accessory)
◆ Treatment of ceiling
The ceiling differs according to structure of building.
For details, consult your constructor or interior nish
contractor.
In the process after the ceiling board has been
removed, it is important to reinforce ceiling foundation
(frame) and to keep horizontal level of installed ceiling
correctly in order to prevent vibration of ceiling board.
1. Cut and remove the ceiling foundation.
2. Reinforce the cut surface of ceiling foundation, and
add ceiling foundation for xing the end of ceiling
board.
◆ Installation of hanging bolt
Use M10 hanging bolts (4 pcs, locally procured).
Matching to the existing structure, set pitch according
to size in the unit external view as shown below.
New concrete slab
Install the bolts with insert brackets or anchor bolts.
(Blade type
bracket)
(Slide type
bracket)
(Pipe hanging
anchor bolt)
Rubber
Anchor bolt
Steel ame structure
Use existing angles or install new support angles.
Hanging bolt
Hanging bolt
Support angle
Existing concrete slab
Use a hole-in anchors, hole-in plugs, or a hole-in bolts.
IM_1115350185.indb 9IM_1115350185.indb 9 26/6/2566 BE 14:5726/6/2566 BE 14:57
 Loading...