5
3. Fan powered terminals require sufficient clearance for ser-
vicing the blower/motor assembly from the bottom of the
unit, low voltage controls from the side and line voltage
motor controls or electric heat (if equipped) from the rear
(discharge end) of the unit.
Bottom access panel removal requires a minimum of 3 in.
minimum clearance, plus substantial horizontal clearance to
slide the access panel out of the way for service. Actual hori-
zontal dimensions will vary due to varying access panels for
different sized units. See your particular unit’s submittal
drawings for more detail.
NOTE: Be certain appropriate accommodations for panel
removal of most unit casings are large enough to allow ade-
quate internal service room once the panels are removed.
A clearance of 18 in. is recommended for control enclosure
access. Unit control enclosure will vary depending on which
control package is used. Control enclosure location is speci-
fied on unit submittals. Low voltage enclosure covers are
removable, not hinged.
A clearance of 36 in. is recommended for line voltage motor
controls and electric heat control access. High-voltage motor
controls or electric heat control access is supplied with hinged
access doors for units with fused disconnect. Specific loca-
tion is indicated on the unit submittal.
NOTE: These recommendations do not supersede NEC
(National Electrical Code) or local codes that may be applica-
ble, which are the responsibility of the installing contractor.
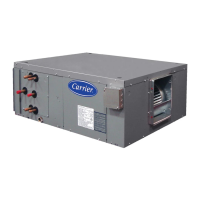
4. Whenever possible, fan-powered boxes should be installed
over halls or passageways (rather than over occupied
spaces) in order to limit the sound reaching occupants.
POSITION UNIT
1. When moving boxes, use appropriate material handling
equipment and avoid contact with shaft extensions, con
-
trols, wiring, piping, heaters, and control boxes.
2. Raise unit to position using safe mechanical equipment
and support until hanging means are attached and box is
level.
INSTALL UNIT
1. Install field-supplied eye bolts, strap hangers or bolt rod
supports. Figure
6 illustrates possible unit suspension
methods. A typical installation is shown in Fig. 7.
2. Care should be taken to use hanging materials of sufficient
stiffness and strength, rigidly attached to the unit. Straps
should not be located on coil flanges, electric heat sec
-
tions, or control boxes. When using trapeze supports,
avoid areas where access is required to side mounted con
-
trols, or side or bottom access doors. For best installation
with trapeze supports, provide elastomeric material
between unit and supports.
3. Hangers should be securely attached to bar joist or mount-
ing anchors properly secured to building structure with
lugs or poured-in-place hangers. Percussion nails are not
considered adequate anchors.
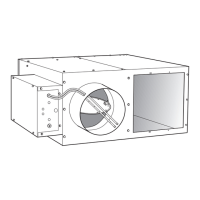
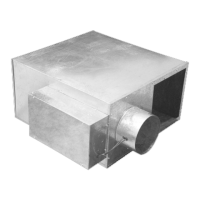
Step 2 — Make Duct Connections
1. Install supply ductwork on each of the unit inlet collars. It
is recommended that 3 duct diameters of straight duct are
supplied to the inlet of the unit. An elbow put at the inlet
of the unit will create turbulence at the inlet making it dif
-
ficult for the flow sensor to accurately measure the air-
flow. Check that the pressure pick-up in primary air collar
is located properly and that air supply duct connections are
airtight. Install supply ductwork on unit inlet collar, fol
-
lowing all accepted medium-pressure duct installation pro-
cedures. Seal joints against leakage.
NOTE: For maximum efficiency in controlling radiated noise in
critical applications, inlet ducts should be fabricated of 24-gage
minimum sheet metal in place of flex connections. Flex duct is ex
-
tremely transparent to radiated sound; consequently high inlet stat-
ics (Ps) or sharp bends with excessive pressure drop can cause a
radiated noise problem in the space. If flex duct is used, it should
be limited to the connection between the distribution duct and the
boot diffuser.
2. Install the discharge duct. On units with electric heat, the
recommended minimum distance of straight duct before
any transitions, elbows or branch connections is 48 inches.
It is strongly recommended that lined discharge duct be
used downstream of the unit. Insulate duct as required.
3. Fan boxes should not be attached to octopus sections
immediately downstream of the unit.
4. Install optional return-air filters before operating the unit.
5. Where construction filters were supplied with the box,
leave filters in place until installation is complete and
building is cleaned for occupancy.
Step 3 — Connect Power Wiring
1. All power wiring must comply with local codes and with
the NEC (National Electrical Code) ANSI/NFPA (Ameri
-
can National Standards Institute/National Fire Protection
Association) 70-2020. Disconnect switches are optional
equipment. Electrical, control and piping diagrams are
shown on the exterior labeling or on a diagram inside the
control and high-voltage enclosure covers, unless other
-
wise specified in the order write-up. All units are wired for
a single point electrical connection to the fan and electric
heater (if equipped). Electric heaters provided by Carrier
are balanced by kW per stage. The installing electrician
should rotate incoming electric service by phase to help
balance overall building load.
2. All field wiring must be provided with a safety disconnect
per NEC 424-19, 20, and 21.
3. Disconnect all incoming power before wiring or servicing
unit. All disconnect switches on the terminal (if equipped)
should be in the OFF position while making power con
-
nections.
4. Units with electric heat should use copper wires rated at
least 125% of rating plate amperage. Refer to the unit’s
rating label and minimum supply circuit amps.
5. Refer to wiring diagram and instructions attached to the
unit. Refer to Fig.
8 for typical power connections for fan
powered units with 3-stage electric heat. The 480-v, 3-
phase units require a Wye power source with a fourth
(neutral) wire in addition to the full sized ground wire. All
units must be grounded as required by NEC 424-14 and
250.
 Loading...