14
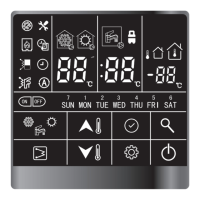
This wired controller can be used to congure the system setting during installation and operation. Here follow two
congurationsections:userparameterscongurationandtechnicalparametersconguration,pleasecheckthedetailsin
3.1 & 3.2.
3.1. Userparameterconguration
Pressthe“settings”buttontoentertheuserparameterscongurationinterfaceandpressthisbuttontopagedownthe
setting items from 0-9 as circuit. Use the “up” or “down” button to change the value of each item.
Detailsoftheuserparameterscongurationtablearegivenbelow:(TheNo.inthetablebelowwillbedisplayedintheleft
LED tube except “0”)
No. Item Description
j Pressthe“settings”buttonandthenpress“conrm”toenterdatesettingsand
then press “up” or “down” button to change the date if necessary;
k Next,press“conrm”toenterhoursettings,press“up”or“down”tosetthecorrect
time in hours;
l Next,press“conrm”toenterminutesettingsandpress“up”or“down”buttonto
set the correct time in minutes.
m Press“conrm”toconrmandexitclocksettings.
Youcanalsopress“settings”buttontogotothenextparameter.
j Pressandholdthe“conrm”button,theicon“on”willash,thenpress“conrm”,
and the “on” icon will light up constantly;
k Press and hold the “down” button to enter day settings, then press “up” or “down”
buttontoselecttheday,press“conrm”,andtheiconwillremainlitup;
l Press and hold the “down” button to enter hour settings, then press “up” or “down”
toselectthetimeinhours,press“conrm”.
m Press and hold the “down” button to enter minute settings, then press “up” or
“down”toselectthetimeinminutesandpress“conrm”.
n Press and hold the “down” button toset the timer o, then press the“down”
button to enter hour settings, then press “up” or “down” button to select the time
inhours,andpress“conrm”.
o Press and hold “down” button to enter minute settings, then press “up” or “down”
toselectthetimeinminutes,pressthe“conrm”buttontoconrm;
p Pressandhold“conrm”toconrmandexitusersettings.Youcanalsopressthe
“settings” button to go to the next item.
This is used to record the settings if power is shutdown, and the system will recover
the previous status once power is back.
j Press “up” or “down” button to set the value;
0- With power memory (default);
1- Without power memory
3 WIFI Status Reserved
j Press the “up” or “down” button to set the value;
0- Do not start air purge mode
1- Start air purge mode
If choosing 0, then press the “settings” button to go to the next item;
Ifchoosing1,thenpressthe“conrm”buttontoexitthesettingsandunitwillstart
3.Conguration
Clock settings
Schedule of DHW
0
1
Power memory setting2
Air purge mode4

 Loading...


