EasyManua.ls Logo

Cateye STRADA - User Manual

Cateye STRADA
2 pages
Print Icon
To Next Page IconTo Next Page
Loading...
AC
MENU
MODE
4
6
9
8
5
2
1
3
7
MENUMENU
MODEMODE
MENUMENU
MODEMODE
MODEMODE
MODEMODE
Tire circumference
reference table
12 x 1.75
14 x 1.50
14 x 1.75
16 x 1.50
16 x 1.75
18 x 1.50
18 x 1.75
20 x 1.75
20 x 1-3/8
22 x 1-3/8
22 x 1-1/2
24 x 1
24 x 3/4
Tubular
24 x 1-1/8
24 x 1-1/4
24 x 1.75
24 x 2.00
24 x 2.125
26 x 7/8
26 x 1
(
59
)
26 x 1
(
65
)
26 x 1.25
26 x 1-1/8
26 x 1-3/8
26 x 1-1/2
26 x 1.40
26 x 1.50
26 x 1.75
26 x 1.95
26 x 2.00
26 x 2.10
26 x 2.125
26 x 2.35
26 x 3.00
27 x 1
27 x 1-1/8
27 x 1-1/4
27 x 1-3/8
650 x 20C
650 x 23C
650 x 35A
650 x 38A
650 x 38B
700 x 18C
700 x 19C
700 x 20C
700 x 23C
700 x 25C
700 x 28C
700 x 30C
700 x 32C
700C Tubular
700 x 35C
700 x 38C
700 x 40C
29 x 2.1
29 x 2.3
935
1020
1055
1185
1195
1340
1350
1515
1615
1770
1785
1753
1785
1795
1905
1890
1925
1965
1920
1913
1952
1953
1970
2068
2100
2005
2010
2023
2050
2055
2068
2070
2083
2170
2145
2155
2161
2169
1938
1944
2090
2125
2105
2070
2080
2086
2096
2105
2136
2146
2155
2130
2168
2180
2200
2288
2326
Tire size L (mm)
MENUMENU
MODEMODE
L mm
2
1
2
1
8
8
6
5
3
9
3
4
4
3
5 mm
3
2
1
4
4 5
Measure wheel
circumference (L) of
your bike
To get the most accurate
calibration do a wheel roll
out. With the valve stem
perpendicular to the ground,
mark the pavement at the
valve stem. With the riders
weight on the bike, roll the
wheel one tire revolution in a
straight line and mark the
ground when the valve stem
is perpendicular to the
ground again. Measure the
distance in millimeters. This
is the most accurate wheel
calibration number.
Switch the
screen or
move digits
(by pressing
& holding)
Enter the tire circumference
Enter the tire circumference of your bicycle in
mm.
* Refer to the tire circumference reference table.
Pull securely
1
2
3
4
km/h mph
Increase
Move digits
(by pressing
& holding)
Register the
setting
Register
the setting
Clear all data (initialization)
Press the AC button on the back.
Select the desired speed units
Select “ ” or “ ”.
How to install the unit on your bicycle
Sensor line
Inside of right
front fork
Stem
Handlebar
Inside of right
front fork
Inside of right
front fork
* Attach between one and three sensor pads 7,
putting them together as required.
24h 12h,
or increase
the value
Register
the
setting
(finish)
To the sensor
Cut
Set the clock
When MODE is pressed and held, “Displayed
time”, “Hour”, and “Minute” will appear, in
this order.
When attaching the bracket to the handlebar
Caution:
Tighten the bracket, ensuring that the
cable does not get caught in the stem.
Caution:
Tighten the bracket, ensuring that the cable
does not get caught in the handlebar.
B
The clearance between the sensor surface
and the magnet must not exceed 5mm.
Attach the bracket to the stem or handlebar
When attaching the bracket to the stem
Wrap the cable around
the front brake cable
Caution:
Turn the handlebar to
make sure wire does
not hinder full rotation.
Caution:
Round off the cut edge of the
bracket band to prevent injury.
Install the sensor and magnet :
A
The magnet should pass
through the sensor line.
Install the sensor
1 Bracket band
2 Bracket
3 Sensor
4 Magnet
5 Sensor rubber band (x2)
6 Sensor hook
7 Sensor rubber pad (x3)
8 Bracket rubber pad
9 Nylon ties (x5)
: Speed unit
: Wheel size icon
AC
Remove/install the computer
Holding the unit
Push outward
Spoke
Preparing the computer
* After installation, rotate the front wheel gently to check that the speed is displayed on the
computer. If the speed is not displayed, check that conditions
A
and
B
are satisfied.
Toward the sensor line
WARNING / CAUTION
Do not concentrate on the computer while riding. Ride safely!
Install the magnet, sensor, and bracket securely. Check these periodically.
If a child swallows a battery, consult a doctor immediately.
Avoid having the computer in direct sunlight for unnecessary or extended periods.
Do not disassemble the computer.
Do not drop the computer. Doing so may result in a computer malfunction or damage.
When using the computer installed on the bracket, change the MODE by pressing on the
three dots below the screen. Pressing hard on other areas can result in malfunction or
damage to the computer.
Never place the computer on a metal surface. If you do, the contact points will conduct
electricity, discharging the battery.
Tighten the dial on the Flex-Tight bracket by hand only. Over-tightening can damage the
bracket threads.
When cleaning the computer, bracket and sensor, do not use thinners, benzene, or
alcohol.
Dispose of used batteries according to local regulations.
LCD screen may be distorted when viewed through polarized sunglass lenses.
Battery case cover
Contact
* You can also use ties 9 (in place of sensor rubber
band 5) to secure the sensor.
Install the magnet
Click
Push!
When the computer is
mounted on the bracket
CATEYE STRADA
CYCLOCOMPUTER CC-RD100
U.S. Pat. Nos. 5236759/6957926 Pat./Design Pat. Pending
Copyright© 2006 CATEYE Co., Ltd.
CCRD10-061114 066600501 3
ENG
Question and Answer IconNeed help?

Do you have a question about the Cateye STRADA and is the answer not in the manual?

Summary

Safety Warnings and Precautions

Riding and General Safety

Prioritize safe riding. Avoid concentrating on the computer while cycling.

Installation, Handling, and Environmental Safety

Secure installation, avoid sun exposure, drops, metal surfaces, harsh cleaners, and ensure proper computer operation.

Computer Preparation and Setup

Data Initialization

Clear all data by pressing the AC button on the back of the computer.

Speed Unit Selection

Select desired speed units: km/h or mph, and register the setting.

Tire Circumference Entry

Enter bicycle tire circumference in mm using increase and register functions.

Clock Setting

Set the clock by pressing and holding MODE to display time, hour, and minute.

Bicycle Installation Guide

Bracket Attachment

Attach bracket to stem or handlebar, ensuring cable clearance and secure fit.

Cable Routing

Wrap the front brake cable around the bracket band, ensuring full rotation is not hindered.

Sensor and Magnet Installation

Install sensor on fork and magnet on spoke, maintaining 5mm clearance.

Computer Mounting

Mount the computer onto the bracket, checking for speed display upon gentle rotation.

Computer Operation and Display

Measuring Screen Functions

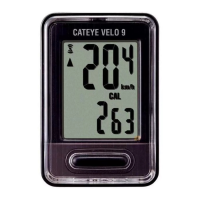
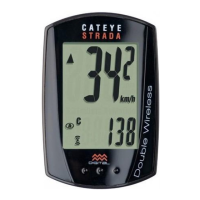
Display elements include pace arrow, current speed, trip distance, average speed, max speed, total distance, and clock.

Computer Function Switching

Press MODE to switch functions sequentially: Dst, Tm, Odo, Clock, etc.

Measurement Control

Measurements occur automatically; km/h or mph flashes during measurement.

Data Resetting

Reset measurement data by pressing and holding MODE, except for total distance.

Power Saving Mode

Activates after one hour of no signal; clock displayed, resumes with signal or MODE press.

Settings Menu Navigation

Accessing Menu

Press MENU in any mode to enter the menu screen.

Changing Settings

Press MODE to cycle through screens; press and hold MODE to change the displayed setting.

Specific Setting Options

Options include Wheel Selection, Wheel Size Entry, Clock Setting, Total Distance Manual Entry, and Speed Unit.

Troubleshooting Common Issues

Bracket Contact Issue

Ensure no dirt between bracket and computer for proper function.

Speed;Distance Display Failure

Check magnet-sensor clearance, contact points, and wire integrity.

No Display or Incorrect Data

Check battery, reinitialize computer, or reinitialize for incorrect data.

Specifications and Parts

Technical Specifications

Details on battery, dimensions, weight, working temperature, and wheel circumference range.

Standard Included Parts

List of standard parts such as bracket band, bracket/sensor, wheel magnet, and parts kit.

Maintenance and Battery Replacement

Cleaning Instructions

Use diluted neutral detergent on a soft cloth, then wipe dry.

Battery Replacement Procedure

Replace with CR1620 battery, ensuring correct orientation and waterproof seal.

Overview

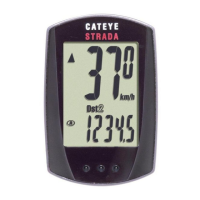
The CATEYE STRADA CYCLOCOMPUTER CC-RD100 is a bicycle computer designed to track various cycling metrics. It provides essential information to cyclists, including speed, distance, elapsed time, and clock functions.

Function Description

The device primarily functions as a cyclocomputer, displaying real-time and accumulated data. Its core functions include:

  • Elapsed Time (Tm): Measures the duration of your ride, from 0:00'00" up to 9:59'59".
  • Trip Distance (Dst): Tracks the distance covered during a single ride, ranging from 0.00 to 999.99 km (or miles).
  • Trip Distance-2 (Dst2): Offers a second trip distance measurement, from 0.00 to 999.99 km (or miles), then automatically switching to 1000.0 to 9999.9 km (or miles) for longer rides. This is useful for tracking different segments or specific routes.
  • Average Speed (Av): Calculates your average speed for the current ride, from 0.0 to 200.0 km/h (or 0.0 to 125.0 mph). If the elapsed time or trip distance exceeds certain limits, an "E" (Error) will be displayed.
  • Maximum Speed (Mx): Records the highest speed achieved during your ride, from 0.0 to 200.0 km/h (or 0.0 to 125.0 mph).
  • Total Distance (Odo): Accumulates the total distance covered over the lifetime of the computer, from 0.0 to 9999.9 km (or miles), then switching to 10000 to 99999 km (or miles). This value is never reset by normal operations.
  • Clock: Displays the current time in either 24-hour (0:00 - 23:59) or 12-hour (1:00 - 12:59) format.
  • Pace Arrow: A visual indicator (▲ or ✔) that shows whether your current speed is faster or slower than your average speed.
  • Current Speed: Displays your real-time speed, from 0.0 to 200.0 km/h (or 0.0 to 125.0 mph).
  • Selected Mode: Indicates which data function is currently being displayed on the screen.

The computer automatically starts and stops measurement when the bicycle is in use. During measurement, the speed unit (km/h or mph) flashes.

Usage Features

The CATEYE STRADA CC-RD100 is designed for ease of use, with clear instructions for installation and operation.

Preparation:

  1. Clear All Data (Initialization): Before first use or after battery replacement, press the AC button on the back of the computer to clear all stored data.
  2. Select Speed Units: Choose between "km/h" or "mph" as your preferred speed unit. This is done through the menu screen.
  3. Enter Tire Circumference: Input the circumference of your bicycle's wheel in millimeters. A reference table is provided in the manual, or users can perform a precise "wheel roll out" measurement for accuracy. The computer supports two wheel size settings (A and B) for shared use between two bicycles.
  4. Set the Clock: Configure the current time in either 24-hour or 12-hour format.

Installation:

The computer system consists of a bracket, sensor, and magnet.

  • Bracket Installation: The bracket can be attached to the stem or handlebar using a band. It's crucial to tighten it securely, ensuring the cable doesn't get caught.
  • Cable Management: The sensor cable should be wrapped around the front brake cable to prevent it from hindering handlebar rotation. Any excess bracket band should be cut and rounded off to prevent injury.
  • Sensor and Magnet Installation: The sensor attaches to the front fork, and the magnet attaches to a spoke. The magnet must pass through the sensor line, and the clearance between the sensor surface and the magnet should not exceed 5mm. Sensor pads can be used to adjust the sensor's position, and nylon ties can be used as an alternative to rubber bands for securing the sensor. After installation, gently rotate the front wheel to verify that speed is displayed on the computer.

Operation:

  • Switching Functions: While the computer is mounted on the bracket, press the three raised dots below the screen to cycle through the different data functions (Tm, Dst, Dst2, Av, Mx, Odo, Clock). Pressing hard on other areas of the computer should be avoided to prevent malfunction.
  • Resetting Data: To reset measurement data (except Dst2 and Odo), display the desired data and then press and hold the MODE button. To reset Dst2, display Dst2 and then press and hold MODE. The Total Distance (Odo) is never reset.
  • Power-Saving Function: To conserve battery life, the computer automatically enters a power-saving mode if no signal is received for an hour, displaying only the clock. The main display reappears when a signal is detected or the MODE button is pressed.

The menu screen allows users to change settings. Pressing MENU brings up the menu, and pressing MODE cycles through menu options. Pressing and holding MODE changes the setting of the displayed menu. Options include:

  • Wheel Selection: Toggles between two specified wheel sizes (A and B).
  • Wheel Size Entry: Allows input of the tire circumference.
  • Clock Setting: Configures the time.
  • Total Distance Manual Entry: Enables manual input of the total distance, useful after battery replacement to restore the accumulated mileage.
  • Speed Unit: Toggles between km/h and mph.

Troubleshooting:

The manual provides guidance for common issues, such as MODE not working, speed/distance not displaying, or incorrect data. It advises checking for dirt, sensor-magnet clearance, cable integrity, and battery status.

Maintenance Features

  • Cleaning: To clean the computer or accessories, use a diluted neutral detergent on a soft cloth, then wipe with a dry cloth. Avoid using thinners, benzene, or alcohol.
  • Battery Replacement: If the display appears faded, the battery needs to be replaced. The device uses a CR1620 lithium battery. Install the new battery with the (+) side facing upward. After replacement, the computer must be reinitialized. It's crucial to ensure the rubber packing is properly seated when closing the battery case cover to maintain its waterproof seal. A precision screwdriver is required for battery replacement.
  • Disposal: Used batteries should be disposed of according to local regulations.

Safety Precautions:

  • Always ride safely and avoid concentrating solely on the computer.
  • Ensure the magnet, sensor, and bracket are securely installed and check them periodically.
  • Keep batteries away from children; consult a doctor immediately if swallowed.
  • Avoid prolonged direct sunlight exposure for the computer.
  • Do not disassemble or drop the computer.
  • When operating the computer on the bracket, only press the three raised dots below the screen.
  • Never place the computer on a metal surface, as this can discharge the battery.
  • Tighten the Flex-Tight bracket dial by hand only to avoid damaging threads.
  • Be aware that the LCD screen may appear distorted when viewed through polarized sunglasses.

Cateye STRADA Specifications

General IconGeneral
DisplayLCD
ConnectivityWired
Battery TypeCR2032
MountingHandlebar mount
Current SpeedYes
Maximum SpeedYes
Average SpeedYes
Trip DistanceYes
Total DistanceYes
ClockYes
FunctionsSpeed, Distance, Time, Clock
Battery LifeApprox. 1 year

Related product manuals