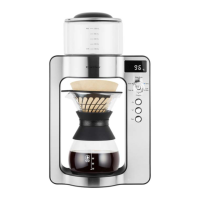
The Catler CM 4012 is a sophisticated coffee maker designed for brewing filtered coffee, offering both automatic and manual brewing modes, a built-in scale, and hot water dispensing capabilities. It prioritizes user safety and convenience with several features and warnings.
Function Description
The primary function of the Catler CM 4012 is to brew filtered coffee. It achieves this through a precise heating and dispensing system that ensures even saturation of ground coffee. The device also features a hot water dispensing mode, allowing users to heat water to a desired temperature for other uses. A built-in electronic scale is integrated to accurately weigh ground coffee, contributing to consistent brewing results. The coffee maker includes a delay start function for both automatic and manual brewing, enabling users to program brewing to begin at a specific time. An automatic stand-by mode conserves energy when the appliance is inactive.
Important Technical Specifications
The water tank has a maximum capacity of 1 liter (1000 mL). The brewing temperature can be set in the manual mode from 80 °C to 98 °C, while the automatic brewing mode is preset to 93 °C. The coffee-to-water ratio in manual mode can be adjusted from 1:10 (strong coffee) to 1:20. The built-in electronic scale has an accuracy of +/-3 g per 1 kg, with a range of 0 – 3 kg. The appliance is designed for household use and operates on a properly grounded electrical socket. It is equipped with a safety thermal fuse that automatically cuts off the electrical circuit in case of overheating. The descaling indicator light flashes after 50 brewing cycles, prompting maintenance.
Usage Features
Before First Use:
Upon unpacking, all packaging and advertising labels should be removed. The silicone cover, carafe, and stainless-steel filter should be washed with warm water and a small amount of dishwashing detergent, then rinsed and dried. The coffee maker body, water tank, and lid should be wiped with a slightly moistened sponge and dried. A crucial step before first use, or after a long period of non-use, is to flush the coffee maker with clean, hot water. This involves filling the water tank to the Max mark, placing the carafe under the dispensing vent (without a filter), turning the rotary knob to "Hot Water," setting the temperature to "100 °C" using the ▼/▲ buttons, and pressing the button to start heating and dispensing the water.
Clock Setting:
After plugging in, the display will flash "0:00." The ▼/▲ buttons are used to set hours and minutes, with the button confirming each setting. Correct clock setting is essential for the delay start functions.
Filling the Water Tank:
Only clean, cold water should be used. The water tank lid is removed, water is poured in, ensuring levels are between the minimum and maximum marks, and the lid is replaced. A sensor at the tank bottom measures water temperature, so proper lid placement is vital for efficient heating.
Automatic Coffee Brewing:
- Fill the water tank with clean, cold water, observing min/max marks.
- Place the stainless-steel filter into the carafe neck, insert a V-shaped paper filter (size 4), and place the carafe into the coffee maker.
- Turn the rotary knob to "Brew Mode A/M," select "AUTO" using ▼/▲ buttons.
- Press TARE, remove the carafe.
- Add the desired amount of ground drip-coffee into the paper filter.
- Place the carafe back; the display will show the weight of the ground coffee.
- Press the button to start. The button will flash, and the coffee maker will heat water, displaying the actual temperature.
- During brewing, the preset temperature (93 °C), coffee-to-water ratio (1:15), or coffee volume can be checked by rotating the knob.
- Once 93 °C is reached, water is slowly dispensed through a rotary mechanism for even brewing.
- After an initial 30-second brewing pause, water dispensing resumes until the total water amount is 15 times the ground coffee weight.
- The display will show the total coffee amount.
- After all coffee has dripped, carefully remove filters and place the stainless-steel filter in its holder to cool.
Manual Coffee Brewing:
- Fill the water tank with clean, cold water, observing min/max marks.
- Place the stainless-steel filter into the carafe neck, insert a V-shaped paper filter (size 4), and place the carafe into the coffee maker.
- Turn the rotary knob to "Brew Mode A/M," select "MANUAL" using ▼/▲ buttons.
- Press TARE, remove the carafe.
- Add the desired amount of ground drip-coffee into the paper filter.
- Place the carafe back; the display will show the weight of the ground coffee.
- Set parameters:
- Water temperature: Turn the rotary knob to "Temp," use ▼/▲ buttons to set between 80 °C and 98 °C. Press the button or wait for the display to stop flashing.
- Coffee-to-water ratio: Turn the rotary knob to "C/W Ratio," use ▼/▲ buttons to set between 1:10 and 1:20. Press the button or wait for the display to stop flashing.
- Press the button to start. The button will flash, and the coffee maker will heat water, displaying the actual temperature.
- During brewing, the set temperature, ratio, or coffee volume can be checked by rotating the knob.
- Once the set temperature is reached, water is slowly dispensed through a rotary mechanism.
- After an initial 30-second brewing pause, water dispensing resumes until the total water amount matches the set ratio.
- The display will show the total coffee amount.
- After all coffee has dripped, carefully remove filters and place the stainless-steel filter in its holder to cool.
Delay Start (Automatic/Manual Brewing):
- For automatic brewing, follow steps 1-6 of "Automatic Coffee Brewing." For manual brewing, follow steps 1-7 of "Manual Coffee Brewing."
- Turn the rotary knob to "Program." The display will show the last delay start setting.
- Use ▼/▲ buttons to set the desired start time, confirming with the button.
- Press the button to activate delay start. The display will show "AUTO" or "MANUAL" and "PROG," then revert to the actual time and "PROG."
- At the set time, brewing will commence according to the programmed parameters.
Hot Water Dispensing:
- Fill the water tank with clean, cold water, observing min/max marks.
- Place the carafe under the dispensing vent (no filter needed).
- Turn the rotary knob to "Hot Water." The display shows the current water temperature.
- Use ▼/▲ buttons to set the desired water temperature (higher than current).
- Press the button to start heating. The display will show the actual water temperature.
- Once the set temperature is reached, the coffee maker will dispense the entire amount of hot water into the carafe.
Built-in Scale:
The electronic scale is precise and temperature-sensitive. Always press the TARE button before weighing ground coffee to ensure accuracy. Avoid placing heavy objects (over 3 kg) on the scale to prevent damage.
Maintenance Features
Descaling:
- The descaling indicator light will flash after 50 brewing cycles.
- Fill the water tank to the Max mark with clean water and add the required amount of citric acid.
- Turn the rotary knob to "Clean." The display will show "100 °C."
- Press the button to start heating. The display will show the actual water temperature.
- Once 100 °C is reached, the coffee maker will dispense hot water until the tank is empty.
- The descaling process is complete when the indicator light stops flashing.
Care and Cleaning:
- Always disconnect the power plug and allow the appliance to cool before cleaning.
- Clean immediately after use to prevent deposits.
- WARNING: Do not wash the appliance, mains cord, or plug under running water, or immerse them in any liquid.
- CAUTION: Do not use sharp objects, chemicals, thinners, petrol, or steam cleaners. No part of the coffee maker is dishwasher safe.
- Cleaning the Carafe: Allow to cool, carefully remove the silicone cover. Wash in warm water with a small amount of dishwashing detergent, rinse, and dry. For heavy soiling, fill with warm water and detergent, let stand, then wash. A soft bottle brush can be used. Reattach the silicone cover to the carafe neck.
- Cleaning Filters: Place the stainless-steel filter with the paper filter and brewed coffee into the holder to cool. Dispose of brewed coffee and paper filter (check manufacturer recommendations for composting). Wash the stainless-steel filter in warm water with a small amount of dishwashing detergent, rinse, and dry.
- Cleaning the Coffee Maker Body: Wipe the body, water tank, and lid with a slightly moistened sponge and dry thoroughly.
Storage:
Ensure the appliance is clean, dry, and completely cooled before storing. Store in a well-ventilated dry place, out of reach of children and animals.
Safety Warnings:
- The appliance is not for use by children. Keep it and its power cord away from children.
- Persons with reduced physical, sensory, or mental capabilities, or lack of experience/knowledge, may use it if supervised or instructed and understand potential dangers.
- Children must not play with the appliance.
- If the power cord is damaged, have it repaired by a professional service center. Do not use if the power cord is damaged.
- WARNING: Risk of injury if used incorrectly.
- Always disconnect from power supply when unsupervised.
- Designed for household use only; not for staff kitchens, hotels, farms, or bed and breakfasts.
- WARNING: Do not submerge the appliance, power cord, or power plug in water or any other liquid.
- Prevent power cord and plug contact with water/liquid.
- The glass kettle should be washed in warm water with neutral dishwashing detergent, rinsed, and dried.
- CAUTION: Hot surface. Parts of the appliance, glass carafe, and water tank contain residual heat. Avoid contact to prevent burns.
- CAUTION: Never overfill the coffeemaker; hot, frothy coffee may overflow.
- Use according to manual to avoid injury or damage.
- Intended exclusively for brewing filtered coffee.
- Check rated voltage before connecting.
- Connect to a properly grounded socket; multi-socket adapters/extension cords are not recommended.
- Do not place on unstable surfaces, windowsills, or kitchen sink drainboards. Place on a stable, flat, dry surface.
- Do not place near electrical/gas stoves or open flames.
- Never use near baths, showers, or swimming pools.
- Do not use the carafe placement surface or water tank lid for placing objects.
- Use only original accessories and the provided glass carafe. Do not overfill the carafe, use it on other heat sources, or for heating liquids/food in a microwave.
- Replace a cracked or damaged glass carafe immediately.
- Hot steam is released during operation; provide at least 20 cm clearance.
- Fill with clean, cold water only; do not pour hot water or other liquids into the tank. Do not overfill the 1L capacity.
- Ensure the water tank is sufficiently filled, the lid is closed, and the glass carafe is placed before turning on. Water level must not exceed the maximum mark.
- WARNING: Do not open the water tank lid during brewing or shortly after. Wait at least 30 seconds to avoid burns. Use the silicone cover for handling.
- Handle the carafe with hot liquid carefully to prevent scalding.
- Do not submerge a heated carafe in ice-cold water.
- Regularly check water level; add water if below minimum. Turn off and disconnect before adding water.
- Allow to cool for 10 minutes before re-using after turning off.
- If the safety thermal fuse activates (overheating), disconnect and allow to cool before resuming use. Do not fill with cold water to cool the heating element.
- Always turn off and disconnect when not in use, unsupervised, before disassembling/assembling, filling, moving, or cleaning. Allow to cool before cleaning/moving.
- Keep appliance and accessories clean. Do not wash under running water or submerge.
- Do not move with a filled water tank or carafe in place.
- Ensure power cord does not contact hot surfaces or water.
- Disconnect by pulling the plug, not the cord.
- Fully unwind power cord before use.
- Do not leave power cord hanging or tangled.
- Connect to an independent electrical circuit.
- Do not use in moving vehicles, boats, outdoors, or for unintended purposes.
- Maintenance beyond standard cleaning must be performed by an authorized Catler service center. Do not repair or adjust yourself.
- Installation of a residual current device (RCD) with a nominal residual operating current of no more than 30mA is recommended for higher protection.
- WARNING: The stainless-steel filter, brewed ground coffee, and carafe are very hot. Handle with extreme care to avoid scalding. Always use the protective silicone cover to handle the carafe.
- If no carafe is in the coffee maker, the display will show "--- / N°C," and no water will dispense. If the carafe is removed during dispensing, it will stop, and the display will show "---." If replaced within 30 seconds, dispensing resumes; otherwise, the coffee maker turns off. The rotary mechanism will return to the center once the tank is empty.