11
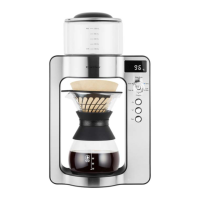
OPERATING YOUR CM 4012 COFFEE MAKER
The indicator light will lit. Use the /
buttons to set the ratio of the grounded
co ee to water in the range from 1:10 to
1:20. Press the button or wait till the
data on the display will stop ashing.
NOTE
By the ratio of the grounded co ee
to water, you set the intensity of
the brewed co ee. The ratio of 1:10
represents strong co ee. If you wish
co ee of less intensity, increase the
ratio between the grounded co ee
and water.
8. Press the button to turn the co ee
maker on. The button will start to ash,
and the co ee maker will start to heat
up the water. The display will show the
actual water temperature in the water
tank while heating.
9. You can check the set temperature,
co ee-to-water ratio, or co ee volume by
rotating the knob while brewing.
10. Once the water temperature reaches the
set temperature, the co ee maker will
stop heating and start to slowly dispense
water through the opening hole in the
centre of the water tank bottom. There is
arotary mechanism under the opening
hole which will rotate while dispensing
water to evenly brew the grounded
co ee.
11. After awhile, the co ee maker will
stop dispensing water and the co ee is
brewed for about 30seconds.
12. Then, the water dispensing starts again,
and the co ee maker will repeat this
process until the total amount of water
weighs more than the grounded co ee in
the ratio you set.
13. Once the adequate amount of water has
been dispensed, the rotary mechanism
will stop. The display will show the total
co ee amount.
14. Wait until all co ee has dropped down
into the carafe, then carefully remove the
lters, and place the stainless-steel lter
into the holder where you leave it to cool
down.
WARNING!
The stainless-
steel filter, brewed
grounded coffee
and carafe are
very hot. Pay more
attention when
handling, not to get
scalded.
DELAY START OF THE COFFEE
MAKER AUTOMATIC BREWING
COFFEE
1. Follow the 1. – 6. steps from the
“Automatic co ee brewing” part.
2. Turn the rotary knob to the “Program”
position and the display will show the
last delay start setting.
3. Use the / buttons to set the time
when the co ee maker starts brewing.
Follow the same steps as setting
the clock. Press the button for
con rmation.
4. Press the button to turn on the co ee
maker and the delay start function. The
display will show “AUTO” and “PROG”.
That means the correct setting of the
delay start. After awhile, the co ee
maker will show the actual time and the