8.3. Setting the limits
Ensure that the Stoppers are correctly placed and tightened. Refer to Section 6.3.
Modifying the position of the door. The limits must be started from approximately
the midway position. Should the door be within approximately 200mm of the
closedposition,usethe“+”buttonbypressingandholdingitdowntodrivethe
door to the midway position then start the limit setup.
8.3.1. Entering Limit setup mode
1. Pressthe“Green“conrmbutton,andtheoperatorwillstartthelimitlearning
procedure. The door will fully close, fully open, and fully close again. It has now
learned where the open and closed positions are.
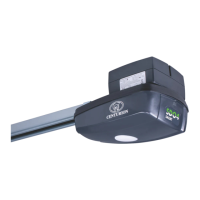
2. TheLEDDisplaywillnolongerdisplay“LL”andtheCourtesyLightwillstopashing;
itwillnowdisplaya“.”(Dot).
IMPORTANT!!
Before the user can modify the position of the door they would have needed to
complete“Section8.2-Selectingthedoortype”.
8.3.2. Fine tuning the CLOSED position
• Drive door into Closed Position
• Press“Learn”for5secondsuntildisplayshows‘‘CL”
• AdjusttheClosedPositionbypressing“+”(movesthedoortotheopenposition);
or“-”(movesthedoortotheclosedposition).EachPressequals3mmoftravel
• ToconrmnewClosedPosition,press“Conrm”
8.3.3. Safety Force Adjustment
The SDO4automaticallyadjuststhesafetyduringthelimitsetup.Thiscanbeadjustedas
follows:
8.3.3.1. Adjust Safety Oset Value
• AtanytimePress“+”or“-”.ThecurrentSafetyOsetValueisshown.
• Press“+”toincreaseor“-”todecreaseValue,
• F1 being the most sensitive
• F5 being the least sensitive
• ToconrmnewSafetyOsetValuePress“Conrm”
• Toexitwithoutchangeswait10secondsorpress“Learn”
COMMISSIONING THE SYSTEM
• “tu”iftheunitisbeinginstalledonaTip-Updoor
• “SE”iftheunitisbeinginstalledonaSectionaldoor
Pressthe“Green”Conrmbuttontoselectthecorrectoption.
4. After door type has been selected, only L.L will be displayed. The dot in-between
indicates that the door type has been selected.
5. Toadjustthepositionofthedoor(afterdoortypehasbeenselected)the“+”canbe
usedtomovethedoorupand“-”tomovethedoordownbeforeinitiatingthelimit
setup.
 Loading...