EasyManua.ls Logo

Chapin 82050C - User Manual

Chapin 82050C
20 pages
Print Icon
To Next Page IconTo Next Page
Loading...
70 lb
70 lb. Contractor Turf Spreader Assembly Instructions
Instrucciones para el ensamblaje de esparcidoras de pasto para contratista de 70 libras
Instructions d’assemblage de l’épandeur à gazon de 32 kg (70 lb) pour entrepreneur
CONTRACTOR TURF SPREADER
015625-1 R0121
DO NOT RETURN TO STORE
Call: 1-800-950-4458
www.chapinmfg.com
Chapin International, Inc
P.O. Box 549 700 Ellicott St.
Batavia, NY 14021-0549 U.S.A.
1-800-950-4458 www.chapinmfg.com
Model 82050C
Question and Answer IconNeed help?

Do you have a question about the Chapin 82050C and is the answer not in the manual?

Summary

Safety Warnings and Precautions

General Safety Instructions

Read all instructions before use to prevent product failure or injuries. Do not allow untrained individuals or children to operate.

Spreader Hardware Components

Tools and Component Identification

Tools Required for Assembly

List of necessary tools for assembling the spreader.

Handle Bar and Gate Control Assembly

Step 1.1: Initial Handle Attachment

Loosely attach handle components for later adjustment.

Frame Assembly

Steps 2 & 3: Frame and Baffle Installation

Assemble the main frame, baffle, and related components.

Impeller and Gearbox Assembly

Steps 4 & 5: Impeller Mounting and Shaft Connection

Connect the impeller to the gearbox and its shaft.

Impeller Orientation and Wheel Assembly

Step 5.1: Impeller Orientation

Note the counterclockwise marking on the impeller.

Step 6: Install Wheels

Attach wheels to the frame using bolts and cotter pins.

Hopper Assembly

Steps 6.2 & 7: Wheel Hardware and Hopper Mounting

Secure wheels with hardware and mount the hopper to the frame.

Auger Assembly

Steps 8 & 8.1: Auger Selection and Installation

Choose and install the appropriate auger type, following installation steps.

Gate Linkage Assembly

Steps 9 & 9.1: Connecting and Securing Linkage

Connect the gate control linkage rod and loosely secure its nuts.

Gate Linkage Connections

Steps 9.2 & 9.3: Linkage to Frame and Gate

Connect linkage arm to the frame and the rotary gate.

Adjustable Feet and Linkage Securing

Steps 9.4 & 10: Securing Linkage and Installing Feet

Secure linkage with R-pin and install adjustable feet for leveling.

Gate Control Adjustment

Steps 11 & 11.1: Initial Setting and Closing Gate

Ensure correct nut positioning and turn rotary gate to fully closed.

Gate Control Final Adjustment

Steps 11.2 & 11.3: Setting Position and Tightening Hardware

Set control position and tighten hex nuts to secure the gate control arm.

Adjusting Spread Patterns

Spread Pattern Guide

Illustrates different spread patterns based on gate adjustments.

Storage and Maintenance

Cleaning and Lubrication

Wash spreader with hose; avoid spraying gearbox; apply grease monthly if applicable.

Replacement Parts List

Application Chart and Guidelines

Application Conversion Chart

Converts spreader settings for different brands and applications.

General Application Guidelines

Provides settings for weed control, fertilizer, grass seed, and salt.
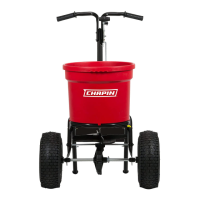
Chapin 82050C Specifications

General IconGeneral
Model82050C
Capacity50 lbs
Adjustable RateYes
ApplicationFertilizer, Seed, Ice Melt
TypeBroadcast
MaterialPoly
UseResidential
Wheels10-inch
Spread Widthup to 12 ft

Related product manuals