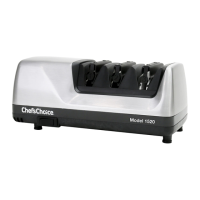
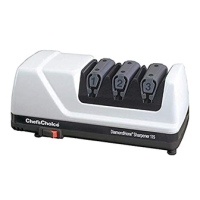
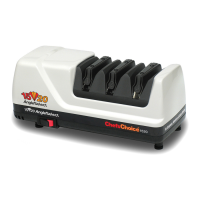
The Chef'sChoice AngleSelect Model 1520 is a versatile three-stage electric knife sharpener designed to maintain the factory-sharp condition of American, European, and Asian style knives. This device employs a highly precise guide system that automatically positions each knife style at its optimal sharpening angle. Customized diamond abrasive disks are used to quickly restore and hone a fresh edge, which is then stropped with a patented stropping disk to achieve exceptional sharpness. The sharpener is engineered to provide effortless cutting and a flawless slice for a variety of blades.
Function Description
The Model 1520 is a sophisticated sharpening system with three distinct stages, each serving a specific purpose in the sharpening process:
-
Stage 1 (Sharpen Asian - 15° Faceted Knives): This stage is exclusively designed for Asian-style knives with 15-degree primary edge facets (30 degrees total angle). It uses fine diamond abrasives to hone the edge, matching the sharpness and edge shape of high-quality Asian knives. For Asian blades, sharpening begins here, followed by stropping and polishing in Stage 3. Optionally, for a stronger edge on Asian blades, two pairs of pulls can be added in Stage 2 to form a small second bevel before proceeding to Stage 3.
-
Stage 2 (Sharpen Euro/American - 20° Faceted Knives): This stage is primarily designed to sharpen conventional American and European knives, which typically have 20-degree primary edge facets (40 degrees total angle). Fine diamond abrasives are used here to hone these blades. For American and European knives, sharpening begins in Stage 2, followed by stropping and polishing in Stage 3. Stage 1 is generally not used for these knives unless the user wishes to convert their 20-degree edge facet to the smaller Asian angle of 15 degrees.
-
Stage 3 (Stropping/Polishing): This final stage contains proprietary ultrafine abrasive stropping disks. It is designed for both Asian and Euro/American blades to create a microscopic bevel along the edge and polish it to astonishing sharpness. This stage refines the edge, removing any burr and delivering a razor-sharp finish.
The Model 1520 is capable of sharpening a wide range of blades, including American, European, and Asian styles. It is particularly adept at handling contemporary Asian knives like Santoku and Nakiri, which are typically double-faceted at 15 degrees. It can also sharpen traditional Japanese single-beveled blades such as sashimi knives, which require specific techniques to maintain their unique edge geometry. The sharpener is not recommended for scissors, ax blades, or any blade that does not fit freely in the slots. It is also not suitable for ceramic knives.
Usage Features
The sharpener is designed for ease of use, with specific procedures tailored to different knife types to achieve optimal results.
-
General Sharpening Principles:
- Always clean knife blades thoroughly before sharpening to prevent accumulation of food or sharpening debris on the disks.
- Operate the sharpener with the power "ON" (red flash on switch exposed) and ensure it is on a stable countertop or table.
- Use light downward pressure, just enough to establish secure and consistent contact between the blade edge and the abrasive disks. Excessive pressure is unnecessary and will not speed up the sharpening process.
- Pull blades at a constant, recommended speed over the entire length of the blade. Avoid interrupting or stopping the blade's motion while it is in contact with the abrasive disks.
- When sharpening curved blades, lift the handle slightly as you approach the tip to maintain audible contact with the disk and sharpen the entire blade length.
- To sharpen the entire blade length, insert the blade as close as possible to the bolster or handle. The Model 1520 allows sharpening to within 1/8 inch of the bolster, a significant advantage for maintaining the curvature of chef's knives.
- For knives with a significant choil, placing an index finger behind the choil can act as a "stop" to prevent the choil area from catching on the front stop-bar of the sharpener.
-
Sharpening Contemporary Asian Knives (15 Degrees):
- Honing (Stage 1): Turn on the power. Pull the blade through the left slot of Stage 1, then through the adjacent right slot, alternating pulls. Each pull should take 4-5 seconds for a 5-inch blade. Continue making pairs of pulls until a small burr develops along the entire blade length. For previously sharpened Asian blades, 2-4 pairs of pulls may suffice.
- Stropping/Polishing (Stage 3): After developing a burr in Stage 1, pull the blade through the left slot of Stage 3, then through the right slot. Make 4 pairs of slow pulls (4-5 seconds each), followed by 4-5 pairs of faster pulls (1-2 seconds each) to achieve a final polish.
- Re-sharpening: For re-sharpening, typically only Stage 3 is needed. If the edge is significantly dulled or Stage 3 alone doesn't achieve razor sharpness, return to Stage 1 for honing.
- Trizor® Triple Bevel Edge: To create a stronger Trizor® edge on Asian blades, after developing a burr in Stage 1, make two pairs of 2-second pulls in Stage 2. Then, finish in Stage 3 as described.
-
Sharpening Traditional Japanese Knives (Single Sided - 15 Degrees):
- Identification: First, confirm if the blade is right-handed or left-handed by identifying the side with the large factory Bevel A.
- Honing (Stage 1 - Right-Handed Blades): Hone only in the left slot of Stage 1. Make 5-10 pulls (3-4 seconds each) and check for a burr along the entire back side of the blade edge. Continue with groups of five pulls until a burr is confirmed. Generally, 20-30 pulls are sufficient, but up to 50 may be needed.
- Stropping/Polishing (Stage 3 - Right-Handed Blades): Make 5-8 slow pulls (3-4 seconds each) only in the left slot of Stage 3. Then, make one regular pull in the right slot of Stage 3 (3-4 seconds) along the back side of the edge to remove the burr. Finish with 2-3 pairs of fast pulls (1-2 seconds each) alternating in left and right slots of Stage 3.
- Left-Handed Blades: The procedure is similar to right-handed blades, but all slot usage is reversed (e.g., use the right slot where right-handed instructions call for the left slot).
- Re-sharpening: For re-sharpening, generally follow the Stage 3 procedure. If the edge is very dull, re-hone in Stage 1 (using only the appropriate slot) until a burr develops, then proceed to Stage 3.
-
Sharpening European/American Knives (20 Degrees):
- Honing (Stage 2): Turn on the power. Insert the blade into the left slot of Stage 2, pulling it towards you while moving it downward until it contacts the diamond disk. Sharpen the entire blade length. Repeat with one full-length pull in the right slot of Stage 2. Always make pairs of pulls, alternating between left and right slots. Each pull should be 4-5 seconds for a 5-inch blade. Make about five pairs of pulls, then check for a burr. Continue until a burr is confirmed.
- Stropping/Polishing (Stage 3): Make 3-4 pairs of slow pulls (4 seconds each) in Stage 3, alternating left and right slots. Follow with 3 pairs of faster pulls (1-2 seconds each), alternating slots. The edge should be incredibly sharp. Repeat if necessary.
- Re-sharpening: For re-sharpening, usually only Stage 3 is needed. If the edge doesn't quickly re-sharpen, return to Stage 2 for 2-3 pairs of alternating pulls, develop a burr, and then proceed to Stage 3.
- Converting to 15-Degree Asian Style Edge: European or American knives used for light duty can be converted to a 15-degree Asian edge by following the sharpening instructions for Asian blades (pages 7-9). Initial sharpening in Stage 1 will take longer for conversion, but subsequent re-sharpening will be normal.
-
Sharpening Serrated Blades:
- Serrated blades can be sharpened using only Stage 3. Make 5-10 pairs of alternating pulls in the left and right slots of Stage 3. This will sharpen the teeth of the serrations and develop microblades along their edges. If the knife edge is severely damaged, make one fast pull (2-3 seconds for an 8-inch blade) in each of the right and left slots of Stage 2, then proceed to Stage 3. Avoid excessive use of Stage 2 to prevent removing too much metal.
-
Detecting the Burr: To confirm the presence of a burr, carefully move your forefinger across the edge, away from the cutting direction. The burr will feel like a rough, bent extension on one side of the edge, while the opposite side will feel smooth. This technique helps determine when sufficient sharpening has occurred in the preliminary stages.
Maintenance Features
The Chef'sChoice Model 1520 is designed for minimal maintenance, ensuring long-term performance and durability.
- No Lubrication Required: The sharpener does not require any honing oils, water, or other lubricants for its moving parts, motor, bearings, or sharpening surfaces. This simplifies operation and prevents mess.
- Cleaning the Exterior: The exterior of the sharpener can be cleaned by carefully wiping it with a damp cloth. Avoid using detergents or abrasive cleaners, as these could damage the unit.
- Dressing of Stropping/Polishing Disks (Stage 3): The Model 1520 includes a built-in manual cleaning/dressing system for the stropping/polishing disks in Stage 3. If these white disks become glazed with grease, food, or sharpening debris, their efficiency may decrease.
- To clean/dress, ensure the power is "ON." Locate the small lever within a recess on the lower left corner of the sharpener's rear (as you face the rear).
- Press the lever to the right and hold for 3-4 seconds, then press it to the left and hold for 3-4 seconds. Moving the lever in one direction cleans and reshapes one disk, and moving it in the opposite direction cleans the other.
- This feature should be used sparingly, only when Stage 3 disks appear seriously darkened or when polishing efficiency noticeably decreases. Excessive use will prematurely wear down the abrasive surface of the disks, potentially requiring factory replacement. Regularly cleaning knives before sharpening can significantly reduce the frequency of disk dressing.
- Removing Metal Dust: Approximately once a year, or as needed, accumulated metal dust inside the sharpener should be removed.
- Locate and remove the small rectangular clean-out cover on the underside of the sharpener.
- Metal particles will be adhered to a magnet attached to the inside of this cover. Rub or brush off these filings with a paper towel or toothbrush.
- If larger amounts of dust are present, shake out any remaining dust through the bottom opening.
- After cleaning, securely replace the cover with its magnet in place.
By following these usage and maintenance guidelines, users can ensure their Chef'sChoice AngleSelect Model 1520 continues to provide optimum sharpening results for years to come.