CIAS Elettronica S.r.l. Ed. 2.2
Installation Handbook page 39 to 43 ERMO 482
Connect the STC 95 instrument to the ERMO 482 Tx barrier, use the related flat cable (16
wires) and insert it in its connector.
a) Check that led Rx/Tx 1 (22) is on. If it isn’t, press the key “1” (21) for on it.
b) Press the key “” (10) a number of time as needed for on the led “+ 13,8 V” (4).
The voltage indicated by display (2) must be 13,8 V + 10%.
c) Press the key “” (10) until the led “9V Tx” is on (8).
The voltage indicated by display (2) must be 9 V + 10%.
d) Press the key “” (10) until the led “sens. Rx / Tx” on (6). The voltage indicated by
display (2) must be 4,5 V + 10%.
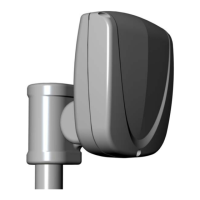
4.1.2 Receiver Setting-up
To align and adjust the Receiver ERMO 482 proceed as follows:
- unscrew the specific screws to remove the front cover ( Radome );
- activate the power supply connection to MS1 terminal block;
- check that the main Led indicating presence of mains lights up;
- connect the “fastons” to the battery paying attention to the polarity (red lead to battery positive,
black lead to battery negative).
- preset one of the 4 channels available through the channel selector DS 1, same as
channel preset on Transmitter unit.
Connect the STC 95 instrument to the ERMO 482 RX barrier as shown in figure 9. Insert the
seven pins connector into its connector present on Receiver circuit (fig. 9).
a) Check that led “Rx / Tx 1” (22) is on If not press the key “1” (21) for on
b) Press the key “” (10) a number of time as needed for on the led “+ 13,8 V” (4). The
voltage indicated by display (2) must be 13,8 V + 10%. Go on the rear part of receiver
head and verifies that the path is free from moving obstacles. If the previous visual
system alignment is correct, check that the CAN and ALL led are on.
For the path optimisation go on with electronic alignment, see next:
c) check that the led “On” (16) is off. If not, press the key “buzzer” (15), for turn the led
off, this force the STC 95 internal buzzer not active.
d) check that the led "open" (18) is on, if not press the key “loop” (17), for the “loop”
opening and turn on the led.
e) press the key “” (10) until the led “field Rx” (5) is on. Check that a 6 V 10 %
voltage is read on the display and that the mid led is glowing on the led (3).
Should the voltage value differ and should the glowing led be the end ones, then press
either key “ gain” (11) or key “ gain” (12), till the previously described condition
arises (i.e., the led in the middle of the bar lights up, and a 6 V 10 % value is
read on the display).
f) After having loosened the fastening screws on the mast, turn the Receiver module on
the horizontal plane till obtaining the maximum reading on the display (2).