© CIAS Elettronica S.r.l. Ed 1.1
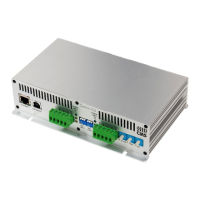
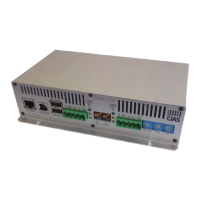
Installation Manual Page 41 of 51 Sioux Pro 2
3.2.1.4 Touch and zone
To activate the “Touch and Zone”, set the function to position 5 then push SET BUTTON.
Take care that the configured sensors number, are equal to the sensors connected to Sioux-CU-
Pro2.
If after the last Master-Pro2 on a branch there aren’t 3 Slave-Pro2 sensors, modify the sensors
number of that branch. See paragraphs 3.2.1.5 e 3.2.1.6.
Now it’s possible to modify the zones dimension, hitting sensors to generate a strong signal.
− The first hit identifies the beginning of the first zone and it must be equal with the last
configured sensor on the left branch. The other hits identify the zone’s end
− Now the sensor that receive the second hit become the last of the first zone, the sensor that
receive the third hit become the last of the second zone, etc.
− The maximum number of zones is 80
The “touch and zone” procedure finishes when the 80
th
zone is located, or when the last
configured sensor on the right will be hit.
The 80
th
zone, if present, always ends with the right sensor in the configuration.
When a sensor is hit, the buzzer emits an acoustic signal in this way:
− The first hit that identifies the beginning of the first zone, induces two short beep
− The hit that identify the end of the zone, induces one short beep
− The hit that ends the procedure, induces two long beep
− If a sensor on the left of the last hit sensor is hit, and this sensor belongs to the same zone
of the other sensor, the zone dimension is reduced and three short beep will be emitted
− If a sensor on a previous zone of the last hit sensor is hit, an error signal will be emitted
In this case it’s possible to proceed as this last sensor is not hit
At the end of the procedure the new configuration will be saved in Sioux-CU-Pro2.
3.2.1.5 Change of the left branch sensor number
The number of sensors in the left branch is set in two steps, the hundreds are set first, then tens
and units are set.
Set the function switch to position 6 and with the unit switch set the number of hundreds (0 if
sensors are up to 99, 1 if sensors are > = 100).
Then press SET BUTTON to store the number of hundreds, the Sioux-CU-Pro2 will emit a beep
to confirm memorization.
Now set tens and unit switches with the respective values.
Press SET BUTTON to store the number of tens and units, the Sioux-CU-Pro2 will emit two beep
to confirm memorization.
3.2.1.6 Change of the right branch sensor number
The number of sensors in the right branch is set in two steps, the hundreds are set first, then tens
and units are set.
Set the function switch to position 7, with the unit switch set the number of hundreds (0 if
sensors are up to 99, 1 if sensors are > = 100).
Then press SET BUTTON to store the number of hundreds, the Sioux-CU-Pro2 will emit a beep
to confirm memorization.
Now set tens and unit switches with the respective values.
Press SET BUTTON to store the number of tens and units, the Sioux-CU-Pro2 will emit two beep
to confirm memorization.