4-6
Cisco AS5350XM and Cisco AS5400XM Universal Gateways Card Installation Guide
78-17406-01
Chapter 4 Channelized T3 Feature Card
Online Insertion and Removal of the CT3 Feature Card
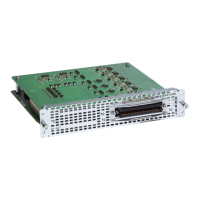
To install the CT3 feature card, follow these steps:
Step 1 Attach an ESD-preventive wrist strap.
Step 2 Slide the feature card into the slot until the connector pins make contact with the carrier card backplane
connector. (See Figure 4-9 and Figure 4-10.)
Figure 4-9 Installing the CT3 Feature Card in the Cisco AS5350XM Universal Gateway
Figure 4-10 Installing the CT3 Feature Card in the Cisco AS5400XM Universal Gateway
Step 3
Align the captive screws with their holes, and seat the card completely.
Step 4 Tighten the screws to secure the feature card to the chassis. (See Figure 4-11 and Figure 4-12.)
Figure 4-11 Tightening the Captive Screws on the Cisco AS5350XM Universal Gateway
58762
37169
58763
Carrier
card
DFC
Captive
screw
Captive
screw
Chassis
 Loading...