18
Section 1 - Furnace Installation
EXISTING FORCED AIR INSTALLATION
When the Classic Outdoor Wood Furnace is installed
in conjunction with an existing forced air system, a
water-to-air heat exchanger is mounted in the plenum
or duct work of the existing furnace. Heated water from
the outdoor furnace either continuously ows through
the water-to-air heat exchanger or is diverted through
a 3-way zone valve. When the thermostat senses the
need for heat, the fan on the existing heating system
forces air through the heat exchanger, transferring heat
throughout the existing ductwork.
Following are several important items for this type of
installation.
• Plenums installed to the furnace must be constructed
of metal in accordance with NFPA 90B, 2-1.3.
• If an air conditioning coil is located in the plenum,
the heat exchanger should be mounted between
the fan and the air conditioning coil so the heat
exchanger will not freeze when the air conditioner
is being used.
• The heat exchanger should not be installed in the
cold-air return of the existing forced air furnace
because components of the existing furnace could
overheat.
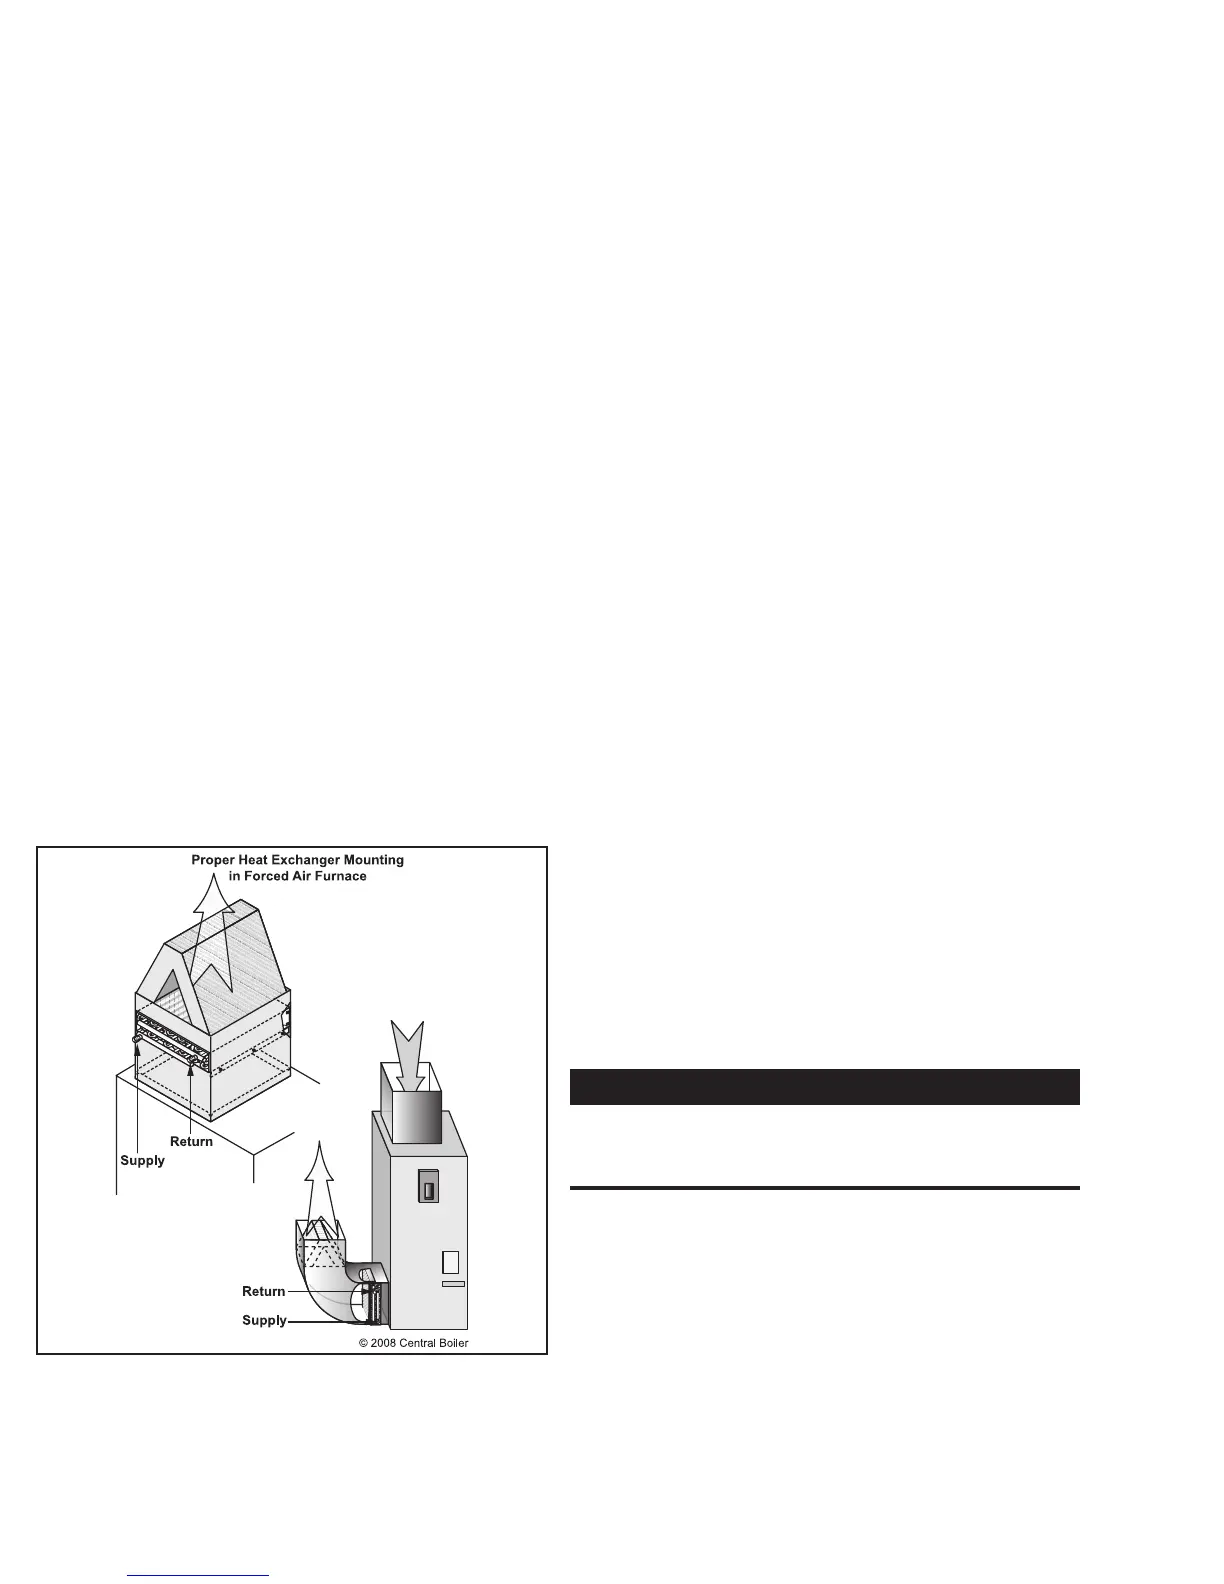
• The heat exchanger may be mounted either
horizontally or vertically with the outlets on the
side (see Fig. 23).
Fig. 23
• In all applications, the heat exchanger must be
mounted level from front to back, with the outlets
on the side. If the outlets are positioned upward or
if the exchanger is not level, an air lock can restrict
the water circulation and reduce the amount of
heat transfer.
• The lower tting is the inlet/hot supply from the
outdoor furnace and the top tting is the outlet/
return back to the outdoor furnace.
• It is best to install a heat exchanger that ts the
plenum.
• If the plenum is larger than the heat exchanger, it
should be mounted in the center without gaps on
the sides that would allow air to ow around the
heat exchanger. All air must be directed through
the face of the exchanger. Air ow deectors need
to be installed in the plenum on the outlet side of
the heat exchanger if air ow is funneled into the
heat exchanger.
• Be sure to consider the airow through the
ductwork so air circulation is not blocked off to
parts of the building.
• Adding a heat exchanger coil in the hot air plenum
or ductwork of the existing furnace may decrease
the air ow in the system. The existing heating
(gas or electric) system should be operated before
adding the heat exchanger.
• The air temperature rise should be measured with
the system running for an adequate amount of time
to get a stabilized temperature reading. The heat
exchanger can then be installed in the system. The
existing heating system should be operated again
and the air ow should be adjusted to maintain the
same temperature reading. The air ow may have
to be increased to accomplish this.
• On a belt-drive system, the blower pulley and/
or motor pulley may be changed; however, the
electrical current owing through the motor must
not be changed to exceed the nameplate rating.
A larger blower motor may be used. On a direct-
drive system, in most cases the blower motor will
not need to be replaced; however, the speed of the
blower motor may have to be increased.
CAUTION
When installing the heat exchanger, be sure
none of the existing system safety controls are
disabled.
NOTE: Any electrical installation should be done
by a certied electrician in accordance with all
applicable codes.
• Due to the internal circuitry of some thermostats,
a snap disc temperature control may have to be
installed on the heat exchanger manifold to provide
an interlock for the air conditioner. This prevents
the air conditioner from operating when the water
temperature is higher than 140°F.