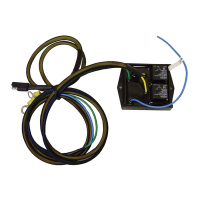
Servo Connection 8’ (2.4m)
This wire will connect to the included Servo that mounts under the cowling of
the motor. For more details on how to install this servo refer to the Hardware
Kit you purchased that corresponds to vout specic make of motor. Route
and secure servo cable as far away as practical from the spark plug wires.
Pairing button
Pushing this button will pair your remote to your receiver. Push this button
once and the Activity light will be solid. Then press any button on the remote.
Once the light goes o, your remote is paired.
Activity Indicator
This blinks any time there is activity between your receiver and remote. It will
also be solid when you are in the process of pairing your remote.
Receiver Antenna
This wire is used for the receiver to be able to communicate to the remote. It can
lay loose and does not need any install attention.
MOUNTING HOLES
The holes are used to mount your receiver to ensure it is secure and will not
be tossed around while the boat is in motion.
QUICK START
1. Install your servo and throttle rod following the directions that come
with the hardware kit.
2. Find a suitable location to install your receiver that will be out of direct
contact with constant water exposure and can be mounted securely but
allows all cables to reach their destination.
3. Run your power cable from your receiver to your battery
4. Run your Acc+ Switched Power cable to helm station
5. Run your servo cable from your receiver out to your servo that was installed
on the kicker motor in Step 1.
6. (Optional) Connect your Panther Electro Steer motor to the 2 Way molded
connector on the receiver.
7. Pair your remote (See ‘Pairing button’ above)
8. Verify proper operation of the servo (and steering if connected).
9. Go shing!
For information on motor specic installation of the servo, please
refer to the installation instructions found at the Trollmaster website:
trollmasters.com/wireless/trollmaster-pro3/installation-guides/
Page 3