This document describes the Comgrow CNC Carving Machine, a versatile digital manufacturing tool designed for various engraving and cutting tasks.
Function Description
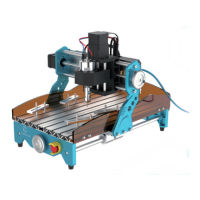
The Comgrow CNC Carving Machine is a desktop-sized device primarily used for engraving and cutting a range of materials. It operates using GRBL software or an offline control handle, providing flexibility in operation. The machine is suitable for both CNC milling and laser engraving, with specific modes and settings for each function. It is equipped with an emergency stop button for safety and an acrylic baffle to prevent dust and facilitate cleanup. The overall structure is made of aluminum, ensuring stability for various milling needs.
Important Technical Specifications
- Product Exterior Size: 400 x 275 x 268 mm (motor not included)
- Milling Size: 300 x 180 x 45 mm
- Weight: 7.5 kg
- Drive Motor: 42 stepper motor, 0.48 N.m.
- Spindle: 775 motor, 12V~24V, 10000 RPM
- System Compatibility: Windows XP, Windows 7 (32/64 bits), Windows 8, Windows 10, Linux system.
- Power Supply: Switchable 230 VAC or 110 VAC.
- Materials: Available for engraving and cutting wood, plastic, acrylic, PCB, soft aluminum. Not suitable for hard metals, jade, or other hard objects.
- Laser Head Options: 5W or 10W laser head (wiring instructions provided).
Usage Features
The machine offers several features to enhance usability and safety:
- Assembly: The manual provides detailed instructions for assembling the Y-axis base, XZ-axis gantry, and spindle motor.
- Wiring Schematic: Clear diagrams illustrate how to connect the Z-axis limit switch cable and spindle motor wires, emphasizing correct polarity and plug direction to prevent damage. Wire buckles are used to secure cables.
- Hold Downs: Clamps are provided to fix materials (PVC, wood, acrylic, plastic boards) onto the engraving table. Users are advised to ensure screws supporting the profile plane and the material thickness are at the same height, avoid overtightening screws, and consider the spindle chuck's space when clamping.
- Tool Change: The process involves using two wrenches to remove the lock nut, inserting the appropriate tool into the handle, and then securing it with the wrenches.
- Mainboard Module: The mainboard supports different modes (MOS tube mode, relay mode) for spindle speed adjustment and laser engraving (black & white, grayscale). Users can switch between these modes by adjusting specific gears on the mainboard.
- Driver & Software Installation: The manual guides users through installing the CH340SER driver and the Grblcontrol (Candle) software from an SD card. It also explains how to identify the machine's COM port.
- Grblcontrol Software Interface: The software allows for coordinates movement, manual control of moving speed, and spindle on/off.
- Starting Operation: After opening a test file, users can control the spindle head to the center of the material, raise the Z-axis to avoid collisions, clear parameters, and start the toolpath. The red box in the software interface indicates the safe engraving area.
- Emergency Stop: A red E-stop button is available to immediately halt operations in case of abnormality, preventing damage. It can be reset by turning clockwise and then clicking "Unlock" in the software.
- Tool Setting Gauge Block: This instrument simplifies setting the Z-axis zero position. Users measure the block's thickness, input it into the Candle software settings, connect the block cable, and press a button to execute the tool setting command.
- Offline Controller: For standalone operation, the USB cable must be disconnected. G-code files are copied to an SD card, which is then inserted into the offline controller. The controller allows for axis movement, file selection, and starting engraving.
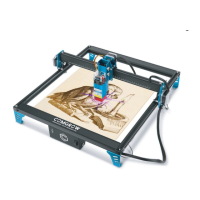
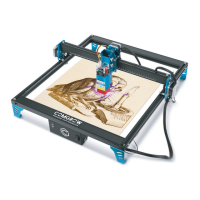
- Laser Engraving: The machine supports laser engraving using LaserGRBL Control Software. Users install the software, connect to the machine, open engraving files, and enter specific commands ($32=1 for laser mode, $32=0 for spindle mode) to switch between engraving modes.
Maintenance Features
- Waterproof and Dustproof: The machine is designed to be waterproof and dustproof, and coolant is not used.
- Emergency Stop Reset: The emergency stop switch button must be reset in time after being pressed before reusing the machine.
- Pressure Block Installation: Ensure standardized installation of the pressure block, keeping it out of the carving work area. Butterfly nuts should be at least 10mm from the carving work area to avoid collision.
- Material Selection: Choose raw materials with an area larger than the carving range to ensure normal carving.
- Regular Maintenance: Periodically add lubricating and anti-rust oil to the optical axis to prevent rust.
- Spindle Motor Cleaning: Regularly clean surface dust from the spindle motor, ensuring the power is disconnected before cleaning.
- Coupling Reinforcement: Regularly reinforce the top tightening screw of the coupling, as it may loosen over time.
- Relay Mode Current: If using relay mode, an external power supply with more than 12A is recommended.
- Laser Head Focal Length: In laser engraving mode, the focal length of the laser head can be adjusted as needed.
- High Power Spindle Motor Upgrade: For upgrading to high-power spindle motors (e.g., 300W, 500W), relay mode with an independent external power supply is required.
- Troubleshooting Spindle Stops: The manual provides four suggestions for addressing spindle stops during operation, including checking the emergency stop button, verifying laser/CNC mode settings, checking limit switches, and addressing spindle motor overload protection.