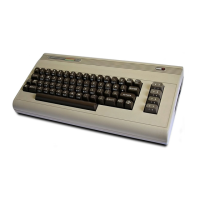
AMIGA 1000 ASSEMBLY LEVEL REPAIR
1.3.1 Connect AC power, the keyboard, a mouse (if not available, see below) and the monitor
to the AMIGA computer. DO NOT connect any other devices to the computer at this time.
Mouseless Operation of the Amiga
On the AMIGA, anything you can do with the mouse you can also do from the keyboard:
• Pressing, at the same time, an AMIGA key and one of the cursor keys (the keys
with arrows on top that are to the right of and slightly below the RETURN key) moves
the Pointer in the direction of the arrow.
• Pressing, at the same time, an AMIGA key, the SHIFT key, and one of the cursor
keys also moves the Pointer, but faster.
• Pressing, at the same time, the left AMIGA key and the left ALT key (the key just
to the left of the left AMIGA key) is like pressing the Selection button, the left but
ton on the mouse.
• Pressing, at the same time, the right AMIGA key and the right ALT key (the key
just to the right of the right AMIGA key) is like pressing the Menu button, the right
button on the mouse.
1.3.2 Turn the POWER SWITCH, located on the left side of the system toward the front, to
the ON position.
1.3.3 The RED Power LED, located at the left front corner of the system, should BLINK on
system power-up, then display solid red.
1.3.4 Check that the unit FAN IS RUNNING by placing your hand near the left rear corner
of the computer. A slight amount of air flow should be felt.
1.3.5 In approximately 20 seconds, the screen should turn white and, approximately 5 seconds
later, a hand should be displayed holding a diskette labeled KICKSTART.
The system is requesting the Boot-Up diskette, called KICKSTART, to be inserted. When
the system reaches this point, it is a good indication that the system data and address lines
are all operating.
• If the above sequence of steps occur CORRECTLY, continue to SYSTEM DRIVE TEST
on page 1-6.
• If the above sequence of steps DO NOT occur, continue to POWER SUPPLY TEST on
page 1-4.
1.3 SYSTEM POWER UP
1-3