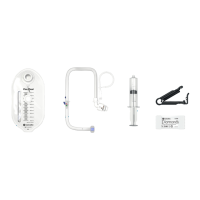
6 | Flexi-Seal™ PROTECT PLUS Fecal Management System
is possible.
2. Remove any in-dwelling or anal device prior to insertion of the Flexi-Seal™ PROTECT PLUS device.
3. Perform a digital rectal exam to evaluate suitability for insertion of device.
C. Insertion of the device and inflation of the balloon using a Luer syringe
1. Remove the white cap from the ination port. Using the Luer syringe provided, remove the air that is in
the balloon by attaching the Luer syringe to the white ination port (marked “≤45ml”) and withdrawing the
plunger. Remove the supplied Luer syringe and ll it with 45ml of water or saline and connect the Luer syringe
to the white ination port of the catheter. Insert a lubricated gloved nger into the blue nger pocket for
digital guidance during device insertion (the nger pocket is located above the position indicator line). (Figure
4) Coat the balloon end of the catheter with lubricant. Grasp the catheter and gently insert the balloon end
through the anal sphincter until the balloon is beyond the external orice and well inside the rectal vault. The
nger may be removed or remain in place in the rectum during initial balloon ination.
2. Inate the balloon with up to 45ml of uid by slowly depressing the Luer syringe plunger. With the insertion
nger removed, the green indication dome will indicate once the balloon has reached the optimal ll level for
the anatomy. (Figure 5). Stop ination once the green dome has signaled optimal ll. Under no circumstances
should the balloon be inated with more than 45ml of uid. If the green indication dome indicates at less
than 30ml of uid, withdraw the uid and reposition the balloon in the rectal vault. After repositioning, ll the
balloon as described above. Do not ll with more than 45ml of uid. If the red indication dome starts to inate,
assess the patient’s position, fully deate the balloon and repeat the balloon ination process. Stop ination
once green dome has signaled optimal ll.
3. Remove the Luer syringe from the ination port, and gently pull on the soft catheter to check that the balloon
is securely in the rectum and that it is positioned against the rectal oor. (Figure 6). Close the cap on the white
ination port to avoid misconnection issues.
4. Position the length of the exible catheter along patient’s leg avoiding kinks and obstruction. Take note of the
position indicator line relative to the patient’s anus. Regularly observe changes in the location of the position
indicator line to determine movement of the retention balloon in the patient’s rectum. This may indicate the
need for the balloon or device to be re-positioned. In the event of expulsion of the device, deate the balloon
fully; rinse the balloon end of the catheter and reinsert following the instructions for “Insertion of Device”. A
rectal exam should be conducted prior to re-insertion to verify that no stool is present. If expulsion continues
for more than three episodes, discontinuation of the device should be considered.
5. Hang the bag by the bead strap on the bedside at a position lower than that of the patient. Add insertion
date of the fecal management system onto the supplied date formatted adhesive label and afx label onto
at region of the hanging strap.
D. Irrigation of the device
To irrigate the device, ll a Luer syringe with water at room temperature, attach the syringe to the connector in
the blue irrigation/medication housing (marked “IRRIG./Rx” Figure 7-1a) and slowly depress the plunger. Do
not irrigate through the white ination port (marked “≤45ml” Figure 7-1b) as this would lead to over ination
of the retention balloon and the device would not be irrigated as intended. Repeat the irrigation procedure as
often as necessary to maintain proper functioning of the device. Flushing the device as described above is an
optional procedure for use only when needed to maintain the unobstructed ow of stool into the collection
bag. If repeated ushing with water does not return the ow of stool through the catheter, the device should be
inspected to ascertain that there is no external obstruction (i.e. pressure from a body part, piece of equipment,
or resolution of diarrhea). If no source of obstruction of the device is detected, use of the device should be
discontinued.
E. Maintenance of the device
Change the collection bag as needed per Step A.4. After removal of the bag from the catheter, close the bag with
the provided cap. To remove the collection bag, push the catheter connector into the bag connector and then
twist anti-clockwise to disengage. See correct method of holding the collection bag without trapping the bag
against the bag connector in gure 3. Gently pull the catheter connector from the collection bag. Use the thumb
to push the back of the cap into the bag connector which is to be held in place from the rear of the collection bag
using the middle and index ngers. Use thumb to press around the cap to ensure full bag closure. Discard used
bags per institutional protocol for disposal of medical waste. Observe the device frequently for obstructions from
kinks, solid fecal particles or external pressure.
 Loading...