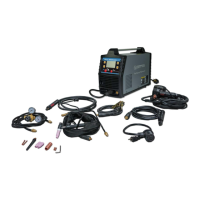
2.2.3.1.2.2 Connect the Weld Power Cable (See Figure 8
or follow the onscreen visual) to the Positive (+)
Weld Output Connection. Press the
MULTI-FUNCTION
ADJUSTMENT/SELECTION KNOB to confirm
your selection.
2.2.3.1.2.3 Use the MULTI-FUNCTION
ADJUSTMENT/SELECTION KNOB to select
the thickness of wire you are using. Press the
MULTI-FUNCTION
ADJUSTMENT/SELECTION KNOB to confirm
your selection.
2.2.3.1.2.4 Use the MULTI-FUNCTION
ADJUSTMENT/SELECTION KNOB to select
the thickness of material to be welded. Press
the MULTI-FUNCTION
ADJUSTMENT/SELECTION KNOB to confirm
your selection.
2.2.3.1.2.5 This machine is now set to weld.
2.2.3.1.2.5.1 Use the MULTI-FUNCTION
ADJUSTMENT/SELECTION KNOB
to fine tune wire feed speed.
2.2.3.1.2.5.2 Use the VOLTAGE CONTROL KNOB
to fine turn voltage.
2.2.3.1.2.6 You can adjust other parameters:
2.2.3.1.2.6.1 Press the MULTI-FUNCTION
ADJUSTMENT/SELECTION KNOB.
Wire Speed will no longer be
highlighted but will have a box around
it. Turn the MULTI-FUNCTION
ADJUSTMENT/SELECTION KNOB
to go to other options. Press the
MULTI-FUNCTION
ADJUSTMENT/SELECTION KNOB
to adjust the highlighted Option.
2.2.4 MIG CuSi – Choose this option if you are welding Copper & Silicon blend wires
such as Silicon Bronze.
2.2.4.1 Connect the Weld Power Cable (See Figure 8 or follow the
onscreen visual) to the Positive (+) Weld Output Connection.
Press the MULTI-FUNCTION ADJUSTMENT/SELECTION KNOB
to confirm your selection.
2.2.4.2 Use the MULTI-FUNCTION ADJUSTMENT/SELECTION KNOB to
select your wire diameter. Press the MULTI-FUNCTION
ADJUSTMENT/SELECTION KNOB to confirm your selection.
2.2.4.3 Use the MULTI-FUNCTION ADJUSTMENT/SELECTION KNOB to
select the thickness of material to be welded. Press the
MULTI-FUNCTION ADJUSTMENT/SELECTION KNOB to confirm
 Loading...