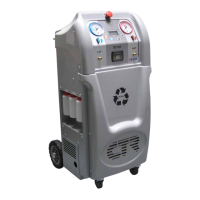
5.6 VACUUM” operation
This function allows the moisture in the system to evaporate by means of a pump that generates a high degree of vacuum.
- Connect the high and low pressure pipes to the A/C system.
- Open the HP and LP valves, or if there is only one service point, open the corresponding valve.
- Select VACUUM with the “+ ↑” and “- ↓ ” buttons.
- Press OK to start the cycle. The display shows the vacuum time, currently set to 30 min. Use the “+ ñ ” and “- ò“
buttons to change the value between 05 and 95 min. You can also change the vacuum time value as desired
in the “Customisation” option in the SERVICE menu.
- Press OK to continue with this function. Before starting the vacuum, the unit runs a check of the starting conditions with the
“vacuum preparation” phase, the microprocessor briefly opens the solenoid valves, and based on the conditions acquired, inde
pendently decides how to proceed. There may be various combinations, among which activation of recovery and
oil discharge, also simultaneously with the vacuum.
-
When the vacuum pump has started, the message changes to “Waiting for pressure level” waiting to reach the vacuum
pressure
(-0.75 bar) counting down the time set. When the level has been reached, the “Vacuum cycle” starts followed by the
remaining time. The LED V (vacuum) stays on for the entire duration of the cycle.
- Press the ESC button for 2 seconds during the operation to return to the main menu.
-
In the event of an emergency, press the red mushroom button on the control panel to completely turn off the unit;
in this case,
the function that was in progress will not be stored.
- When the set time has run out, a leak test is run for 5 min., and the progress bar shows the remaining time
at the end of the phase. If a leak is detected (-0.75 bar) the error message is shown on the display followed by an acoustic
signal.
- When the cycle has been completed, press the ESC button for 2 sec. to exit
- When you exit the operation you will be prompted to print the report. Press OK to print or ESC to return to the main menu.
- The vacuum pump operating time increments a vacuum hour counter to monitor when oil change is due.
When 200 hours of operation have been reached, you will be warned to change the oil. The counter increments in seconds.
- In the event of an error, the display shows the relative message and activates an acoustic signal. To exit, press the ESC button
for 2 seconds.
5.7 “CHARGE TO VEHICLE” operation
This function allows you to charge the system with refrigerant, oil and UV tracer in the correct quantities.
Absolutely do not mix different types of lubricants. Always check the types of oil to be used in the different A/C
systems (according to the type of compressor used), which can be found on the technical specification sheets.
- Connect the high and low pressure pipes to the A/C system
- Open the HP and LP valves, or if there is only one service point, open the corresponding valve.
- Select “CHARGE TO VEHICLE” with the “+ ↑” and “- ↓ ” buttons. Press OK to start the cycle (Fig.1)