2
1. Attach adjustable legs, threading them into
the holes beneath the four corners of the urn.
2. Place unit at counter height, on a rm, level
base, near water and power supply connec-
tions.
3. Install the water and coffee faucets.
4. Connect water line to inlet tting on valve. All
Curtis Automatic Urns are equipped with a
¼” male are tting which must be connected
to the water supply with a ¼” copper tubing
and a ¼” are nut. Water pressure enter-
ing brewer is required to be stable and must
provide minimum of 1 gallon per minute. Use
water regulator for constant pressure. Re-
quired water pressures, 20 to 100 psi.
CAUTION: DO NOT connect this urn to
hot water. The inlet valve is not rated for
hot water.
5. Turn on water valve.
6. Hook-up electrical power to the unit (refer to
schematic for power requirements). If gas or
steam, 120V circuit is required.
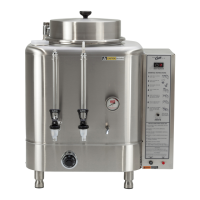
UNPACKING THE URN
All urns are carefully packed in cartons with lami-
nated cardboard inserts. The packaging is speci-
cally to tted to your urn. The packaging exceeds
the requirements of the I. C. C. regulations.
Inspect all containers at the time of delivery for
visual or concealed damage. In case of punctured
or damaged cartons the carrier must be notied im-
mediately.
ITEM QTYTWINQTYSINGLE
WIREBASKET
LIDWITHKNOB
FAUCET,HOTWATER
FAUCET, COFFEE
LEGS,ADJUSTABLE
FILTERS,PAPER
SERVICEMANUAL
1
1
1
1
4
25
1
2
2
1
2
4
40
1
PACKING LIST
INSTALLATION AND OPERATING INSTRUCTIONS
7. When power is turned on, water will start
owing into the water jacket. To expedite the
lling of the urn, you may use the emergency
rell valve located behind the machine.
CAUTION Don’t forget to close the
valve once the water jacket has lled.
8. When the water jacket has lled, turn on the
thermostat by turning the dial clockwise to
the desired setting. It will take 50 to 60 min-
utes for the heating tank to reach operating
temperature. On electric urns, the thermostat
indicator will light at this time.
WARNING When you hookup an electric
urn, use the proper wire gauge, plus 25%
(see table on page 12). Never use fuses
or breakers larger than needed.
The body of the urn must be securely grounded
with a separate grounding conductor and never
with the neutral conductor of a single phase, 3
wire system. Refer to the wiring diagram included
with each urn for wire gauge.
WARNING:DONOTplacethisurncloserthansix[6]inchesfromwall.Urnmusthaveadequatecross-ventilation.
SETUP STEPS
NOTE: A water ltration system must be used to help maintain trouble-free operation. Air must
be purged from the cartridge prior to connection to equipment. In areas with extremely hard
water, we recommend the use of a Curtis approved water lter. For our full line of lters, please
log on to www.wilburcurtis.com.