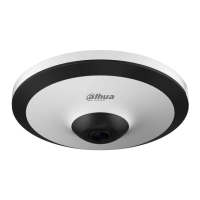
This document is a Quick Start Guide for an IR Fisheye Network Camera, providing essential information on its functions, installation, and operation. The camera is designed for digital video surveillance, leveraging internet protocol to independently send and receive audio and video data over a network. A key feature of this series is its fisheye lens, combined with an advanced algorithm for fisheye image rectification. This technology enables surveillance with no dead zones and allows for panorama image output across multiple screens, each supporting virtual PTZ (Pan, Tilt, Zoom) capabilities.
Safety Instructions and Important Safeguards:
The manual emphasizes several safety instructions and warnings to ensure proper and safe operation of the device. These include:
- Electrical Safety: All installation and operation must comply with local electrical safety codes. The power source should meet the Safety Extra Low Voltage (SELV) standard and supply power with a rated voltage conforming to the Limited Power Source requirement (IEC60950-1). Users must verify the power supply is correct before operating the device and ensure a readily accessible disconnecting device is integrated into the building wiring. It's crucial to prevent the power cable from being trampled or pressed, especially at the plug, power socket, and the junction extruded from the device. Incorrect power supply can lead to device abnormalities or damage.
- Environmental Considerations: The camera should not be aimed at strong light sources like lamps or direct sunlight, as this can cause over-brightness, light marks, and reduce the longevity of the Complementary Metal-Oxide Semiconductor (CMOS). It should not be placed in damp, dusty, extremely hot, or cold environments, or locations with strong electromagnetic radiation or unstable lighting. The device must be kept away from liquids to prevent damage to internal components. Indoor devices should be protected from rain and dampness to avoid fire or lightning. Good ventilation is necessary to prevent heat accumulation. The device should be transported, used, and stored within the specified humidity and temperature ranges. Heavy stress, violent vibration, or water splashes are to be avoided during transportation, storage, and installation. When transporting, the device should be packed in standard factory packaging or equivalent material. Installation should only be performed by professional staff with relevant safety knowledge to prevent accidental injury to non-professionals who might enter the installation area during operation.
- Operation and Daily Maintenance: Users should avoid touching the heat dissipation component of the device to prevent burns. When disassembling the device, instructions in the manual must be carefully followed to prevent water leakage or poor image quality due to unprofessional handling. It's important to ensure the gasket ring is flat and properly installed in the groove before reinstalling the cover. If condensed fog appears on the lens after unpacking or if the desiccant turns green (for models that include desiccant), after-sale service should be contacted for desiccant replacement. Using the device with a lightning arrester is recommended to enhance lightning protection.
- Reliability and Cleaning: Grounding the device is recommended for enhanced reliability. The image sensor (CMOS) should not be touched directly. Dust and dirt can be removed with an air blower, or by gently wiping the lens with a soft cloth moistened with alcohol. The device body can be cleaned with a soft dry cloth, and for stubborn stains, a cloth with mild detergent can be used. Volatile solvents like alcohol, benzene, or diluent, as well as strong, abrasive detergents, should not be used on the device body coating to prevent damage or performance decrease. The dome cover is an optical component and should not be touched or wiped directly with hands during installation or operation. For cleaning dust, grease, or fingerprints, a moistened oil-free cotton cloth with diethyl or a soft cloth can be used, or an air blower.
- Network and Data Security: Strengthening network, device data, and personal information protection is crucial. This includes using strong passwords, regularly modifying passwords, upgrading firmware to the latest version, and isolating the computer network. For older firmware versions, the ONVIF password might not automatically update with the system password, requiring a firmware upgrade or manual ONVIF password update. Only standard components or accessories provided by the manufacturer should be used, and installation and maintenance must be performed by professional engineers.
- Laser Beam Radiation: The surface of the image sensor should not be exposed to laser beam radiation in environments where laser beam devices are used.
- Power Supply: Do not provide two or more power supply sources for the device unless explicitly specified, as this can cause damage.
Device Ports and Connections:
The camera features several ports:
- 12V DC Power Input: For supplying 12V DC power as instructed in the manual.
- Audio Output: Connects to a speaker for audio signal output.
- Audio Input: Connects to sound pickups for receiving audio signals.
- Ethernet Port: Connects to the network using a network cable.
- Alarm I/O: Includes alarm signal input and output ports, with the number of I/O ports varying by device model. The alarm input collects different states (logic "1" for +3V to +5V or idling, logic "0" for ground connection). The alarm output is an open-drain output, supporting level application (high and low level with external pull-up resistance) and switch application (driving external circuits up to 12V/300mA).
Network Configuration:
Device initialization and IP address setting can be done using the "ConfigTool" software or through the web interface.
- Initialization: Required for first-time use or after a device reset. It's only possible when the device's IP address (default 192.168.1.108) and the PC are in the same network segment. Users must set and confirm a strong password (8-32 characters, combination of letters, numbers, and symbols) and enter a valid email address for password reset.
- Modifying IP Address: The ConfigTool allows modifying IP addresses for one or multiple devices simultaneously, provided they share the same login password. Users can set static IP addresses, subnet masks, and gateways. If a DHCP server is available, devices can automatically obtain IP addresses by selecting DHCP mode.
- Logging in to Web Interface: After configuration, users can access the device's web interface by entering its IP address in an IE browser. For the first login, a plugin download and installation might be required.
Installation:
The manual provides details on the packing list, dimensions, and installation procedures.
- Packing List: Includes the network camera, quick start guide, CD-ROM/QR code, screw package, positioning map, and mounting plate.
- Dimensions: The camera has a diameter of 126.2 mm (4.97 inches) and a height of 44.6 mm (1.76 inches).
- Installation Type: Various installation types are illustrated, including ceiling mount and wall mount.
- SD Card Installation (Optional): Users must disconnect power before installing or removing the SD card.
- Attaching Device: The mounting surface must be strong enough to support at least three times the weight of the device and bracket. Grounding the device is recommended for stability, using the grounding hole near the cable outlet at the bottom of the device with an M3 screw. The mounting plate is in the "open" state by default for installation and adjustment, and should be moved to the "close" state to fix the camera. The manual illustrates cable routing through the mounting surface or a side cable tray.
- WPS/Reset Button: The camera includes a WPS/Reset button. Pressing and holding it for 1-2 seconds after pressing the WPS button on the router connects the camera to the router within 1 minute. Holding it for at least 10 seconds during proper operation resets the camera to factory settings.
This comprehensive guide ensures users can effectively set up, operate, and maintain their IR Fisheye Network Camera while adhering to crucial safety and maintenance protocols.