SERVICING
26
ment to prevent overheating of components in case of low
150°F. to 160°F and close at approximately 110°F.
WARNING
Disconnect ALL power before servicing.
1. Remove the wiring from the control terminals. Using an
ohmmeter test for continuity across the normally closed
contacts. No reading indicates the control is open - re-
place if necessary. Make sure the limits are cool before
testing.
IF FOUND OPEN - REPLACE - DO NOT WIRE AROUND.
S-52 CHECKING HEATER ELEMENTS
Optional electric heaters may be added, in the quantities
shown in the spec sheet for each model unit, to provide
electric resistance heating. Under no condition shall more
heaters than the quantity shown be installed.
WARNING
HIGH VOLTAGE
DISCONNECT ALL POWER BEFORE SERVICING OR
INSTALLING THIS UNIT. MULTIPLE POWER SOURC-
ES MAY BE PRESENT. FAILURE TO DO SO MAY
CAUSE PROPERTY DAMAGE, PERSONAL INJURY
OR DEATH.
1. Disassemble and remove the heating element(s).
2. Visually inspect the heater assembly for any breaks in
the wire or broken insulators.
3. Using an ohmmeter, test the element for continuity - no read-
ing indicates the element is open. Replace as necessary.
S-60 ELECTRIC HEATER (OPTIONAL ITEM)
Optional electric heaters may be added, in the quantities
-
tance heating. Under no condition shall more heaters than
the quantity shown be installed.
The low voltage circuit in the air handler is factory wired and
terminates at the location provided for the electric heater(s).
-
lation.
Other components such as a Heating/Cooling Thermostat
and Outdoor Thermostats are available to complete the in-
stallation.
HEATER KIT CAPACITY SETTING (DV*PEC):
For heater kit installation, it is important to set the capacity
of the electric heater at the communicating thermostat and
DIP switch.
Setting with communicating thermostat:
For a detailed procedure of thermostat heater kit capacity
selection process, please visit the DAIKIN ONE+ SMART
THERMOSTAT website at http://www.daikinone.com (If us-
ing a CTK04 thermostat, please see the addendum for fur-
ther instructions.)
Setting with DIP Switch:
In the event of loss communication, emergency mode can
be activated. In emergency mode operation, heater kit se-
lection will be driven by the DIP switch (S9, S10, S11, and
S12) selection from the control board on indoor unit. For fur-
ther detail, read an emergency mode section in this manual.
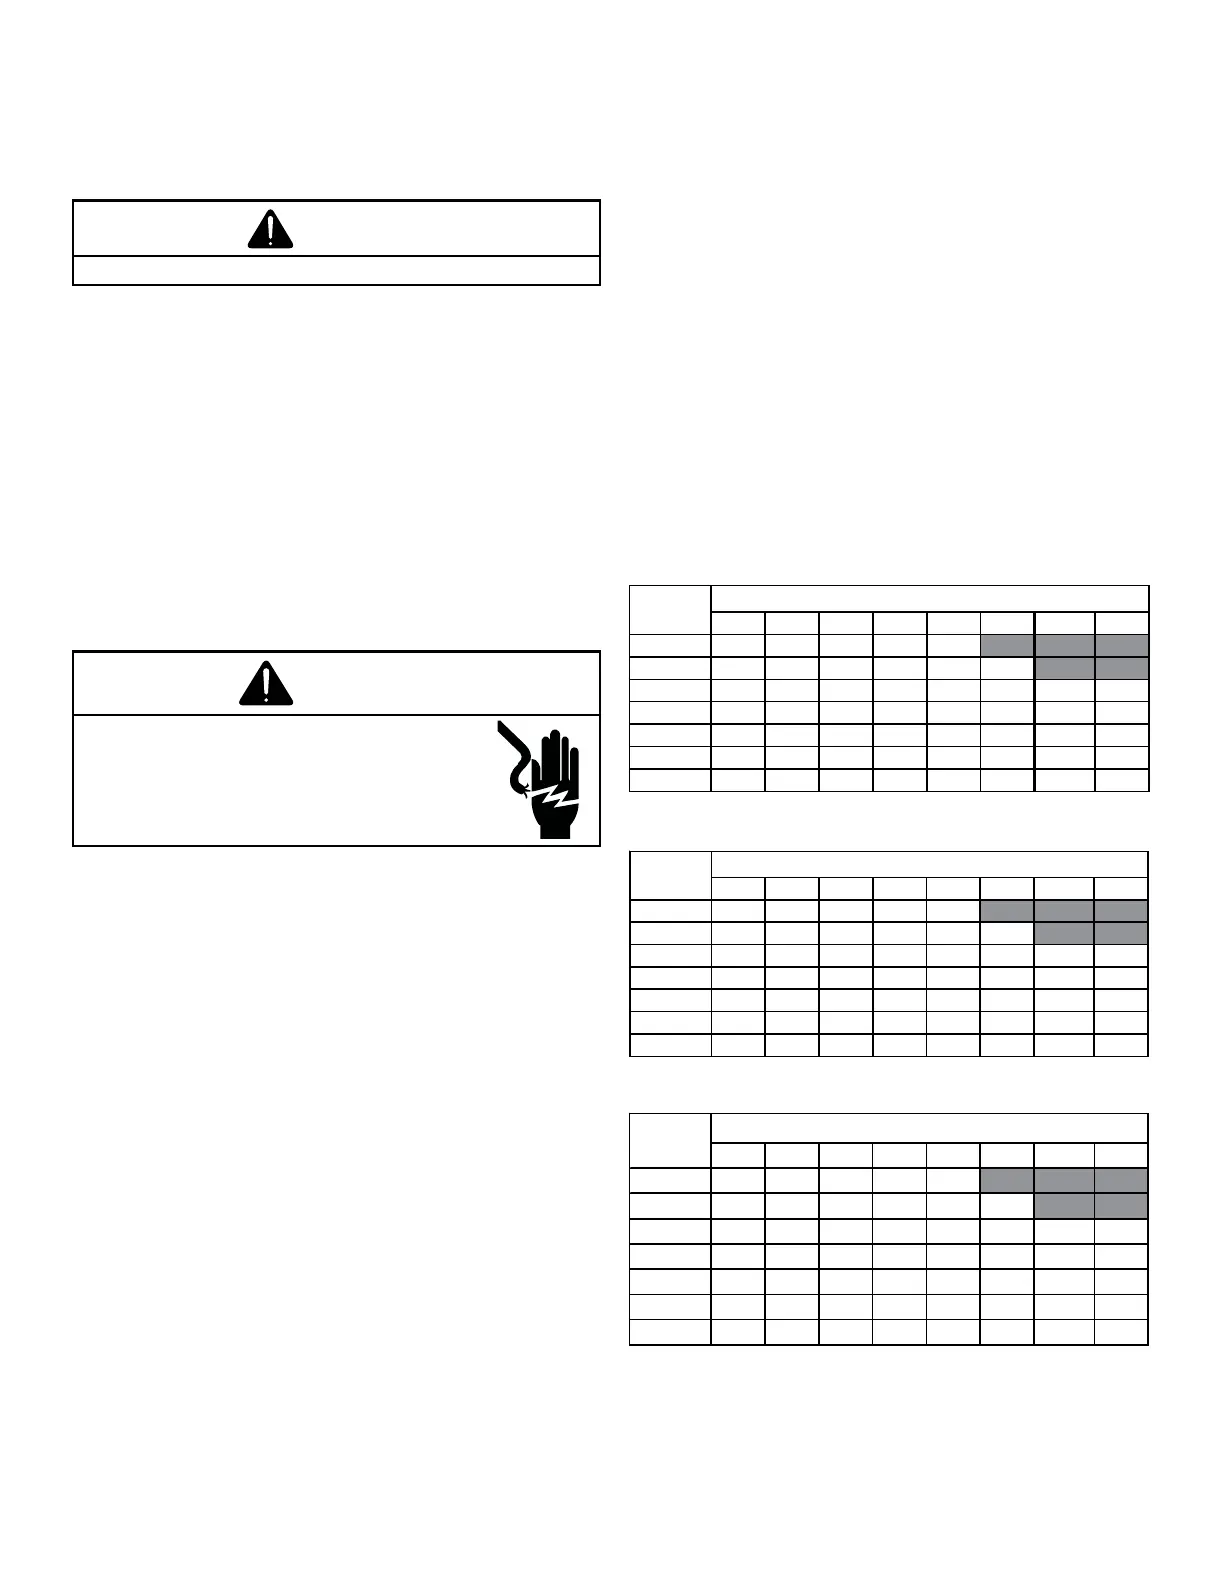
The heating mode temperature rise is dependent upon the
(kW) selected. Use data provided in below Table to deter-
mine the temperature rise (°F).
3 5 6 8 10 15 19/20 25
800 12 19 23 31 37
1000 9 15 19 25 30 44
1200 8 12 15 21 25 37 49 62
1400 7 11 13 18 21 32 42 53
160069 12 15 19 28 37 46
180058 10 14 16 25 33 41
200057 9 12 15 22 30 37
CFM
HEAT KIT NOMINAL kW
240/1/60 SUPPLY VOLTAGE - TEMP. RISE °F
356 8 10 15 19/20 25
800 11 18 22 30 35
1000 9 14 18 24 28 42
1200 7 12 15 20 24 35 47 59
1400 6 10 13 17 20 30 40 51
1600 6 9 11 15 18 27 35 44
1800 5 8 10 13 16 24 31 39
2000 479 12 14 21 28 35
CFM
HEAT KIT NOMINAL kW
230/1/60 SUPPLY VOLTAGE - TEMP. RISE °F
356 8 10 15 19/20 25
800 10 17 21 28 33
1000 8 13 17 22 27 40
1200 7 11 14 19 22 33 45 56
1400 6 10 12 16 19 29 38 48
1600 5 8 10 14 17 25 33 42
1800 579 12 15 22 30 37
2000 478 11 13 20 27 33
CFM
HEAT KIT NOMINAL kW
220/1/60 SUPPLY VOLTAGE - TEMP. RISE °F


 To Next Page