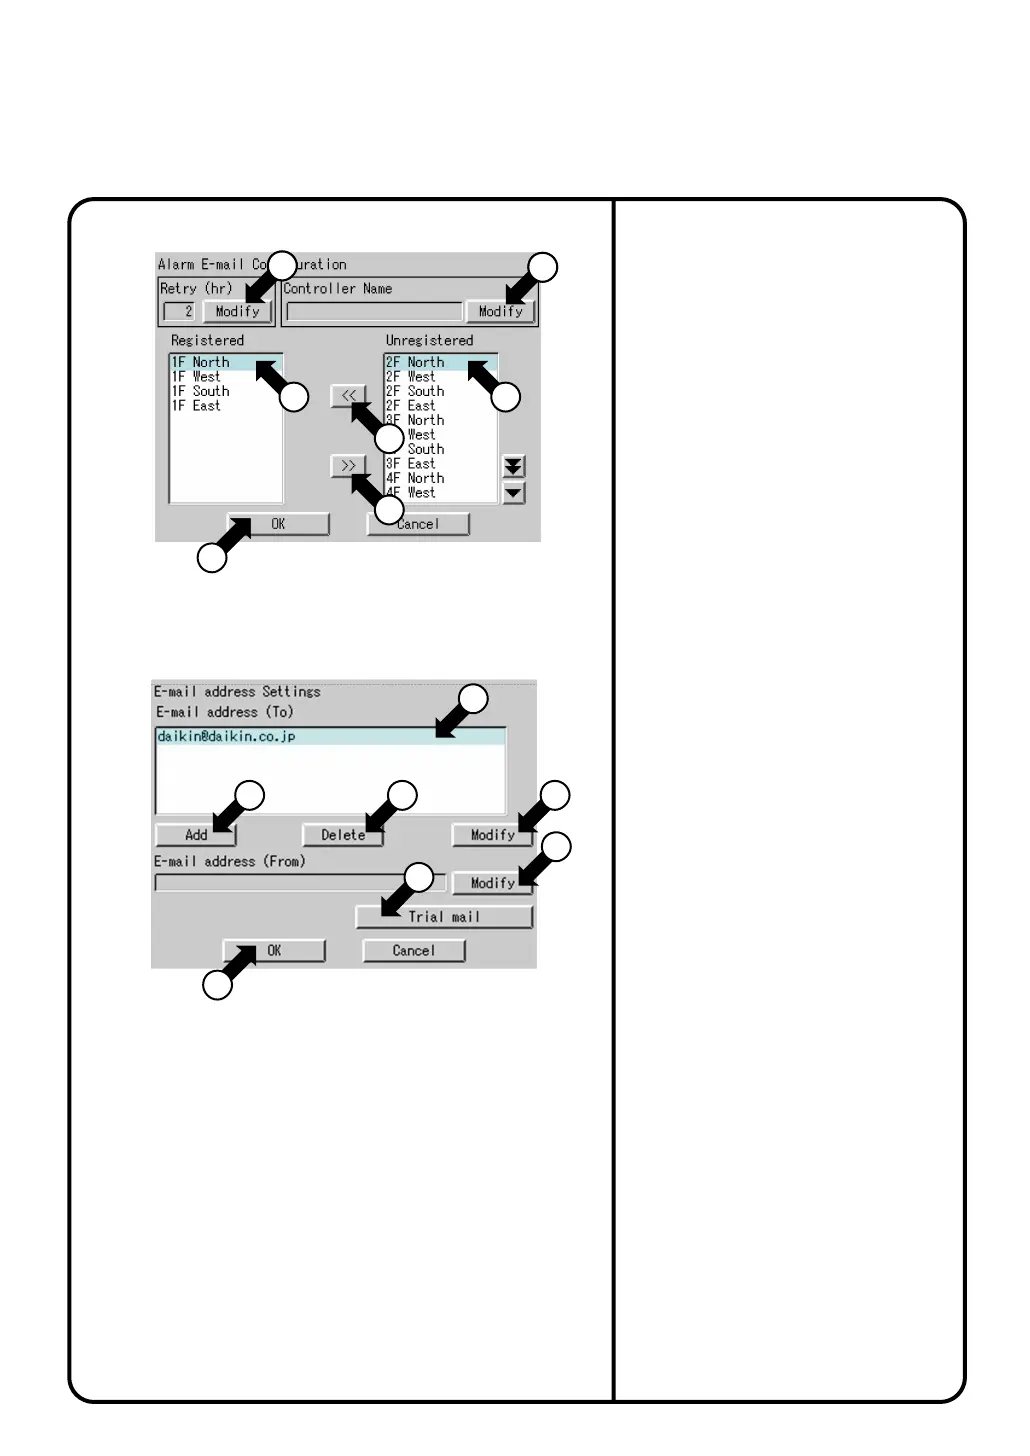
Screen 3 Alarm E-mail Configuration
Screen 4 E-mail address Settings
3
13
3
14
17
16
18
15
22
25
26
19
27
15
.
16
.
17
.
Push the [Modify] button !3 and enter a
retransmission interval on the input screen.
The retransmission interval is an e-mail
retransmission interval when faults occur
consecutively with the equipment. This
interval time (hour) must be a value from 1 to
72. Initially, it is set to 2 hours.
Push the [Modify] button !4 and enter an ITC
identifier on the input screen. The name
specified here is displayed in the Subject field
during e-mail transmission.
When adding an air conditioner for fault
confirmation by e-mail, select the air
conditioner at !5 and push the [<<] button !6.
When deleting an air conditioner for fault
confirmation by e-mail, select the air
conditioner at !7 and push the [>>] button !8.
After finishing the necessary edit operations,
push the [OK] button !9 to return to the Alarm
E-mail screen on the previous page
Screen 1.
To cancel the settings made, push the
[Cancel] button.
18
.
Push the [E-mail address] button @0 on the
previous page to display the E-mail address
settings screen Screen 4.
20
.
To set an address to send e-mail to, push the
[Modify] button @5. Enter the e-mail address
to send e-mail to on the input screen.
22
.
After making the necessary settings, push the
[OK] button @7 to return to the Alarm E-mail
screen on the previous page Screen 1.
To cancel the settings made, push the
[Cancel] button.
19
.
To add an address for sending e-mail to in the event
of an air conditioner fault or other fault, push the
[Add] button
@1
. Enter the e-mail address to send e-
mail to on the input screen.
A maximum of 3 e-mail addresses can be registered.
To delete an address, select the address to delete at
@2
and push the [Delete] button
@3
. To change a
registered address, select the address to change at
@2
and push the [Modify] button
@4
.
23
.
After finishing the necessary setting for e-mail,
push the [OK] button @8.
To cancel the settings made, push the
[Cancel] button.
21
3
23 24
System Settings Menu Operation
91
12
.
Push the [Modify Password] button
!0
.
Enter the password that is used for
authentication on the input screen. Enter the
password if
POP before SMTP
or
SMTP-AUTH
is selected for the authentication method.
13
.
Last, push the [OK] button !1 to return to the
Alarm E-mail screen Screen 1.
(To cancel the settings made, push the [Cancel] button.)
14
.
Push the [Configuration] button !2 to display
the Alarm E-mail Configuration screen of the
Screen 3.
21
.
When sending test e-mail, select a
destination e-mail address at @2 and push the
[Trial mail] button @6.