Accessories
12
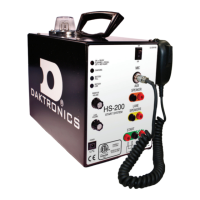
Using the Wireless Microphone
1� Turn on the HS-200 unit using the ON/OFF
switch. Note the CHANNEL number.
2� Turn on the wireless microphone unit by
pressing the SET CHANNEL button once.
A blinking dot will appear to verify it is
powered on.
3� Press the SET CHANNEL button again to view
the channel number. If it does not match
the number noted in step 1, press the SET
CHANNEL button until they are the same.
4� With matching channel numbers, the dot
will continue to blink while it attempts
to connect. Once connected, the dot
disappears, and the PAIRED LED on the HS-
200 unit lights up.
5� Plug the handheld microphone into the wireless unit. Clip the wireless unit to belt, and
hang the microphone by the lanyard from neck as demonstrated in Figure 17.
6� Press the side push-to-talk lever and speak into the microphone. The DATA LED on the
HS-200 unit should light up. To send a start signal, hold the side push-to-talk lever and
press the top button.
7� To power down the wireless unit, either press and hold the SET CHANNEL button until
a “P” appears, or remove the batteries. Note that the unit also automatically powers
off 2 minutes after the HS-200 unit has been turned off to conserve battery life.
Set Channel Button
The wireless microphone belt pack and the HS-200R unit both include a SET CHANNEL
button to select the radio channel used for the start signal. Pressing the SET CHANNEL
button once on the wireless microphone belt pack shows the current transmit channel
on the CHANNEL # display. Pressing the button while the channel number is displayed
moves to the next channel. As with the wireless microphone belt pack, pressing the SET
CHANNEL button on the HS-200R unit changes the current radio channel; the current
channel is always shown on the CHANNEL display. Channels 0-7 are available for use.
Once both the wireless microphone belt pack and HS-200R unit are set to the same
channel, they should nd each other and connect within 30 seconds. After two seconds,
the channel number on the wireless microphone belt pack will turn off to save power, but
the decimal point will continue to blink while attempting to connect. Once a successful
connection is made, the decimal point will stop blinking, and the PAIRED LED on the HS-
200R unit will light up and stay lit.
The wireless microphone belt pack will attempt to connect to an HS-200R for one minute.
If a connection is not found, it will automatically power down.
If the HS-200R is turned off, the wireless microphone belt pack CHANNEL # display will start
ashing again, indicating no connection. As noted above, it will look for a connection for
one minute before powering down.
Wireless Belt Pack Batteries
The wireless microphone belt pack uses two AA batteries for operation (included). To
replace the batteries, remove the cover on the back of the wireless microphone belt
pack. Always keep spare batteries on hand for each meet.
Figure 17: Wireless Unit & Microphone